
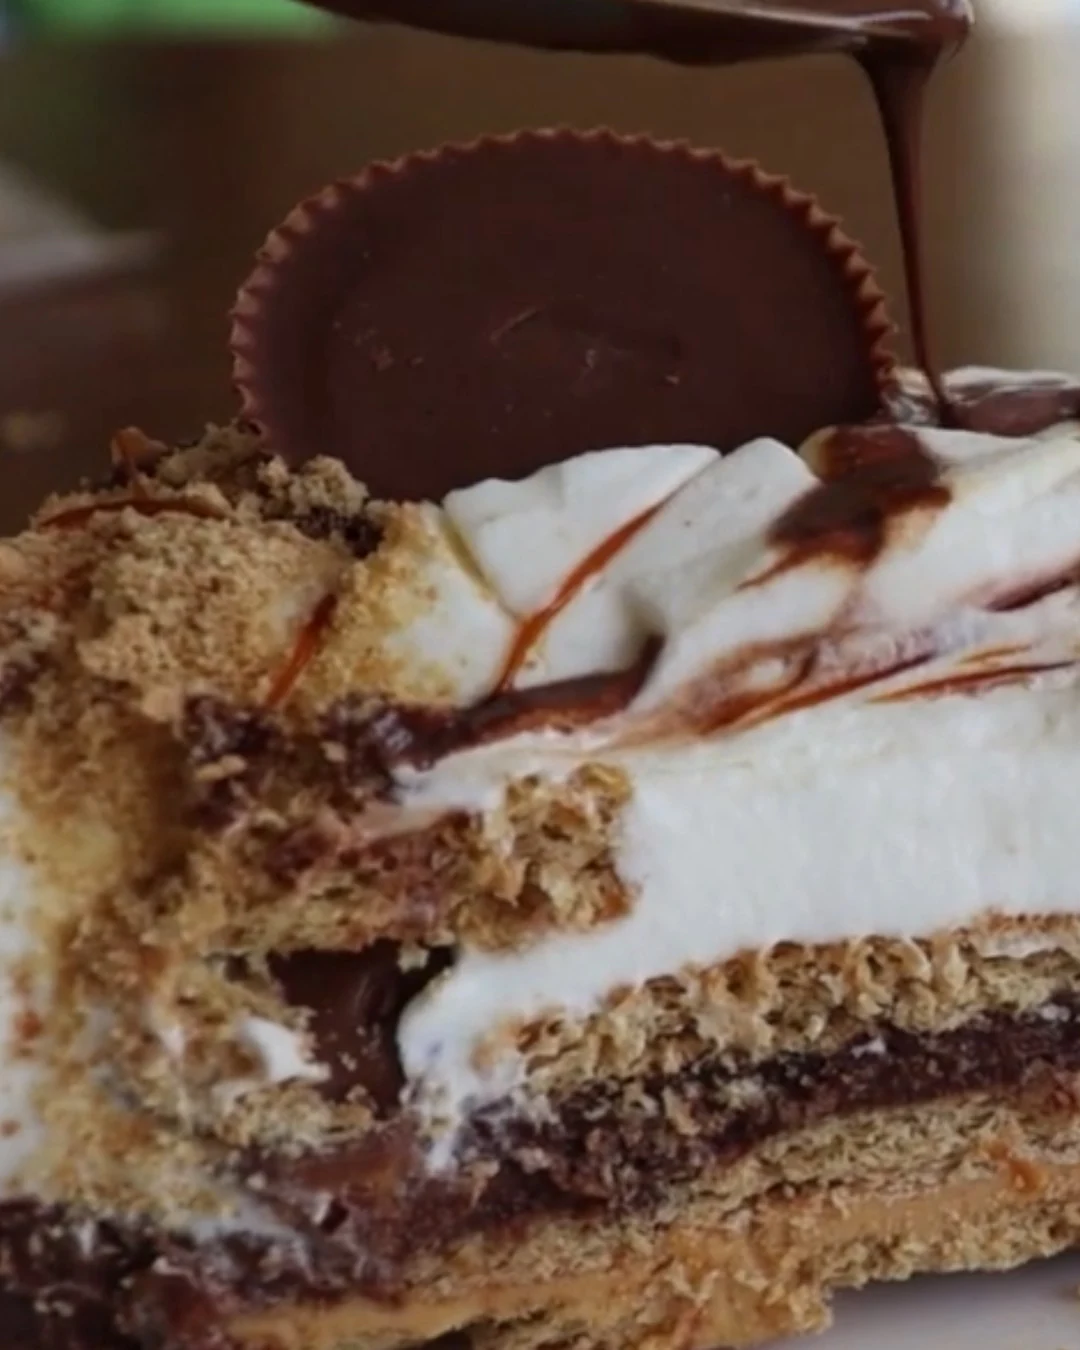
Peanut Butter Icebox Cake is the ultimate dessert that combines rich chocolate and creamy peanut butter in every layer. This no-bake treat is perfect for warm days or any occasion where you want to impress guests with minimal effort. The blend of flavors and textures makes it a standout choice for dessert lovers.
Why You’ll Love This Recipe
- Decadent Flavor: The combination of chocolate and peanut butter creates an irresistible taste that satisfies cravings.
- No-Bake Delight: This recipe requires no baking, making it a hassle-free option for busy cooks.
- Layered Goodness: Each layer offers a unique texture and flavor, creating a delightful experience with every bite.
- Perfect for Gatherings: Whether for a party or a family dinner, this cake is sure to impress guests.
- Easily Customizable: You can adjust the ingredients to fit your preferences, such as using different cookie brands or toppings.
Tools and Equipment
Having the right tools makes preparing the Peanut Butter Icebox Cake easier and more efficient.
Essential Tools
- 9×13 baking dish
- Mixing bowls
- Electric mixer
- Measuring cups and spoons
- Rubber spatula
- Nonstick spray
Why These Tools Matter
- 9×13 baking dish: The perfect size for layering and serving this dessert.
- Electric mixer: Ensures that your cream cheese and peanut butter mixture is smooth and creamy without effort.
- Rubber spatula: Great for folding ingredients together gently, preserving the lightness of the whipped topping.
Ingredients for Peanut Butter Icebox Cake
For the Crust
- ⅓ cup salted sweet cream butter (melted)
- 19.1 ounces crushed chocolate sandwich cookies (divided into 2 ¼ cups, 1 ½ cups, and 1 ½ cups)
For the Pudding Layers
- 2 (3.9-ounce) boxes of instant chocolate pudding mix
- 2 ¾ cups whole milk
For the Peanut Butter Filling
- 8 ounce package of cream cheese (softened)
- 1 cup creamy peanut butter (your favorite brand, I used Reese’s brand)
- 1 ½ cups powdered sugar (sifted)
- 2 cups whipped topping (thawed)
For the Toppings
- 5 cups Miniature Reese’s peanut butter cups (unwrapped and halved; divided into 2 cups and 3 cups)
- 7.25 ounce bottle of chocolate magic shell
How to Make Peanut Butter Icebox Cake Step-by-Step
Step 1: Prep the Base
Lightly spray a 9×13 baking dish with nonstick spray to prevent sticking.
Step 2: Layer the Crust
Combine 2¼ cups of crushed chocolate sandwich cookies with melted butter. Press this mixture firmly into the bottom of the prepared baking dish to form a sturdy crust.
Step 3: Prepare Pudding Mixture
In a mixing bowl, beat the instant pudding mix and whole milk until thickened. Gently fold in 2 cups of thawed whipped topping until well combined.
Step 4: Assemble First Layer
Spread half of the pudding mixture evenly over the cookie crust, ensuring it covers the entire surface.
Step 5: Add Peanut Butter Cups
Sprinkle 2 cups of halved Miniature Reese’s peanut butter cups over the pudding layer, distributing them evenly.
Step 6: Layer of Crushed Cookies
Sprinkle 1 ½ cups of crushed sandwich cookies over the peanut butter cups for added crunch and flavor.
Step 7: Prepare Peanut Butter Cream Cheese Mixture
In a separate bowl, mix the softened cream cheese, creamy peanut butter, and sifted powdered sugar until smooth. Fold in 2 cups of thawed whipped topping until fully incorporated.
Step 8: Assemble Second Layer
Spread the entire peanut butter mixture over the crushed cookies layer, smoothing it out evenly.
Step 9: Final Layers
Sprinkle the remaining 1½ cups of crushed chocolate sandwich cookies over the peanut butter layer. Then spread the remaining pudding mixture over the crushed cookies.
Step 10: Drizzle and Chill
Drizzle the chocolate magic shell over the top of the assembled cake. Chill in the refrigerator for at least 4 hours or overnight to allow the layers to set properly.
Step 11: Slice and Serve
Once chilled, slice the Peanut Butter Icebox Cake into squares and serve chilled. Enjoy the delightful layers of flavor and texture in every piece.
How to Serve Peanut Butter Icebox Cake
Serving Peanut Butter Icebox Cake can be as delightful as making it. Here are some creative ideas to enhance your dessert experience.
Garnish with Fresh Berries
Add a burst of color and freshness by garnishing each slice with fresh raspberries or strawberries. The tartness of the berries beautifully contrasts the sweetness of the cake.
Serve with a Scoop of Vanilla Ice Cream
For a classic touch, serve slices of Peanut Butter Icebox Cake with a scoop of vanilla ice cream. The creaminess of the ice cream complements the rich peanut butter flavor.
Drizzle with Additional Chocolate Sauce
Elevate the indulgence by drizzling extra chocolate sauce or caramel over each slice just before serving. This adds an extra layer of flavor and visual appeal.
Pro Tips for the Best Peanut Butter Icebox Cake
To achieve the perfect Peanut Butter Icebox Cake, consider these expert tips.
- Use Quality Ingredients: Always opt for high-quality peanut butter and chocolate sandwich cookies to enhance the overall flavor of the cake.
- Chill Overnight: For the best texture and flavor, allow the cake to chill overnight. This helps the layers set properly and meld together.
- Sift Powdered Sugar: Sifting powdered sugar before mixing ensures a smooth and lump-free peanut butter cream cheese mixture.
- Customize with Mix-Ins: Feel free to add chopped nuts or additional candy pieces to the layers for added crunch and flavor.
- Slice with a Warm Knife: To get clean cuts, dip your knife in warm water before slicing the cake. Wipe it clean between cuts for the best presentation.
Best Side Dishes and Pairings
Pairing Peanut Butter Icebox Cake with complementary sides can create a balanced meal. Here are some great options to consider.
- Coffee: The rich, robust flavor of coffee enhances the dessert’s sweetness, making it an ideal pairing.
- Milkshakes: A creamy milkshake, especially chocolate or vanilla, creates a delightful combination with the cake.
- Fruit Salad: A light fruit salad adds freshness and balances the richness of the cake with its natural acidity.
- Chocolate Milk: For chocolate lovers, a glass of chocolate milk offers a decadent pairing that harmonizes with the cake’s flavors.
- Vanilla Yogurt: Serving a side of vanilla yogurt can provide a tangy contrast that complements the cake’s sweetness.
Common Mistakes to Avoid
- Not Using Thawed Whipped Topping: Ensure your whipped topping is fully thawed to achieve the right consistency in layers.
- Skipping the Chilling Time: Do not rush the chilling process; allowing the cake to set overnight enhances the flavors and texture.
- Incorrect Layering: Follow the layering instructions carefully to maintain the structure and balance of flavors in the Peanut Butter Icebox Cake.
- Using Low-Fat Ingredients: Avoid substituting low-fat ingredients, as they can alter the taste and creaminess of the final product.
Storage & Reheating Instructions
Refrigerator Storage
Store the Peanut Butter Icebox Cake in an airtight container in the refrigerator. It will stay fresh for up to 5 days, maintaining its texture and flavor.
Freezing Instructions
For long-term storage, you can freeze the cake. Wrap it tightly in plastic wrap and then in aluminum foil. It can be frozen for up to 2 months. Thaw in the refrigerator overnight before serving.
Reheating Tips
- Oven: Preheat to 350°F (175°C) and heat for about 10 minutes. Cover with foil to prevent drying out.
- Microwave: Heat individual slices on a microwave-safe plate for 20-30 seconds until slightly warm.
- Stovetop: Not recommended as this dessert is best served chilled.
Frequently Asked Questions
Can I make Peanut Butter Icebox Cake ahead of time?
Yes, this cake is perfect for making ahead. It actually gets better as it chills, so feel free to prepare it a day or two in advance.
What can I substitute for peanut butter in this recipe?
If you need a nut-free option, consider using sun butter or a similar seed butter. Just be aware that the flavor will change.
How do I make Peanut Butter Icebox Cake gluten-free?
To make this recipe gluten-free, substitute the chocolate sandwich cookies with a gluten-free variety and ensure all other ingredients are gluten-free.
Can I use homemade whipped cream instead of whipped topping?
Absolutely! Homemade whipped cream can be used for a richer flavor, just ensure it is whipped to stiff peaks for the best texture.
How long does Peanut Butter Icebox Cake last in the fridge?
When stored properly in an airtight container, the Peanut Butter Icebox Cake can last up to 5 days in the refrigerator.
Final Thoughts
This Peanut Butter Icebox Cake is a delightful treat that combines rich flavors and creamy textures, making it a perfect dessert for any occasion. I encourage you to try making it and share your thoughts in the comments below. Your feedback is invaluable, and I would love to hear how your cake turned out!
Desserts
PrintPeanut Butter Icebox Cake
This Peanut Butter Icebox Cake is a delightful dessert that layers creamy peanut butter, rich chocolate pudding, and crunchy chocolate sandwich cookies. It’s a no-bake treat that’s perfect for any occasion, offering a symphony of flavors in every bite.
- Prep Time: 20 minutes
- Cook Time: 0 minutes
- Total Time: 260 minutes
- Yield: 20 servings 1x
- Category: Desserts
- Method: Baking
- Cuisine: American
Ingredients
- ⅓ cup salted sweet cream butter (melted)
- 19.1 ounces crushed chocolate sandwich cookies (divided into 2 1/4 cups, 1 1/2 cups, and 1 1/2 cups)
- 2 (3.9-ounce) boxes of instant chocolate pudding mix
- 2 ¾ cups whole milk
- 8 ounce package of cream cheese (softened)
- 1 cup creamy peanut butter
- 1 ½ cups powdered sugar (sifted)
- 2 cups whipped topping (thawed)
- 5 cups Miniature Reese’s peanut butter cups (unwrapped and halved; divided into 2 cups and 3 cups)
- 7.25 ounce bottle of chocolate magic shell
Instructions
- Lightly spray a 9×13 baking dish with nonstick spray.
- Combine 2¼ cups of crushed chocolate sandwich cookies with melted butter. Press into the bottom of the prepared baking dish.
- Beat pudding mix and milk until thickened. Fold in 2 cups of thawed whipped topping.
- Spread half of the pudding mixture over the cookie crust.
- Sprinkle 2 cups of halved peanut butter cups over the pudding layer.
- Sprinkle 1 ½ cups of crushed sandwich cookies over the peanut butter cups.
- Mix softened cream cheese, creamy peanut butter, and powdered sugar until smooth. Fold in 2 cups of thawed whipped topping.
- Spread all of the peanut butter mixture over the crushed cookies layer.
- Sprinkle the remaining 1½ cups of crushed chocolate sandwich cookies over the peanut butter layer. Spread the remaining chocolate pudding mixture over the crushed cookies.
- Drizzle the magic shell over the top. Chill in the refrigerator for at least 4 hours or overnight.
- Slice and serve chilled.
Nutrition
- Calories: 480
- Sugar: 32g
- Sodium: 320mg
- Fat: 31g
- Saturated Fat: 14g
- Carbohydrates: 47g
- Fiber: 3g
- Protein: 9g
- Cholesterol: 35mg