
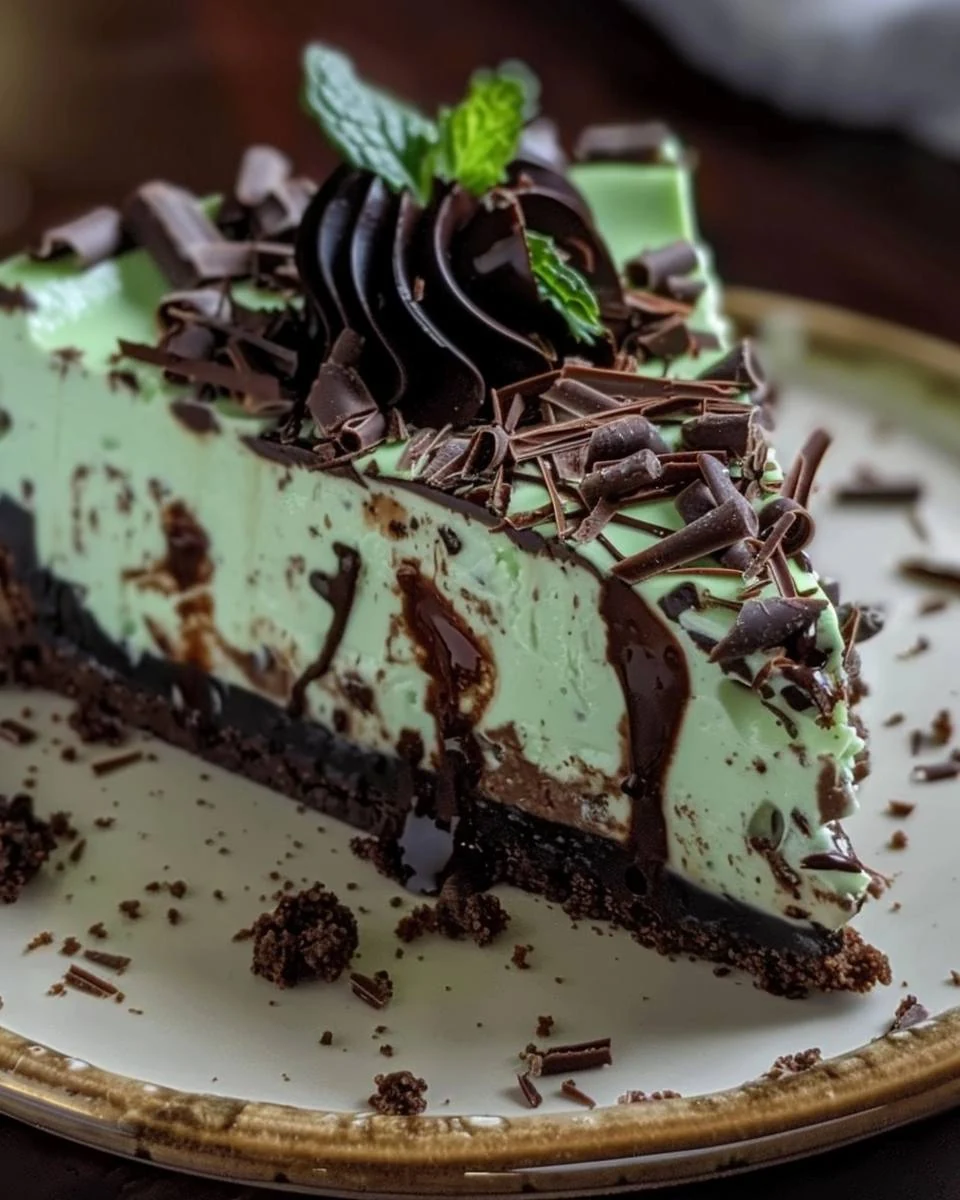
Indulge in the decadent delight of our Rich and Creamy Mint Chocolate Cheesecake. This dessert combines a luscious chocolate crust, a velvety cheesecake filling infused with mint, and a smooth ganache topping, making it an unforgettable treat for any occasion.
Why You’ll Love This Recipe
- Decadent Flavor: The rich combination of chocolate and mint creates a delightful taste experience.
- Impressive Presentation: This cheesecake is as beautiful as it is delicious, perfect for special gatherings.
- Perfectly Creamy Texture: The velvety filling melts in your mouth, offering a luxurious dessert experience.
- Versatile Occasion: Ideal for holidays, birthdays, or any celebration where you want to impress.
- Make-Ahead Option: This cheesecake can be prepared in advance, allowing for stress-free entertaining.
Tools and Equipment
To create this delightful cheesecake, you’ll need some essential kitchen tools.
Essential Tools
- 9-inch springform pan
- Mixing bowls
- Electric mixer
- Medium saucepan
- Rubber spatula
- Aluminum foil
- Roasting pan
Why These Tools Matter
- Springform Pan: Allows for easy removal of the cheesecake, ensuring a beautiful presentation.
- Electric Mixer: Saves time and energy while achieving a smooth and creamy filling.
- Roasting Pan: Creates a water bath that helps prevent cracking in the cheesecake during baking.
Ingredients for Rich and Creamy Mint Chocolate Cheesecake
For the Crust
- 1 1/2 cups chocolate cookie crumbs (such as Oreos)
- 1/4 cup unsalted butter, melted
For the Cheesecake Filling
- 24 oz cream cheese, softened
- 1 cup granulated sugar
- 1/4 cup brown sugar, packed
- 1/4 cup cocoa powder
- 4 large eggs
- 1/2 cup sour cream
- 1 teaspoon vanilla extract
- 1/2 teaspoon peppermint extract
- 1 cup semi-sweet chocolate chips, melted and slightly cooled
For the Ganache Topping
- 1 cup heavy cream
- 8 oz semi-sweet chocolate, chopped
- 1/2 teaspoon peppermint extract
For Garnish
- Whipped cream
- Fresh mint leaves
- Chocolate shavings
How to Make Rich and Creamy Mint Chocolate Cheesecake Step-by-Step
Step 1: Prepare the Crust
- Preheat the oven to 325°F (160°C).
- Grease a 9-inch springform pan and wrap the outside with aluminum foil.
- In a medium bowl, combine chocolate cookie crumbs and melted butter. Press firmly into the bottom of the prepared pan. Set aside.
Step 2: Make the Cheesecake Filling
- In a large bowl, beat softened cream cheese until smooth.
- Add granulated sugar, brown sugar, and cocoa powder. Beat until well combined.
- Add eggs one at a time, beating well after each addition.
- Mix in sour cream, vanilla extract, and peppermint extract.
- Fold in melted chocolate until fully incorporated.
Step 3: Bake the Cheesecake
- Pour the cheesecake filling over the crust in the springform pan.
- Place the pan in a larger roasting pan and fill the roasting pan with hot water halfway up the sides of the springform pan.
- Bake for 70-80 minutes, until the center is set and the top is slightly puffed.
Step 4: Cool and Chill
- Remove the cheesecake from the water bath and let it cool to room temperature.
- Refrigerate for at least 4 hours or overnight.
Step 5: Prepare the Ganache Topping
- In a small saucepan, heat heavy cream over medium heat until simmering.
- Remove from heat and add chopped chocolate and peppermint extract. Let sit for 2 minutes, then stir until smooth and glossy.
- Allow ganache to cool slightly.
Step 6: Assemble and Serve
- Pour ganache over the chilled cheesecake, spreading evenly.
- Refrigerate for 30 minutes to set the ganache.
- Before serving, garnish with whipped cream, fresh mint leaves, and chocolate shavings.
Indulge in the luxurious flavors of chocolate and mint with every velvety bite of this decadent cheesecake! Enjoy your Rich and Creamy Mint Chocolate Cheesecake with friends and family for an unforgettable dessert experience.
How to Serve Rich and Creamy Mint Chocolate Cheesecake
Serving this delightful cheesecake can elevate any occasion. Here are some creative ideas to impress your guests.
Individual Cheesecake Cups
Serve slices of the Rich and Creamy Mint Chocolate Cheesecake in individual cups. Layer crumbled crust and cheesecake filling, then top with ganache and garnishes for a personalized touch.
Mint Chocolate Cheesecake Trifle
Create a stunning trifle by layering cheesecake pieces, chocolate cookie crumbs, and whipped cream in a large glass bowl. This visually appealing dessert is perfect for gatherings and allows everyone to enjoy the rich flavors.
Cheesecake Brownie Sundae
Transform your cheesecake into a decadent sundae. Place a slice of the cheesecake on a warm brownie, drizzle with ganache, and top with a dollop of whipped cream and fresh mint leaves for an indulgent treat.
Pro Tips for the Best Rich and Creamy Mint Chocolate Cheesecake
To ensure your cheesecake turns out perfectly every time, follow these expert tips:
-
Use Room Temperature Ingredients: Always ensure that cream cheese and eggs are at room temperature for a smooth filling without lumps.
-
Don’t Overmix: When incorporating the eggs, mix just until combined to avoid incorporating too much air, which can cause the cheesecake to crack.
-
Water Bath Technique: Using a water bath during baking helps to maintain moisture and creates a gentle cooking environment, resulting in a creamy texture.
-
Chill Properly: Allow the cheesecake to chill for at least four hours, or overnight if possible. This helps the flavors meld and ensures a firmer texture.
-
Garnish Just Before Serving: To keep the whipped cream and mint leaves fresh, add garnishes right before serving for the best presentation.
Best Side Dishes and Pairings
Pairing the Rich and Creamy Mint Chocolate Cheesecake with complementary dishes and drinks enhances the overall experience. Consider these options:
-
Fresh Berries – A mix of strawberries, raspberries, and blueberries adds a refreshing contrast to the rich cheesecake.
-
Coffee or Espresso – The bitterness of coffee balances the sweetness of the cheesecake, creating a delightful flavor combination.
-
Mint Tea – A warm cup of mint tea can enhance the minty notes in the cheesecake, making for a harmonious pairing.
-
Chocolate Mousse – For chocolate lovers, serving a light chocolate mousse alongside adds an extra layer of indulgence.
-
Vanilla Ice Cream – A scoop of vanilla ice cream complements the rich flavors of the cheesecake while providing a creamy, cold contrast.
-
Coconut Whipped Cream – For a dairy-free option, coconut whipped cream adds a tropical twist that pairs beautifully with the mint chocolate flavors.
Common Mistakes to Avoid
- Overmixing the Batter: Be careful not to overbeat the cheesecake filling, as it can incorporate too much air and lead to cracking.
- Skipping the Water Bath: Using a water bath helps maintain moisture and prevents the cheesecake from drying out during baking.
- Not Cooling Gradually: Allowing the cheesecake to cool slowly at room temperature before refrigerating can help prevent cracks.
- Rushing the Chilling Time: For the best texture and flavor, allow the cheesecake to chill for a minimum of four hours, or overnight if possible.
Storage & Reheating Instructions
Refrigerator Storage
Store the Rich and Creamy Mint Chocolate Cheesecake in an airtight container in the refrigerator. It will stay fresh for up to 5 days.
Freezing Instructions
To freeze, wrap individual slices of cheesecake tightly in plastic wrap and then in aluminum foil. The cheesecake can be frozen for up to 3 months. To thaw, place it in the refrigerator overnight.
Reheating Tips
- Oven: Preheat to 350°F (175°C), place the cheesecake in the oven for about 10-15 minutes until warmed through.
- Microwave: Heat on medium power for 30-second intervals until just warmed. Avoid overheating, as it can alter the texture.
- Stovetop: Use a double boiler to gently warm the cheesecake, ensuring it doesn’t get too hot too quickly.
Frequently Asked Questions
Can I use a different crust for the Rich and Creamy Mint Chocolate Cheesecake?
Yes, you can substitute the chocolate cookie crumbs with graham cracker crumbs or even a nut-based crust for a different flavor profile.
How can I enhance the mint flavor in the cheesecake?
For a stronger mint flavor, you can increase the amount of peppermint extract used in the filling. Start with an additional 1/4 teaspoon and adjust to your taste.
Is it possible to make the Rich and Creamy Mint Chocolate Cheesecake ahead of time?
Absolutely! This cheesecake can be made up to a day in advance, allowing the flavors to meld beautifully.
What should I do if my cheesecake cracks?
A cracked cheesecake is often due to overmixing or rapid temperature changes. If it does crack, you can cover it with ganache or whipped cream for a beautiful presentation.
Can I use low-fat cream cheese for this recipe?
While low-fat cream cheese can be used, it may alter the texture and creaminess of the cheesecake. Full-fat cream cheese is recommended for the best results.
Final Thoughts
We hope you enjoy making this Rich and Creamy Mint Chocolate Cheesecake as much as we do. Its rich layers of flavor are perfect for any occasion. Please leave a comment below with your feedback or questions; we love hearing from you!
Desserts
PrintRich and Creamy Mint Chocolate Cheesecake
Indulge in the decadent delight of our Rich and Creamy Mint Chocolate Cheesecake. With a luscious chocolate crust, velvety cheesecake filling infused with mint, and a smooth ganache topping, this dessert is sure to impress!
- Prep Time: 30 minutes
- Cook Time: 80 minutes
- Total Time: 110 minutes + chilling time
- Yield: 12 servings 1x
- Category: Desserts
- Method: No bake
- Cuisine: American
Ingredients
- 1 1/2 cups chocolate cookie crumbs (such as Oreos)
- 24 oz cream cheese, softened
- 1 cup granulated sugar
- 1/4 cup brown sugar, packed
- 1/4 cup cocoa powder
- 4 large eggs
- 1/2 cup sour cream
- 1 teaspoon vanilla extract
- 1/2 teaspoon peppermint extract
- 1 cup semi-sweet chocolate chips, melted and slightly cooled
- 1 cup heavy cream
- 8 oz semi-sweet chocolate, chopped
- 1/2 teaspoon peppermint extract
- 1/4 cup unsalted butter, melted
- Whipped cream, for garnish
- Fresh mint leaves, for garnish
- Chocolate shavings, for garnish
Instructions
- Preheat oven to 325°F (160°C). Grease a 9-inch springform pan and wrap the outside with aluminum foil. In a medium bowl, combine chocolate cookie crumbs and melted butter. Press firmly into the bottom of the prepared pan. Set aside.
- In a large bowl, beat softened cream cheese until smooth. Add granulated sugar, brown sugar, and cocoa powder. Beat until well combined. Add eggs one at a time, beating well after each addition. Mix in sour cream, vanilla extract, and peppermint extract. Fold in melted chocolate until fully incorporated.
- Pour cheesecake filling over the crust in the springform pan. Place the pan in a larger roasting pan and fill the roasting pan with hot water halfway up the sides of the springform pan. Bake for 70-80 minutes, until the center is set and the top is slightly puffed.
- Remove cheesecake from water bath and let cool to room temperature. Refrigerate for at least 4 hours or overnight.
- In a small saucepan, heat heavy cream over medium heat until simmering. Remove from heat and add chopped chocolate and peppermint extract. Let sit for 2 minutes, then stir until smooth and glossy. Allow ganache to cool slightly.
- Pour ganache over chilled cheesecake, spreading evenly. Refrigerate for 30 minutes to set ganache. Before serving, garnish with whipped cream, fresh mint leaves, and chocolate shavings.
Nutrition
- Calories: 450
- Sugar: 30g
- Sodium: 270mg
- Fat: 31g
- Saturated Fat: 18g
- Carbohydrates: 38g
- Fiber: 2g
- Protein: 7g
- Cholesterol: 125mg