
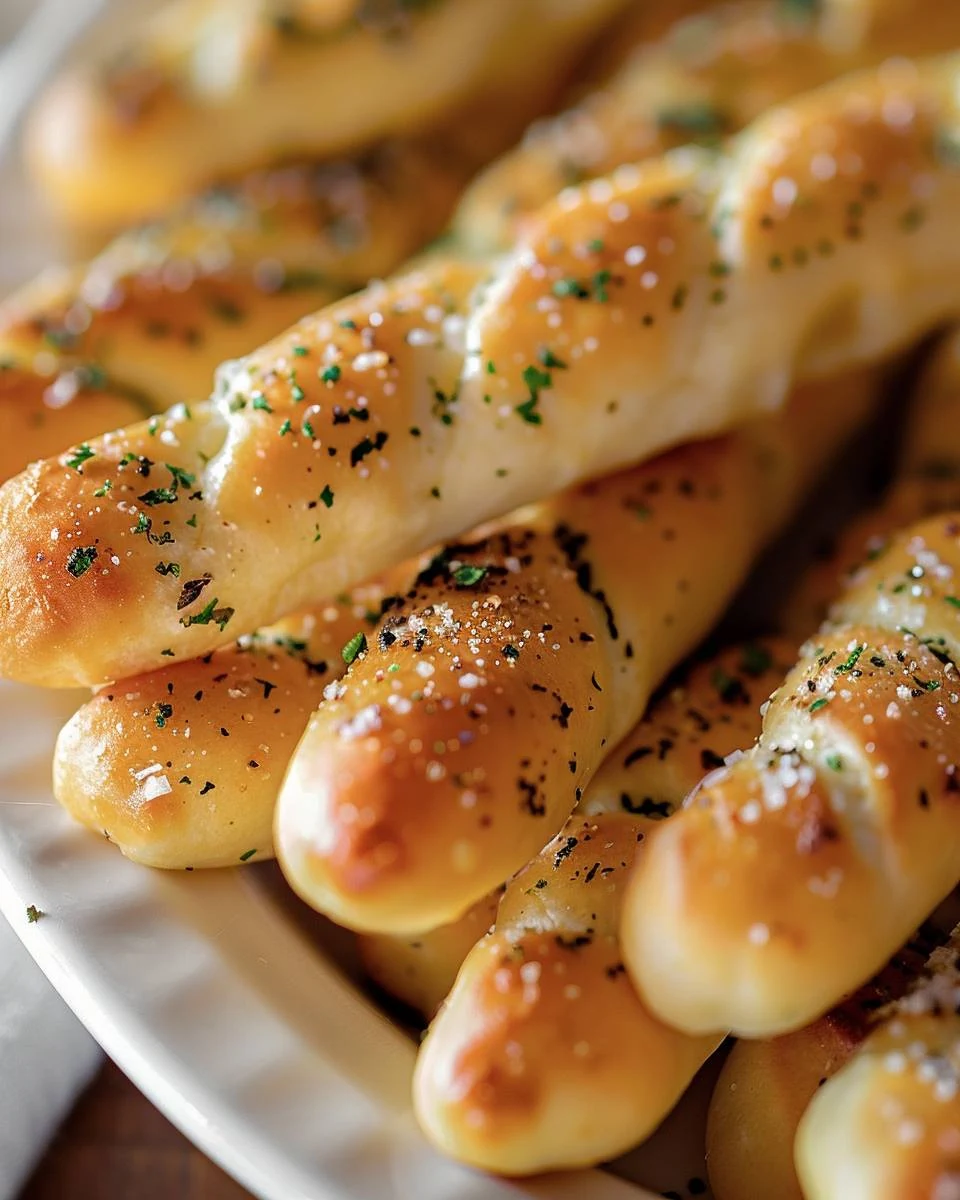
Olive Garden Breadsticks are a delightful treat that bring the warmth of Italian dining right to your kitchen. With their soft, buttery texture and a hint of garlic, these breadsticks are perfect for any meal or simply as a snack. They are irresistibly good and easy to make, ensuring that you can enjoy them fresh from the oven.
Why You’ll Love This Recipe
- Homemade Goodness: Enjoy the satisfaction of making fresh breadsticks from scratch.
- Perfectly Soft: These breadsticks have a soft, pillowy texture that melts in your mouth.
- Customizable: Feel free to add herbs or spices to the dough for a personal touch.
- Great for Sharing: Ideal for family dinners or gatherings, everyone will love them.
- Simple Ingredients: Made with pantry staples, you can whip them up anytime.
Tools and Equipment
Having the right tools makes the process smoother and more enjoyable.
Essential Tools
- Mixing bowls
- Baking sheet
- Kitchen towel
- Rolling pin
- Measuring cups and spoons
Why These Tools Matter
- Mixing bowls: Essential for combining ingredients without spills.
- Baking sheet: Provides a flat surface for even baking and easy cleanup.
- Kitchen towel: Helps keep the dough warm during rising, ensuring a good texture.
Ingredients for Olive Garden Breadsticks
Breadstick Dough
- 1 ½ cups warm water (110 degrees)
- 2 ¼ teaspoons active dry yeast (1 package)
- 2 tablespoons sugar
- 4 ¼ cups bread flour
- 1 tablespoon salt
- 2 tablespoons melted butter
Garlic Butter Topping
- ¼ cup butter, melted
- 1 teaspoon garlic salt
How to Make Olive Garden Breadsticks Step-by-Step
Step 1: Activate Yeast
In a small bowl, combine warm water, sugar, and active dry yeast. Let it sit for about 5 minutes until it becomes foamy. This step is crucial for ensuring your breadsticks rise properly.
Step 2: Mix Dough
In a large bowl, whisk together bread flour and salt. Add the melted butter and the foamy yeast mixture. Mix until the dough starts to come together. This will form the base of your breadsticks.
Step 3: Knead Dough
Turn the dough onto a lightly floured surface. Knead for about 5 minutes until it is smooth and elastic. Kneading helps develop the gluten, which contributes to the breadsticks’ texture.
Step 4: Divide and Shape
Form the dough into a square on your countertop. Divide it into 12 equal pieces. Roll each piece into a breadstick shape, ensuring they are uniform for even baking.
Step 5: First Rise
Place the shaped breadsticks on a lined baking sheet. Cover them with a kitchen towel and let them rise for about 45 minutes, until they are puffy. This step helps create a light and airy texture.
Step 6: Bake
Preheat the oven to 400°F (200°C). Bake the breadsticks for about 12 minutes, or until they are lightly browned. Keep an eye on them to avoid over-baking.
Step 7: Prepare Topping
While the breadsticks are baking, mix melted butter and garlic salt together. This will create a delicious topping that enhances the flavor of the breadsticks.
Step 8: Finish and Serve
Remove the breadsticks from the oven and immediately brush them with the garlic butter mixture while they are still warm. Allow the breadsticks to cool slightly before serving. Enjoy them fresh for the best taste.
Enjoy your homemade Olive Garden Breadsticks as a perfect accompaniment to any meal or as a tasty snack on their own!
How to Serve Olive Garden Breadsticks
Olive Garden breadsticks are versatile and can enhance any meal. Here are a few creative serving ideas.
Dipping Sauces
Serve the breadsticks with a variety of dipping sauces such as marinara, Alfredo, or pesto. This adds an extra layer of flavor and encourages guests to customize their experience.
Salad Accompaniment
Pair the breadsticks with a fresh salad. The lightness of the salad complements the warm, buttery breadsticks, making for a delightful contrast in textures and flavors.
Garlic Butter Topping
Elevate your breadsticks by adding a sprinkle of fresh herbs or grated Parmesan cheese on top of the garlic butter. This simple addition makes them extra special and flavorful.
Pro Tips for the Best Olive Garden Breadsticks
To achieve the perfect Olive Garden breadsticks, consider the following tips:
- Use Fresh Yeast: Always check the expiration date on your yeast to ensure it’s active, as this will affect the dough’s rise.
- Knead Thoroughly: Knead the dough until it is smooth and elastic; this helps develop the gluten for a chewier texture.
- Warm Environment: Place the dough in a warm, draft-free area while it rises. This promotes proper fermentation and helps the breadsticks become light and fluffy.
- Don’t Skimp on Butter: Generously brush the breadsticks with the garlic butter mixture right out of the oven for maximum flavor.
- Experiment with Flavors: Feel free to add seasonings like Italian herbs or cheese to the dough for a unique twist on the classic recipe.
Best Side Dishes and Pairings
Olive Garden breadsticks pair wonderfully with various dishes and drinks. Consider these options for a complete meal experience:
- Caesar Salad: The creamy dressing and crunchy croutons complement the soft, buttery breadsticks perfectly.
- Pasta Primavera: This vibrant vegetable pasta dish adds a fresh and colorful contrast to the warm, savory breadsticks.
- Minestrone Soup: A hearty, vegetable-rich soup that makes an excellent dipping companion for the breadsticks.
- Chicken Alfredo: The rich, creamy sauce of this pasta dish is balanced by the light texture of the breadsticks.
- Red Wine: A glass of red wine, such as Chianti, enhances the overall dining experience, bringing out the flavors of both the breadsticks and main dishes.
Common Mistakes to Avoid
- Using Cold Water: Always ensure the water is warm enough to activate the yeast properly.
- Not Kneading Enough: Insufficient kneading can result in dense breadsticks; aim for a smooth and elastic dough.
- Skipping the First Rise: Allowing the dough to rise is crucial for achieving a light and airy texture.
- Overbaking: Keep an eye on the breadsticks to prevent burning; they should be lightly browned, not dark.
Storage & Reheating Instructions
Refrigerator Storage
Store leftover Olive Garden Breadsticks in an airtight container in the refrigerator. They will stay fresh for up to 3 days.
Freezing Instructions
To freeze, place the cooled breadsticks in a freezer-safe bag or container. They can be frozen for up to 3 months. Thaw in the refrigerator overnight before reheating.
Reheating Tips
- Oven: Preheat to 350°F (175°C). Place breadsticks on a baking sheet and heat for about 5-7 minutes.
- Microwave: Heat on a microwave-safe plate for 15-20 seconds until warm.
- Stovetop: Warm in a skillet over medium heat for a few minutes, turning occasionally.
Frequently Asked Questions
How do I make Olive Garden Breadsticks taste like the restaurant’s?
To replicate the restaurant’s flavor, use garlic salt in the topping and brush the breadsticks with melted butter immediately after baking.
Can I use all-purpose flour instead of bread flour for Olive Garden Breadsticks?
Yes, you can use all-purpose flour, but the texture may be slightly less chewy than when using bread flour.
How long does it take to make Olive Garden Breadsticks?
The total time to make Olive Garden Breadsticks is approximately 1 hour and 15 minutes, including preparation and baking.
Can I add herbs to my Olive Garden Breadsticks?
Absolutely! Feel free to incorporate dried herbs like oregano or rosemary into the dough for an extra flavor boost.
Are Olive Garden Breadsticks vegetarian?
Yes, this recipe for Olive Garden Breadsticks is vegetarian-friendly, as it does not contain any meat or animal-derived ingredients.
Final Thoughts
Making Olive Garden Breadsticks at home is a rewarding experience that yields delicious results. We encourage you to try this recipe and share your feedback in the comments. Your thoughts and experiences can help others in their baking journey.
Dinner
PrintOlive Garden Breadsticks
These Olive Garden Breadsticks are soft, warm, and perfect for dipping. Made with simple ingredients, they are easy to prepare and bake to a golden brown. Brushed with a garlic butter topping, these breadsticks are a delightful addition to any meal.
- Prep Time: 60 minutes
- Cook Time: 12 minutes
- Total Time: 72 minutes
- Yield: 12 servings 1x
- Category: Dinner
- Method: Baking
- Cuisine: American
Ingredients
- 1 ½ cups warm water (110 degrees)
- 2 ¼ teaspoons active dry yeast
- 2 tablespoons sugar
- 4 ¼ cups bread flour
- 1 tablespoon salt
- 2 tablespoons melted butter
- ¼ cup butter, melted
- 1 teaspoon garlic salt
Instructions
- In a small bowl, combine warm water, sugar, and active dry yeast. Let it sit for about 5 minutes until foamy.
- In a large bowl, whisk together bread flour and salt. Add melted butter and the foamy yeast mixture. Mix until the dough starts to come together.
- Turn the dough onto a lightly floured surface and knead for about 5 minutes until smooth and elastic.
- Form the dough into a square on your countertop. Divide it into 12 equal pieces. Roll each piece into a breadstick shape.
- Place the shaped breadsticks on a lined baking sheet. Cover them with a kitchen towel and let them rise for about 45 minutes, until they are puffy.
- Preheat the oven to 400°F (200°C). Bake the breadsticks for about 12 minutes, or until they are lightly browned.
- While the breadsticks are baking, mix melted butter and garlic salt together.
- Remove the breadsticks from the oven and immediately brush them with the garlic butter mixture while they are still warm. Allow the breadsticks to cool slightly before serving.
Nutrition
- Calories: 235
- Sugar: 2g
- Sodium: 480mg
- Fat: 10g
- Saturated Fat: 6g
- Carbohydrates: 31g
- Fiber: 1g
- Protein: 5g
- Cholesterol: 25mg