
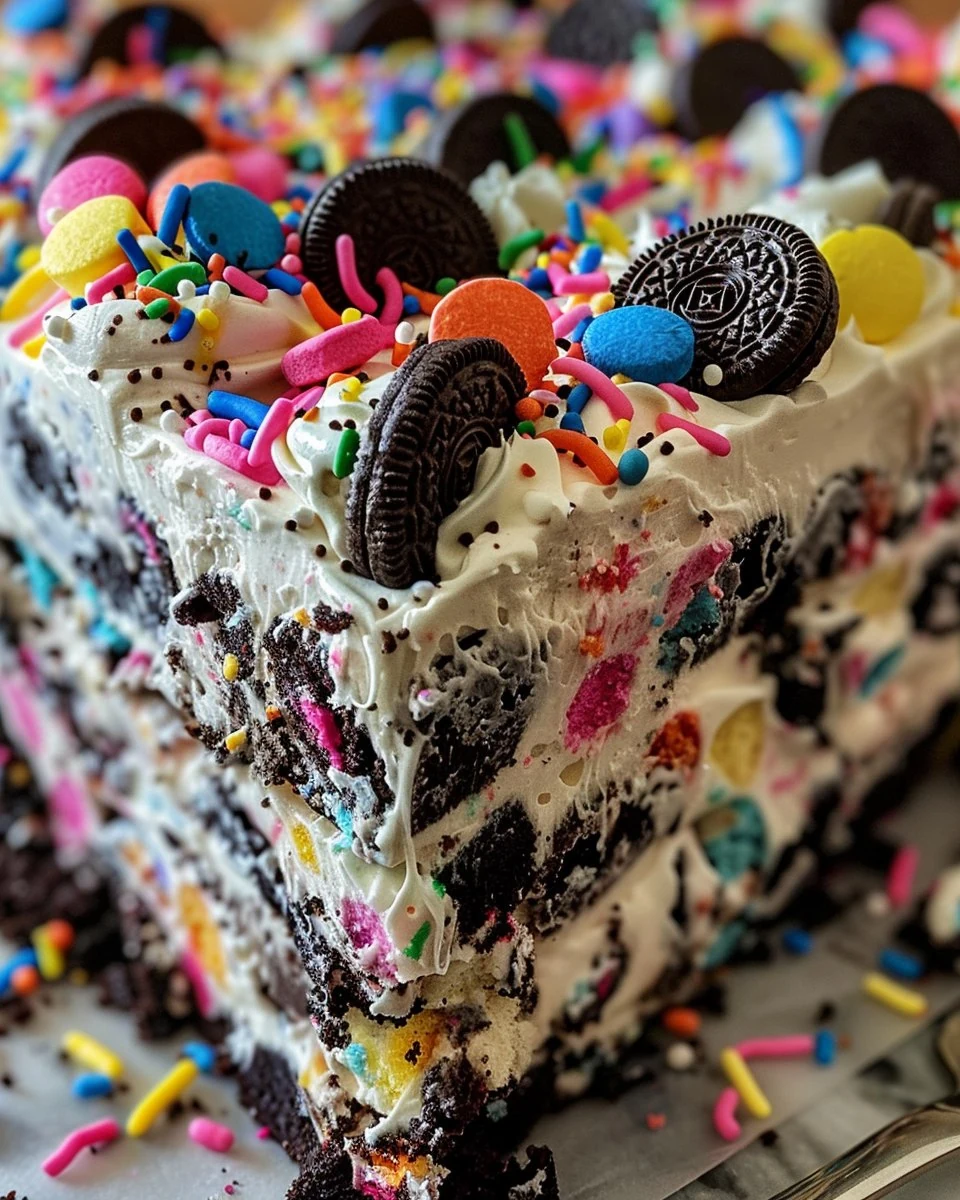
No-Bake Funfetti Icebox Cake is a delightful dessert that brings joy to any celebration. Its creamy layers combined with colorful sprinkles and the crunch of Oreos create a treat that is as visually appealing as it is delicious. This cake is perfect for those who want a festive dessert without turning on the oven.
Why You’ll Love This Recipe
- No Baking Required: Save time and energy with this easy no-bake dessert, perfect for summer gatherings.
- Fun Appearance: The vibrant sprinkles make this cake a standout centerpiece for birthdays and celebrations.
- Creamy Texture: The combination of whipped cream and cream cheese results in a rich, velvety mouthfeel.
- Customizable: Feel free to swap out the sprinkles or cookies to suit your taste or occasion.
- Make Ahead: This cake can be prepared in advance, making it an ideal choice for busy hosts.
Tools and Equipment
Having the right tools can simplify your preparation process significantly.
Essential Tools
- Stand mixer
- 9″ round springform pan
- Mixing bowls
- Whisk
- Rubber spatula
Why These Tools Matter
- Stand mixer: Ensures your whipped cream reaches the perfect consistency quickly.
- Springform pan: Makes it easy to remove the cake without damaging its layers.
- Rubber spatula: Helps in folding ingredients gently without deflating the whipped cream.
Ingredients for No-Bake Funfetti Icebox Cake
Cake Base
- 3/4 cup dry white cake mix (just the powder)
- 2 packages Birthday Cake Oreos (or regular/Double Stuf)
- 2/3 cup milk
Cream Mixture
- 8 oz cream cheese, softened
- 2/3 cup granulated sugar
- 2 tsp vanilla extract
- 1¾ cups heavy whipping cream
- 1/2 cup confectioners’ sugar
- 3/4 cup rainbow sprinkles
Garnish (Optional)
- Additional whipped cream
- Additional sprinkles
How to Make No-Bake Funfetti Icebox Cake Step-by-Step
Step 1: Prepare the Pan
- Grease a 9″ round springform pan to prevent sticking.
Step 2: Whip the Cream
- In a stand mixer, whip the heavy cream until soft peaks form.
- Add the confectioners’ sugar and cake mix powder, continuing to whip until stiff peaks are achieved.
- Gently stir in the rainbow sprinkles and set aside.
Step 3: Cream the Cheese
- In a separate bowl, cream together the softened cream cheese, granulated sugar, and vanilla extract until smooth.
- Gently fold in the whipped cream mixture to combine.
Step 4: Layer the Cake
- Spread a thin layer of the cream mixture on the bottom of the prepared pan.
- Dip each Oreo in milk and arrange them in a single layer on the bottom of the pan.
- Top with 1/3 of the cream mixture. Repeat the layering process two more times, finishing with a layer of the cream mixture.
Step 5: Chill
- Chill the cake in the refrigerator for at least 4-6 hours, or overnight for the best results.
Step 6: Garnish and Serve
- Before serving, garnish with additional whipped cream and sprinkles if desired.
Preparation Time: 30 minutes | Chilling Time: 6 hours | Total Time: 6 hours 30 minutes
Enjoy this delightful and colorful No-Bake Funfetti Icebox Cake at your next celebration!
How to Serve No-Bake Funfetti Icebox Cake
No-Bake Funfetti Icebox Cake is not only visually stunning but also versatile in how it can be served.
Individual Servings
Serve the cake in individual portions by cutting it into slices and plating them with a dollop of whipped cream and a sprinkle of extra rainbow sprinkles for a festive touch.
Icebox Cake Parfaits
Layer the cake mixture and Oreo pieces in clear cups for delightful parfaits. This presentation allows guests to see the colorful layers, making it an eye-catching dessert option.
Birthday Celebration Centerpiece
For a birthday party, decorate the top of the cake with candles and additional sprinkles. This makes the No-Bake Funfetti Icebox Cake a show-stopping centerpiece that will delight guests of all ages.
Pro Tips for the Best No-Bake Funfetti Icebox Cake
To ensure your No-Bake Funfetti Icebox Cake turns out perfectly, consider these helpful tips.
- Use High-Quality Ingredients: Opt for high-quality cream cheese and heavy cream for a richer flavor and smoother texture.
- Chill Thoroughly: Allow the cake to chill overnight for the best flavor and texture, as this helps the layers set properly.
- Customize the Sprinkles: Feel free to use themed sprinkles to match your celebration, adding a personal touch to the cake.
- Watch the Whipping: Be careful not to over-whip the heavy cream, as it can turn grainy and lose its light texture.
- Experiment with Flavors: Try substituting different flavored cake mixes or Oreos to create unique variations of this classic dessert.
Best Side Dishes and Pairings
No-Bake Funfetti Icebox Cake pairs delightfully with various dishes and drinks, enhancing your dessert experience.
- Fresh Fruit Salad: A light and refreshing fruit salad balances the richness of the cake and adds a burst of color.
- Vanilla Ice Cream: The creamy texture of vanilla ice cream complements the cake perfectly, making for a classic dessert pairing.
- Sparkling Lemonade: A refreshing sparkling lemonade provides a delightful contrast to the sweetness of the cake.
- Chocolate-Covered Strawberries: These decadent treats add a touch of elegance and a chocolatey flavor that pairs well with the funfetti.
- Coffee or Espresso: A cup of coffee or espresso adds depth and balances the sweetness of the No-Bake Funfetti Icebox Cake, making it a great after-dinner option.
Common Mistakes to Avoid
- Using Warm Ingredients: Ensure that your cream cheese is softened but not warm, as this can affect the consistency of the cream mixture.
- Skipping the Chilling Time: Don’t rush the chilling process; allowing it to set for at least 4-6 hours ensures the layers meld beautifully.
- Overmixing the Whipped Cream: Stop mixing as soon as stiff peaks form to avoid a grainy texture in your cream mixture.
- Neglecting to Grease the Pan: Always grease the springform pan to prevent the cake from sticking and to ensure easy removal.
Storage & Reheating Instructions
Refrigerator Storage
Store any leftover No-Bake Funfetti Icebox Cake in an airtight container in the refrigerator. It will remain fresh for up to 3 days.
Freezing Instructions
For best results, freeze individual slices wrapped tightly in plastic wrap, then place them in an airtight container. The cake can be frozen for up to 2 months.
Reheating Tips
- Oven: Preheat to 350°F (175°C) and warm the cake for about 10 minutes, covered with foil to prevent drying out.
- Microwave: Heat a slice for 15-20 seconds on medium power, checking to ensure it doesn’t melt.
- Stovetop: Use a skillet on low heat and cover with a lid, warming for about 5 minutes until slightly softened.
Frequently Asked Questions
Can I use a different flavor of cake mix for the No-Bake Funfetti Icebox Cake?
Yes, you can experiment with other flavors like chocolate or strawberry cake mix to create your own unique version of this dessert.
How long can I store the No-Bake Funfetti Icebox Cake?
When stored properly in the refrigerator, this cake can last for about 3 days. For longer storage, consider freezing it.
What can I substitute for cream cheese in this recipe?
You can use mascarpone cheese or a dairy-free cream cheese alternative if you’re looking for a different flavor or a vegan option.
Is it necessary to use Birthday Cake Oreos for the No-Bake Funfetti Icebox Cake?
While Birthday Cake Oreos add a fun flavor, you can substitute them with regular or Double Stuf Oreos based on your preference.
Can I add more sprinkles to the No-Bake Funfetti Icebox Cake?
Absolutely! Feel free to incorporate more sprinkles in between the layers or on top for extra color and fun.
Final Thoughts
This No-Bake Funfetti Icebox Cake is sure to be a hit at your next gathering. Its delightful flavors and vibrant colors make it a perfect dessert for celebrations. We invite you to try this recipe and share your thoughts in the comments below.
Desserts
PrintNo-Bake Funfetti Icebox Cake

This No-Bake Funfetti Icebox Cake is a delightful dessert that combines creamy layers of whipped cream and cream cheese with crunchy Birthday Cake Oreos and colorful rainbow sprinkles. Perfect for celebrations, this cake is easy to prepare and requires no baking, making it a fun and festive treat for all ages.
- Prep Time: 30 minutes
- Cook Time: 0 minutes
- Total Time: 390 minutes
- Yield: 12 servings 1x
- Category: Desserts
- Method: Baking
- Cuisine: American
Ingredients
- 3/4 cup dry white cake mix
- 8 oz cream cheese, softened
- 3/4 cup rainbow sprinkles
- 2 packages Birthday Cake Oreos
- 2/3 cup granulated sugar
- 1¾ cups heavy whipping cream
- 2/3 cup milk
- 2 tsp vanilla extract
- 1/2 cup confectioners' sugar
Instructions
- Grease a 9" round springform pan.
- In a stand mixer, whip the heavy cream to soft peaks. Add the confectioners' sugar and cake mix powder, and continue whipping until stiff peaks form. Stir in the sprinkles and set aside.
- In a separate bowl, cream together the softened cream cheese, granulated sugar, and vanilla extract until smooth. Gently fold in the whipped cream mixture.
- Spread a thin layer of the cream mixture on the bottom of the prepared pan. Dip each Oreo in milk and arrange them on the bottom of the pan. Top with 1/3 of the cream mixture. Repeat the layering process twice more, ending with a layer of the cream mixture.
- Chill the cake in the refrigerator for at least 4-6 hours, or overnight for best results.
- Before serving, garnish with additional whipped cream and sprinkles if desired.
Nutrition
- Calories: 400
- Sugar: 35g
- Sodium: 250mg
- Fat: 20g
- Saturated Fat: 12g
- Carbohydrates: 50g
- Fiber: 1g
- Protein: 5g
- Cholesterol: 60mg