Category: Lunch

  • Delicious Baked Fish with Lemon Cream Sauce Recipe

    Delicious Baked Fish with Lemon Cream Sauce Recipe

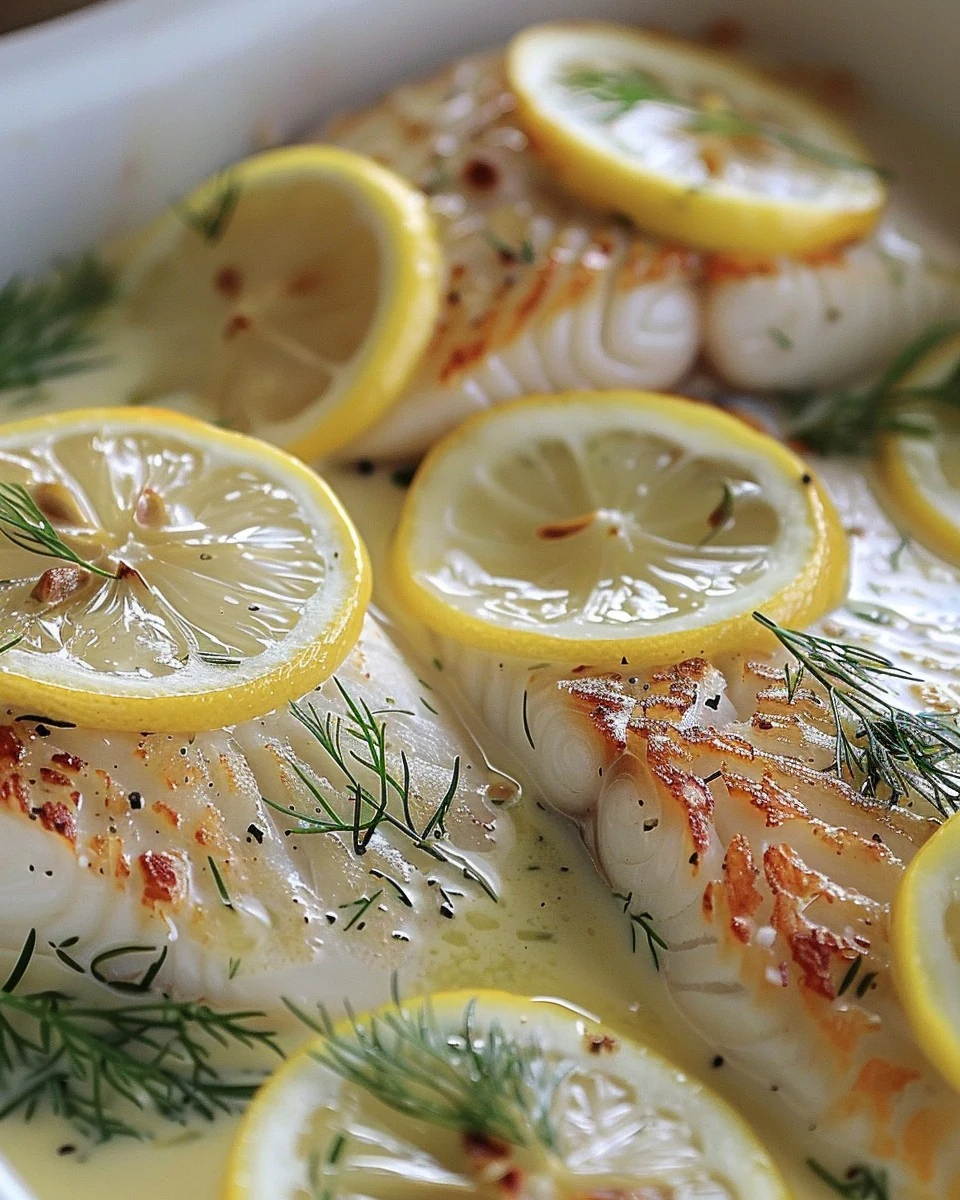
    Baked Fish with Lemon Cream Sauce is a delightful dish that combines tender fish fillets with a rich, creamy lemon sauce. The bright citrus notes elevate the flavors, making it a perfect choice for both weeknight dinners and special occasions.

    Why You’ll Love This Recipe

    • Quick & Easy: Ready in under 30 minutes, making dinner preparation a breeze.
    • Flavorful & Creamy: The lemon cream sauce adds a rich and tangy flavor that complements the fish perfectly.
    • Healthy & Nutritious: Packed with protein and healthy fats, this recipe is both satisfying and nutritious.
    • Versatile: You can use different types of white fish, allowing for customization based on what you have on hand.
    • Impressive Presentation: The garnished finished dish is visually appealing and will impress your guests.

    Tools and Equipment

    Having the right tools makes cooking easier and more enjoyable.

    Essential Tools

    • Baking dish
    • Saucepan
    • Measuring cups and spoons
    • Knife and cutting board
    • Whisk

    Why These Tools Matter

    • Baking dish: Ensures even cooking and easy serving of the fish.
    • Saucepan: Perfect for preparing the creamy sauce without spillage.
    • Measuring cups and spoons: Guarantees precise ingredient amounts for the best flavor.

    Ingredients for Baked Fish with Lemon Cream Sauce

    Fish and Seasoning

    • 4 white fish fillets (such as cod or tilapia)
    • Salt and pepper, to taste

    Lemon Cream Sauce

    • 2 tablespoons lemon juice
    • 1 cup heavy cream
    • 1 teaspoon lemon zest
    • 2 garlic cloves, minced
    • 2 tablespoons butter

    Optional Garnish

    • 1 tablespoon fresh dill, chopped
    • Lemon slices, for garnish

    How to Make Baked Fish with Lemon Cream Sauce Step-by-Step

    Step 1: Prep the Base

    1. Preheat your oven to 400°F (200°C).
    2. Season the fish fillets with salt and pepper.
    3. Place the seasoned fillets in a baking dish, ready for the sauce.

    Step 2: Make Lemon Cream Sauce

    1. In a saucepan over medium heat, melt the butter.
    2. Add the minced garlic and sauté until fragrant, about 1 minute.
    3. Stir in the heavy cream, lemon juice, and lemon zest.
    4. Simmer the mixture for 3-4 minutes, stirring occasionally, until the sauce thickens slightly.

    Step 3: Assemble and Bake

    1. Pour the lemon cream sauce evenly over the seasoned fish fillets in the baking dish.
    2. Bake in the preheated oven for 15-20 minutes.
    3. The fish is done when it flakes easily with a fork.

    Step 4: Garnish and Serve

    1. Once baked, garnish the dish with fresh dill and lemon slices.
    2. Serve hot and enjoy your delicious Baked Fish with Lemon Cream Sauce.

    Enjoy a delightful and creamy baked fish that’s perfect for a special dinner!

    How to Serve Baked Fish with Lemon Cream Sauce

    Baked Fish with Lemon Cream Sauce can be presented in various delightful ways to enhance your dining experience.

    Serve with Steamed Vegetables

    Bright and colorful steamed vegetables like asparagus or broccoli add a nutritious element and contrast beautifully with the creamy sauce.

    Pair with Rice Pilaf

    A fluffy rice pilaf infused with herbs provides a lovely base that absorbs the lemon cream sauce, making each bite satisfying.

    Accompany with Garlic Bread

    Crispy garlic bread is perfect for soaking up the rich lemon cream sauce, making it an excellent choice for a complete meal.

    Pro Tips for the Best Baked Fish with Lemon Cream Sauce

    To elevate your dish, consider these expert tips for achieving the best results.

    • Choose Fresh Fish: Opt for the freshest fish fillets available to ensure maximum flavor and texture in your dish.

    • Don’t Overcook the Fish: Keep an eye on the cooking time; overcooking can lead to dry fish. It should flake easily when done.

    • Adjust Sauce Consistency: If you prefer a thinner sauce, add a splash of fish stock or water to achieve your desired consistency.

    • Use Fresh Herbs: Fresh dill or parsley can enhance the dish’s flavor profile, making it even more aromatic and appealing.

    • Serve Immediately: For the best taste and texture, serve the dish right after baking to enjoy the sauce at its creamiest.

    Best Side Dishes and Pairings

    Enhance your meal with these complementary side dishes and beverages.

    1. Garlic Mashed Potatoes: Creamy and flavorful, these potatoes provide a comforting base that pairs perfectly with the lemony sauce.

    2. Quinoa Salad: A light quinoa salad with cucumbers and tomatoes adds freshness and texture, balancing the richness of the fish.

    3. Roasted Brussels Sprouts: Crispy roasted Brussels sprouts add a nutty flavor that complements the creaminess of the sauce.

    4. Chardonnay: A chilled glass of Chardonnay enhances the dish’s lemon notes and provides a refreshing contrast.

    5. Mixed Green Salad: A simple salad with vinaigrette cuts through the richness of the fish, offering a refreshing palate cleanser.

    Common Mistakes to Avoid

    • Not Preheating the Oven: Always ensure your oven is preheated to the correct temperature before baking the fish to achieve even cooking.
    • Overcooking the Fish: Monitor the cooking time closely; overcooked fish can become dry and tough.
    • Skipping the Seasoning: Don’t forget to season the fish fillets adequately with salt and pepper to enhance the flavor of the dish.
    • Not Allowing the Sauce to Thicken: Make sure to simmer the lemon cream sauce until it thickens slightly for the best texture.

    Storage & Reheating Instructions

    Refrigerator Storage

    Store leftovers in airtight containers in the refrigerator for up to 3 days. Make sure to keep the fish and sauce together for optimal flavor retention.

    Freezing Instructions

    For best results, freeze the baked fish with lemon cream sauce in airtight containers or freezer bags. It can be stored in the freezer for up to 2 months. Thaw in the refrigerator overnight before reheating.

    Reheating Tips

    • Oven: Preheat the oven to 350°F (175°C). Place the fish in a baking dish, cover with foil, and heat for about 15-20 minutes.
    • Microwave: Place the fish on a microwave-safe plate, cover with a damp paper towel, and heat in 30-second intervals until warmed through.
    • Stovetop: Heat a skillet over medium heat. Add a splash of water or broth, and gently reheat the fish, covering the skillet to retain moisture.

    Frequently Asked Questions

    How do I know when the fish is done in the Baked Fish with Lemon Cream Sauce?

    The fish is cooked when it flakes easily with a fork and reaches an internal temperature of 145°F (63°C).

    Can I use different types of fish for this recipe?

    Yes, you can substitute other white fish such as haddock or snapper, but adjust the cooking time based on the thickness of the fillets.

    Is the lemon cream sauce necessary for Baked Fish with Lemon Cream Sauce?

    While the sauce adds richness and flavor, you can also serve the fish with a squeeze of fresh lemon juice or a light herb sauce for a lighter option.

    Can I make Baked Fish with Lemon Cream Sauce ahead of time?

    Yes, you can prepare the fish and sauce in advance, store them separately, and bake them just before serving for optimal freshness.

    What sides pair well with Baked Fish with Lemon Cream Sauce?

    Consider serving this dish with steamed vegetables, rice, or a fresh salad to complement the creamy flavors.

    Final Thoughts

    Baked Fish with Lemon Cream Sauce is a delectable dish that elevates any dinner table. Its simplicity and rich flavor profile make it a must-try recipe. We encourage you to give it a go and share your thoughts or any variations you tried in the comments below.


    Dinner

    Baked Fish with Lemon Cream Sauce


    5.0 from 24 reviews

    This baked fish with lemon cream sauce is a delightful dish that combines tender white fish fillets with a rich, creamy sauce infused with fresh lemon and garlic. Perfect for a special dinner, it’s easy to prepare and packed with flavor.
    Author: Munch Twist
    Prep Time: 10 minutes
    Cook Time: 20 minutes
    Total Time: 30 minutes
    Yield: 4 servings
    Category: Lunch
    Method: Baking
    Cuisine: American

    Baked Fish with Lemon Cream Sauce

    SCALE:
    1x
    2x
    3x
    Cook Mode: Prevent your screen from going dark

    Ingredients

    • 4 white fish fillets (such as cod or tilapia)
    • 2 tablespoons lemon juice
    • 1 cup heavy cream
    • 1 teaspoon lemon zest
    • 2 garlic cloves, minced
    • 2 tablespoons butter
    • Salt and pepper, to taste
    • 1 tablespoon fresh dill, chopped (optional)
    • Lemon slices, for garnish

    Instructions

    1. Preheat your oven to 400°F (200°C). Season fish fillets with salt and pepper and place them in a baking dish.
    2. In a saucepan over medium heat, melt the butter. Add minced garlic and sauté until fragrant. Stir in heavy cream, lemon juice, and lemon zest. Simmer for 3-4 minutes, stirring occasionally, until the sauce slightly thickens.
    3. Pour the lemon cream sauce over the seasoned fish fillets. Bake in the preheated oven for 15-20 minutes, or until the fish is cooked through and flakes easily with a fork.
    4. Garnish with fresh dill and lemon slices. Serve hot.

    Nutrition Facts

    Serving Size: 1 serving
    Calories: 290 kcal
    Sugar: 2g
    Sodium: 150mg
    Fat: 20g
    Saturated Fat: 12g
    Carbohydrates: 4g
    Fiber: 0g
    Protein: 26g
    Cholesterol: 90mg

  • Delicious Thai Chicken Fried Rice Recipe

    Delicious Thai Chicken Fried Rice Recipe

    Thai Chicken Fried Rice is a delightful dish that captures the essence of Thai cuisine. It’s a perfect blend of savory flavors, tender chicken, and vibrant vegetables, all brought together with fragrant jasmine rice. This dish is not only satisfying but also incredibly quick to prepare, making it a weeknight favorite.

    Why You’ll Love This Recipe

    • Flavor Packed: The combination of fish sauce, oyster sauce, and soy sauce creates a rich umami flavor.
    • Quick & Easy: Ready in under 30 minutes, this dish is perfect for busy weeknights.
    • Customizable: Feel free to add your favorite vegetables or substitute protein to suit your taste.
    • One-Pan Wonder: Minimal cleanup is required, allowing you to focus on enjoying your meal.
    • Great for Leftovers: This Thai Chicken Fried Rice tastes even better the next day, making it ideal for meal prep.

    Tools and Equipment

    Having the right tools can make your cooking experience smoother and more enjoyable.

    Essential Tools

    • Wok or large skillet
    • Cutting board
    • Sharp knife
    • Spatula or wooden spoon
    • Measuring spoons

    Why These Tools Matter

    • Wok or large skillet: Provides ample space to stir-fry ingredients evenly and helps achieve that perfect texture.
    • Sharp knife: Ensures precise cuts for chicken and vegetables, enhancing the cooking process and presentation.
    • Spatula or wooden spoon: Ideal for mixing ingredients thoroughly without scratching your cookware.

    Ingredients for Thai Chicken Fried Rice

    Main Ingredients

    • 2 cups cooked jasmine rice (preferably day-old)
    • 1 tablespoon fish sauce
    • 1 tablespoon oyster sauce
    • 2 garlic cloves, minced
    • 1 lb chicken breast, thinly sliced
    • 2 eggs, lightly beaten
    • 3 tablespoons soy sauce
    • 2 green onions, chopped
    • 1 small onion, diced
    • 1 red bell pepper, sliced
    • 1 teaspoon sugar
    • 2 tablespoons vegetable oil
    • Fresh cilantro and lime wedges (for garnish)

    How to Make Thai Chicken Fried Rice Step-by-Step

    Step 1: Cook Chicken

    Heat 1 tablespoon of vegetable oil in a wok over medium-high heat. Add the sliced chicken and cook until browned, approximately 5-7 minutes. Remove the chicken from the wok and set aside.

    Step 2: Sauté Vegetables

    In the same wok, add the remaining oil. Sauté the diced onion and minced garlic until fragrant, about 2 minutes. This will create a flavorful base for your fried rice.

    Step 3: Add Bell Pepper

    Add the sliced red bell pepper to the wok. Cook for an additional 2-3 minutes until the bell pepper is softened, adding color and sweetness to the dish.

    Step 4: Scramble Eggs

    Push the vegetables to one side of the wok. Pour the beaten eggs into the empty side and scramble until fully cooked, about 2 minutes. Mix the eggs with the vegetables once cooked.

    Step 5: Combine Ingredients

    Add the cooked jasmine rice to the wok. Stir in the soy sauce, fish sauce, oyster sauce, and sugar. Mix everything well to ensure the rice is evenly coated with the sauces.

    Step 6: Add Chicken

    Return the cooked chicken to the wok. Stir until everything is heated through and evenly mixed, approximately 2-3 minutes. This step melds all the flavors together.

    Step 7: Garnish and Serve

    Garnish your Thai Chicken Fried Rice with chopped green onions, fresh cilantro, and lime wedges. Serve hot for an authentic Thai dining experience.

    Preparation and Cooking Time

    • Preparation time: 15 minutes
    • Cooking time: 15 minutes

    Nutritional Information (per serving, based on 4 servings)

    • Calories: 380
    • Carbohydrates: 45g
    • Protein: 30g
    • Fat: 12g
    • Fiber: 2g
    • Sugars: 6g

    Enjoy your flavorful Thai Chicken Fried Rice, packed with savory goodness! This dish is sure to become a staple in your home cooking repertoire.

    How to Serve Thai Chicken Fried Rice

    Thai Chicken Fried Rice is a versatile dish that can be enjoyed in various ways. Here are some creative serving ideas:

    Serve with Fresh Salad

    Accompany your fried rice with a light, refreshing salad, such as a Thai cucumber salad. The crunch and acidity of the salad balance the richness of the fried rice.

    Pair with Spring Rolls

    Serve crispy vegetable or shrimp spring rolls on the side. Their texture and flavors complement the savory notes of the Thai Chicken Fried Rice perfectly.

    Add a Spicy Sauce

    Offer a side of sriracha or chili sauce for those who enjoy a kick. The heat enhances the overall flavor profile, bringing an exciting contrast to the dish.

    Pro Tips for the Best Thai Chicken Fried Rice

    To elevate your Thai Chicken Fried Rice, consider these helpful tips:

    • Use Day-Old Rice: Day-old jasmine rice has less moisture, preventing your fried rice from becoming mushy.

    • High Heat Cooking: Use high heat for quick cooking, allowing the ingredients to fry rather than steam, which enhances flavor and texture.

    • Don’t Overcrowd the Wok: Cook in batches if necessary. Overcrowding can lead to uneven cooking and soggy rice.

    • Customize Ingredients: Feel free to add vegetables like peas or carrots, or substitute chicken with shrimp or tofu for variety.

    • Adjust Seasoning: Taste and adjust the soy sauce, fish sauce, and sugar to suit your preference for a perfectly balanced flavor.

    Best Side Dishes and Pairings

    Pairing your Thai Chicken Fried Rice with complementary dishes can enhance your meal. Here are some excellent options:

    1. Tom Yum Soup: This spicy and sour soup adds a zesty contrast to the savory flavors of fried rice.

    2. Mango Salad: A sweet and tangy mango salad brings freshness and brightness, balancing the richness of the fried rice.

    3. Thai Iced Tea: The creamy, sweet notes of Thai iced tea provide a delightful contrast to the savory dish.

    4. Crispy Pork Belly: The crunch and richness of crispy pork belly create a satisfying texture contrast alongside the fried rice.

    5. Satay Skewers: Grilled chicken or beef satay, served with peanut sauce, offers a delicious protein pairing that complements the meal.

    Common Mistakes to Avoid

    • Using Fresh Rice: Freshly cooked rice tends to be sticky and clumps together. Day-old rice works best for a fluffy texture.
    • Overcooking Chicken: Ensure the chicken is cooked just until browned to maintain juiciness; overcooking can lead to dry meat.
    • Skipping the Sauces: The combination of fish sauce and oyster sauce is crucial for authentic flavor; don’t omit them.
    • Neglecting Garnishes: Fresh cilantro and lime wedges elevate the dish significantly; always include them for the best presentation and taste.

    Storage & Reheating Instructions

    Refrigerator Storage

    Store your Thai Chicken Fried Rice in airtight containers. It will stay fresh for up to 3 days in the refrigerator.

    Freezing Instructions

    For freezing, let the fried rice cool completely. Transfer it to freezer-safe bags or containers, where it can be stored for up to 3 months. To thaw, place it in the refrigerator overnight.

    Reheating Tips

    • Oven: Preheat to 350°F (175°C). Spread the rice in a baking dish, cover with foil, and heat for 15-20 minutes.
    • Microwave: Place in a microwave-safe dish, cover, and heat on high for 2-3 minutes, stirring halfway through.
    • Stovetop: Heat a little oil in a pan over medium heat, add the rice, and stir until warmed through, about 5-7 minutes.

    Frequently Asked Questions

    What is the best rice for Thai Chicken Fried Rice?

    The best rice to use is jasmine rice, preferably day-old, as it helps achieve the right texture and flavor.

    Can I add vegetables to Thai Chicken Fried Rice?

    Absolutely! Feel free to customize with vegetables like peas, carrots, or broccoli for added nutrition and flavor.

    How can I make Thai Chicken Fried Rice spicier?

    To add heat, incorporate sliced fresh chilies, chili paste, or a dash of sriracha during cooking.

    Is Thai Chicken Fried Rice suitable for meal prep?

    Yes, this dish is great for meal prep. It can be stored in the refrigerator or frozen for future meals.

    What can I serve with Thai Chicken Fried Rice?

    Consider serving it with a side of Thai salad, spring rolls, or a light soup to complement the meal.

    Final Thoughts

    Thai Chicken Fried Rice is a delightful and flavorful dish that’s perfect for any occasion. We encourage you to try this recipe at home and share your experience in the comments. Your feedback is invaluable!


    Dinner


    Title: Delicious Thai Chicken Fried Rice Recipe
    Meta: Discover the flavorful Thai Chicken Fried Rice recipe. Try it today and enjoy a delicious meal that’s easy to prepare!
    Synonyms: Thai fried rice, chicken fried rice, jasmine rice stir-fry, Thai style fried rice, wok-fried chicken rice, savory chicken rice, Asian fried rice, quick fried rice, rice stir-fry, Thai chicken stir-fry, fried rice with chicken, Thai rice dish, chicken jasmine rice, homemade fried rice, Thai cuisine fried rice, spicy chicken fried rice, easy fried rice recipe, chicken and rice stir-fry, flavorful fried rice, Thai chicken meal.

    Thai Chicken Fried Rice


    5.0 from 24 reviews

    A delicious and savory Thai Chicken Fried Rice made with tender chicken, colorful vegetables, and flavorful sauces. This dish is perfect for a quick weeknight dinner and is best served hot with fresh garnishes.

    Author: Munch Twist
    Prep Time: 15 minutes
    Cook Time: 15 minutes
    Total Time: 30 minutes
    Yield: 4 servings
    Category: Lunch
    Method: No bake
    Cuisine: American

    Thai Chicken Fried Rice

    SCALE:
    1x
    2x
    3x
    Cook Mode: Prevent your screen from going dark

    Ingredients

    • 2 cups cooked jasmine rice
    • 1 tablespoon fish sauce
    • 1 tablespoon oyster sauce
    • 2 garlic cloves, minced
    • 1 lb chicken breast, thinly sliced
    • 2 eggs, lightly beaten
    • 3 tablespoons soy sauce
    • 2 green onions, chopped
    • 1 small onion, diced
    • 1 red bell pepper, sliced
    • 1 teaspoon sugar
    • 2 tablespoons vegetable oil
    • Fresh cilantro and lime wedges for garnish

    Instructions

    1. Heat 1 tablespoon of vegetable oil in a wok over medium-high heat. Add the sliced chicken and cook until browned. Remove and set aside.
    2. In the same wok, add the remaining oil. Sauté the diced onion and minced garlic until fragrant.
    3. Add the sliced red bell pepper and cook until softened.
    4. Push the vegetables to one side of the wok. Pour the beaten eggs into the empty side and scramble until fully cooked.
    5. Add the cooked jasmine rice to the wok. Stir in the soy sauce, fish sauce, oyster sauce, and sugar. Mix well to combine.
    6. Return the cooked chicken to the wok and stir until everything is heated through and evenly mixed.
    7. Garnish with chopped green onions, fresh cilantro, and lime wedges. Serve hot.

    Nutrition Facts

    Serving Size: 1 serving
    Calories: 380 kcal
    Sugar: 6g
    Sodium: 800mg
    Fat: 12g
    Saturated Fat: 2g
    Carbohydrates: 45g
    Fiber: 2g
    Protein: 30g
    Cholesterol: 180mg

  • Quick One Pot Chili Mac and Cheese Recipe

    Quick One Pot Chili Mac and Cheese Recipe

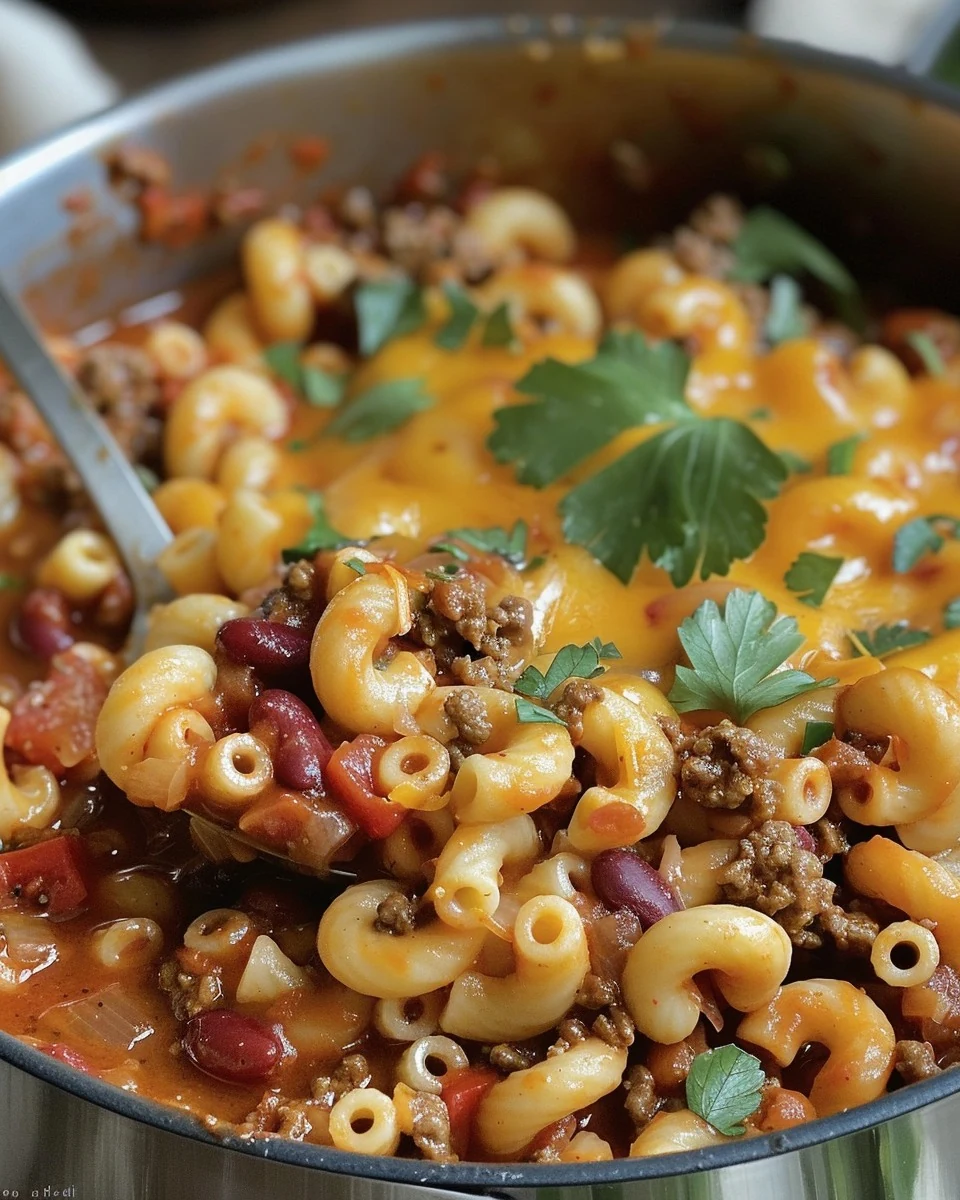
    One Pot Chili Mac and Cheese is a delightful fusion of comfort food that brings together the rich flavors of chili and the creamy goodness of macaroni and cheese. This dish is not only hearty but also incredibly satisfying, making it a perfect choice for busy weeknight dinners.

    Why You’ll Love This Recipe

    • Quick & Easy: Ready in under 30 minutes, this recipe is perfect for those hectic evenings when time is of the essence.
    • Flavor-Packed: The combination of chili spices and melted cheddar creates a rich and savory taste that everyone will love.
    • One Pot Wonder: Minimal cleanup is required since everything is cooked in one pot, making it convenient and hassle-free.
    • Customizable: You can easily tweak the spices or add your favorite vegetables to suit your taste preferences.
    • Crowd-Pleaser: This dish is sure to impress family and friends, making it ideal for gatherings or potlucks.

    Tools and Equipment

    Having the right tools makes cooking more efficient and enjoyable.

    Essential Tools

    • Large pot
    • Wooden spoon or spatula
    • Measuring cups and spoons
    • Knife and cutting board

    Why These Tools Matter

    • Large pot: Provides ample space for cooking all ingredients together, preventing overflow.
    • Wooden spoon or spatula: Ideal for stirring without scratching your pot, ensuring even cooking.
    • Knife and cutting board: Essential for preparing ingredients quickly and safely.

    Ingredients for One Pot Chili Mac and Cheese

    Main Ingredients

    • 2 cups shredded cheddar cheese
    • 1 pound ground beef
    • 1 cup beef broth
    • 1 tablespoon olive oil
    • 1 ½ tablespoons chili powder
    • 1 teaspoon cumin powder
    • 1 can (14 oz) diced tomatoes
    • 2 cups elbow macaroni, uncooked
    • 1 onion, diced
    • 3 garlic cloves, minced
    • 1 can (14 oz) red kidney beans, drained
    • ½ teaspoon paprika
    • 1 cup milk
    • 2 tablespoons tomato paste
    • ½ teaspoon cayenne pepper (optional)
    • Salt and pepper to taste
    • Fresh parsley, chopped (for garnish)

    How to Make One Pot Chili Mac and Cheese Step-by-Step

    Step 1: Cook Aromatics

    Heat olive oil in a large pot over medium-high heat. Add diced onion and minced garlic. Sauté until softened and fragrant, about 3-5 minutes.

    Step 2: Brown the Beef

    Add ground beef to the pot. Cook until browned, breaking it up with a spoon. This should take about 5-7 minutes.

    Step 3: Add Spices

    Stir in tomato paste, chili powder, cumin, paprika, and optional cayenne pepper. Cook for 1 minute to enhance the flavors.

    Step 4: Combine Ingredients

    Mix in diced tomatoes, red kidney beans, beef broth, and milk. Stir to combine all ingredients well.

    Step 5: Cook Pasta

    Add uncooked elbow macaroni. Bring the mixture to a simmer. Cover and cook for 12-15 minutes, or until the macaroni is tender, stirring occasionally.

    Step 6: Add Cheese

    Stir in shredded cheddar cheese until melted and fully incorporated. Season with salt and pepper to taste.

    Step 7: Garnish and Serve

    Garnish with fresh chopped parsley before serving.

    Preparation time: 10 minutes
    Cooking time: 20 minutes

    Enjoy this comforting, cheesy, and hearty meal that’s perfect for a quick weeknight dinner!

    How to Serve One Pot Chili Mac and Cheese

    One Pot Chili Mac and Cheese can be enjoyed in various creative ways to enhance your dining experience.

    Add a Crunchy Topping

    Top your chili mac and cheese with crushed tortilla chips or breadcrumbs mixed with melted butter for an added texture and flavor contrast.

    Serve with a Side Salad

    Pair your dish with a fresh garden salad dressed in a light vinaigrette to balance the richness of the chili mac and cheese.

    Create a Chili Mac Bake

    Transfer the finished dish to a baking dish, sprinkle with additional cheese, and broil until golden brown for a deliciously crispy topping.

    Pro Tips for the Best One Pot Chili Mac and Cheese

    For optimal results, consider these helpful tips.

    • Use Quality Ingredients: The flavor of your chili mac significantly improves with high-quality beef and cheese.
    • Adjust the Spice Level: Feel free to modify the amount of cayenne pepper or chili powder based on your heat preference.
    • Stir Frequently: To prevent sticking, stir the mixture occasionally while the pasta cooks.
    • Make It Vegetarian: Substitute ground beef with lentils or plant-based meat for a vegetarian-friendly option.
    • Store Leftovers Properly: Keep any leftovers in an airtight container in the refrigerator for up to three days for best freshness.

    Best Side Dishes and Pairings

    Complement your One Pot Chili Mac and Cheese with these delightful sides.

    1. Garlic Bread: The buttery, garlicky goodness of garlic bread perfectly complements the cheesy flavors of the dish.
    2. Cornbread: This slightly sweet bread enhances the savory elements of the chili mac and adds a comforting touch.
    3. Coleslaw: A crisp and tangy coleslaw provides a refreshing contrast to the rich and hearty chili mac.
    4. Grilled Vegetables: Seasonal grilled vegetables add a smoky flavor and nutritional balance to your meal.
    5. Iced Tea: A cold glass of iced tea refreshes the palate and complements the hearty nature of the dish.

    Common Mistakes to Avoid

    • Not Browning the Beef Properly: Ensure the beef is fully browned for better flavor.
    • Skipping the Seasoning: Don’t underestimate the importance of spices; they enhance the dish significantly.
    • Overcooking the Pasta: Keep an eye on the macaroni to avoid mushiness; it should be al dente.
    • Using Low-Quality Cheese: Opt for good-quality cheddar for the best melting and flavor results.

    Storage & Reheating Instructions

    Refrigerator Storage

    Store leftover One Pot Chili Mac and Cheese in airtight containers. It will stay fresh for up to 3 days in the refrigerator.

    Freezing Instructions

    For freezing, allow the dish to cool completely, then transfer it to freezer-safe containers. It can be frozen for up to 3 months. Thaw in the refrigerator overnight before reheating.

    Reheating Tips

    • Oven: Preheat to 350°F (175°C) and bake covered for 15-20 minutes until heated through.
    • Microwave: Heat in short intervals, stirring in between, until warmed evenly.
    • Stovetop: Reheat in a pot over medium heat, adding a splash of milk to restore creaminess.

    Frequently Asked Questions

    How can I make One Pot Chili Mac and Cheese vegetarian?

    You can substitute ground beef with plant-based meat or omit it entirely. Add more beans or vegetables for added texture.

    Can I use a different type of cheese in One Pot Chili Mac and Cheese?

    Absolutely! Feel free to experiment with cheeses like Monterey Jack or Pepper Jack for a different flavor profile.

    How long does One Pot Chili Mac and Cheese take to make?

    This recipe takes about 30 minutes from start to finish, making it perfect for a quick weeknight dinner.

    Can I add more vegetables to this recipe?

    Yes, you can incorporate bell peppers, corn, or zucchini for added nutrition and flavor.

    What should I serve with One Pot Chili Mac and Cheese?

    This dish pairs well with a simple green salad or garlic bread for a complete meal.

    Final Thoughts

    This One Pot Chili Mac and Cheese is not only comforting but also incredibly easy to prepare. I encourage you to try this recipe and share your feedback in the comments. Let us know how your version turns out!


    Dinner

    One Pot Chili Mac and Cheese


    5.0 from 24 reviews

    This One Pot Chili Mac and Cheese is a comforting and hearty dish that combines the flavors of chili with creamy macaroni and cheese. It's perfect for a quick weeknight dinner, packed with protein and cheesy goodness, all made in one pot for easy cleanup.

    Author: Munch Twist
    Prep Time: 10 minutes
    Cook Time: 20 minutes
    Total Time: 30 minutes
    Yield: 6 servings
    Category: Lunch
    Method: No bake
    Cuisine: American

    One Pot Chili Mac and Cheese

    SCALE:
    1x
    2x
    3x
    Cook Mode: Prevent your screen from going dark

    Ingredients

    • 2 cups shredded cheddar cheese
    • 1 pound ground beef
    • 1 cup beef broth
    • 1 tablespoon olive oil
    • 1 ½ tablespoons chili powder
    • 1 teaspoon cumin powder
    • 1 can (14 oz) diced tomatoes
    • 2 cups elbow macaroni, uncooked
    • 1 onion, diced
    • 3 garlic cloves, minced
    • 1 can (14 oz) red kidney beans, drained
    • ½ teaspoon paprika
    • 1 cup milk
    • 2 tablespoons tomato paste
    • ½ teaspoon cayenne pepper (optional)
    • Salt and pepper to taste
    • Fresh parsley, chopped (for garnish)

    Instructions

    1. Heat olive oil in a large pot over medium-high heat. Add diced onion and minced garlic. Sauté until softened and fragrant.
    2. Add ground beef to the pot. Cook until browned, breaking it up with a spoon.
    3. Stir in tomato paste, chili powder, cumin, paprika, and optional cayenne pepper. Cook for 1 minute to enhance the flavors.
    4. Mix in diced tomatoes, red kidney beans, beef broth, and milk. Stir to combine.
    5. Add uncooked elbow macaroni. Bring the mixture to a simmer. Cover and cook for 12-15 minutes, or until the macaroni is tender, stirring occasionally.
    6. Stir in shredded cheddar cheese until melted and fully incorporated. Season with salt and pepper to taste.
    7. Garnish with fresh chopped parsley before serving.

    Nutrition Facts

    Serving Size: 1 serving
    Calories: 480 kcal
    Sugar: 7g
    Sodium: 800mg
    Fat: 22g
    Saturated Fat: 10g
    Carbohydrates: 45g
    Fiber: 4g
    Protein: 30g
    Cholesterol: 80mg

  • Delicious WOULD ANYONE EAT THIS FRIED CABBAGE WITH BACON ONION AND GARLIC Recipe

    Delicious WOULD ANYONE EAT THIS FRIED CABBAGE WITH BACON ONION AND GARLIC Recipe

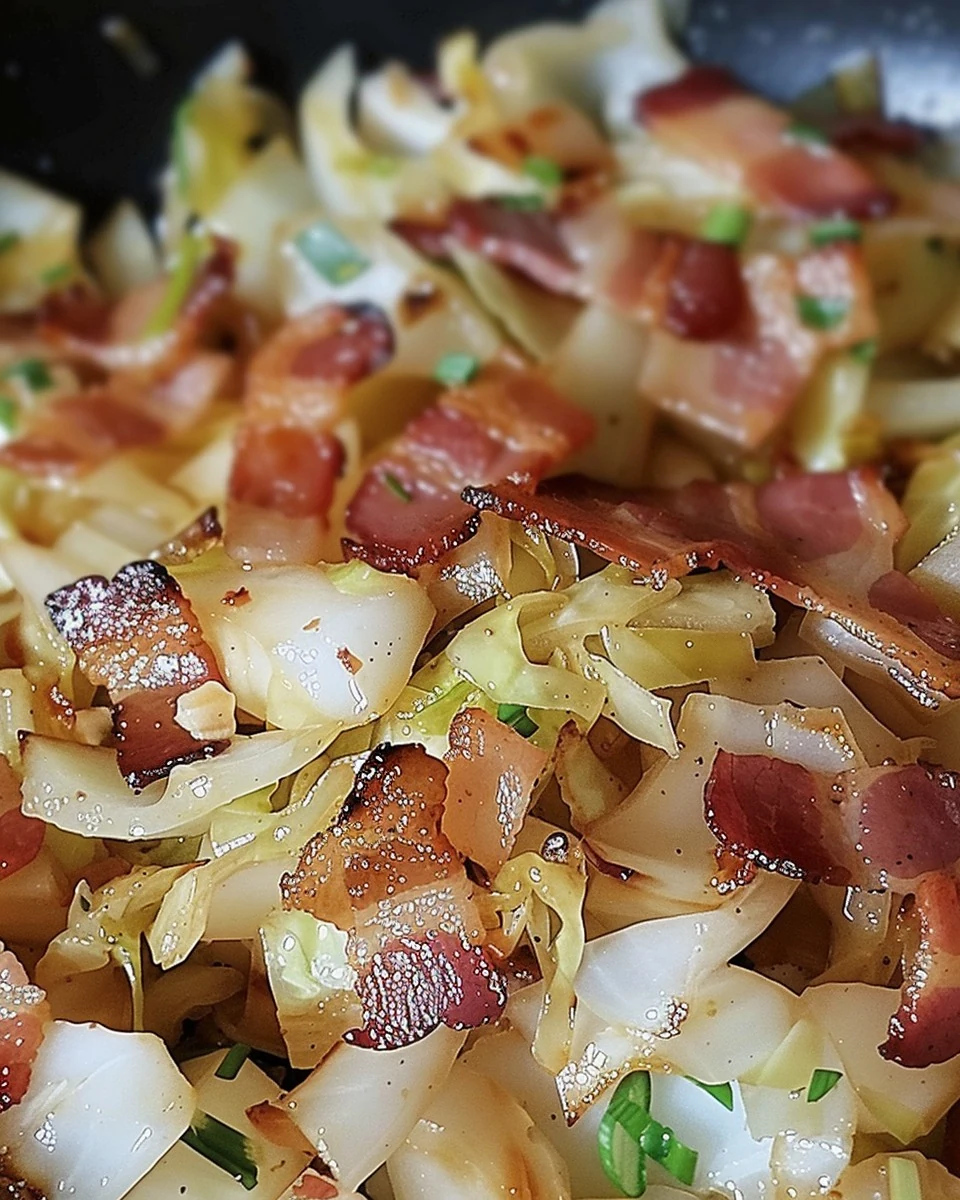
    Would anyone eat this fried cabbage with bacon, onion, and garlic? The answer is a resounding yes. This dish combines the savory flavors of crispy bacon, the sweetness of sautéed onions, and the aromatic goodness of garlic, all enveloped in tender cabbage. It’s a comforting side dish that is sure to please everyone at the table.

    Why You’ll Love This Recipe

    • Delicious Flavor: The combination of bacon, garlic, and onion elevates the taste of simple cabbage.
    • Healthy Option: Cabbage is low in calories and packed with nutrients, making this a guilt-free choice.
    • Versatile Side Dish: Pair it with meats or serve it as a vegetarian option; it fits well with any meal.
    • Simple Ingredients: You likely have most of these ingredients in your pantry already.
    • Quick & Easy: Ready in under 30 minutes, this recipe is perfect for busy weeknights.

    Tools and Equipment

    Before you start cooking, gather your kitchen tools. Having everything ready makes the process smoother.

    Essential Tools

    • Deep-sided pot or skillet
    • Cutting board
    • Sharp knife
    • Measuring spoons
    • Spatula

    Why These Tools Matter

    • Deep-sided pot or skillet: Allows for easy stirring and prevents spills as the cabbage cooks down.
    • Sharp knife: Makes chopping the cabbage and onion quick and easy, saving you time.
    • Spatula: Ideal for mixing ingredients and ensuring even cooking without damaging the cabbage.

    Ingredients for WOULD ANYONE EAT THIS FRIED CABBAGE WITH BACON ONION AND GARLIC

    Main Ingredients

    • 1 onion, chopped
    • ½ tsp garlic powder
    • 1 head of cabbage, chopped
    • Reserved bacon grease
    • Salt and pepper to taste
    • ½ tsp onion powder
    • 2 tsp minced garlic
    • 5 strips of bacon, cooked and crumbled

    How to Make WOULD ANYONE EAT THIS FRIED CABBAGE WITH BACON ONION AND GARLIC Step-by-Step

    Step 1: Cook the Bacon

    Start by cooking the bacon in a skillet over medium heat until it becomes crispy. Once cooked, remove it from the skillet and let it cool. Be sure to reserve the bacon grease in the skillet for added flavor.

    Step 2: Cook the Onion

    In the same skillet with the reserved bacon grease, add the chopped onion. Cook over medium heat until the onion is softened and translucent, about 5 minutes.

    Step 3: Add Garlic

    Once the onion is cooked, add the minced garlic to the skillet. Sauté for about 30 seconds, stirring frequently, until the garlic becomes fragrant.

    Step 4: Add Cabbage

    Reduce the heat to medium-low and add the chopped cabbage to the onion and garlic mixture. Stir well to combine. Cover the skillet and let the cabbage simmer until it softens, around 10-15 minutes.

    Step 5: Season

    After the cabbage has softened, stir in the garlic powder, onion powder, salt, and pepper. Cook for an additional 2-3 minutes, allowing the flavors to meld.

    Step 6: Combine with Bacon

    Finally, add the crumbled bacon to the skillet. Stir everything together until well combined. Serve hot as a delicious side dish.

    This fried cabbage with bacon, onion, and garlic is a flavorful addition to any meal. Enjoy this savory, comforting dish that brings together simple ingredients for an amazing taste experience.

    How to Serve WOULD ANYONE EAT THIS FRIED CABBAGE WITH BACON ONION AND GARLIC

    This Fried Cabbage with Bacon, Onion, and Garlic is versatile and can be enjoyed in various ways.

    As a Side Dish

    Serve this dish alongside grilled meats or fish to complement their flavors. The savory notes of cabbage and bacon make it an excellent pairing with hearty proteins.

    In Tacos

    Use the fried cabbage mixture as a filling for tacos. Top with fresh cilantro and a squeeze of lime for a unique twist on traditional tacos.

    Over Rice

    Serve the fried cabbage over a bed of fluffy rice. The rice absorbs the flavors, making for a filling and satisfying meal.

    Pro Tips for the Best WOULD ANYONE EAT THIS FRIED CABBAGE WITH BACON ONION AND GARLIC

    To elevate your dish, consider these helpful tips.

    • Fresh Ingredients: Always use fresh cabbage and quality bacon for the best flavor and texture.
    • Control the Heat: Keep the heat at medium-low when cooking the cabbage to prevent it from burning while allowing it to soften nicely.
    • Customize Seasonings: Feel free to experiment with different spices like paprika or red pepper flakes for added depth or heat.
    • Add More Veggies: Incorporate other vegetables like bell peppers or carrots for added color and nutrition.
    • Leftover Storage: Store leftovers in an airtight container in the refrigerator for up to three days; reheat gently to maintain texture.

    Best Side Dishes and Pairings

    This dish pairs well with several accompaniments that enhance its flavors.

    1. Grilled Chicken: The smoky flavor of grilled chicken complements the savory cabbage beautifully.
    2. Mashed Potatoes: Creamy mashed potatoes provide a comforting contrast to the crispy bacon and tender cabbage.
    3. Cornbread: Sweet cornbread balances the savory elements of the dish, making for a delightful combination.
    4. Coleslaw: A fresh coleslaw brings a crunchy texture and a refreshing contrast to the warmth of the fried cabbage.
    5. Apple Cider: A glass of apple cider adds a fruity sweetness that pairs well with the savory notes of the dish.

    Common Mistakes to Avoid

    • Overcooking the Cabbage: Ensure you simmer the cabbage just until it’s soft and tender, but not mushy.
    • Ignoring Seasoning: Don’t skip the salt and pepper; they enhance the flavors significantly.
    • Using Cold Bacon Grease: Make sure the bacon grease is warm when adding the onions for better caramelization.
    • Not Stirring Enough: Stir frequently to prevent the cabbage from sticking and to ensure even cooking.

    Storage & Reheating Instructions

    Refrigerator Storage

    Store leftovers in airtight containers in the refrigerator. The dish stays fresh for up to 3 days.

    Freezing Instructions

    For best results, freeze the fried cabbage in an airtight container or freezer bag. It can be frozen for up to 3 months. Thaw in the refrigerator overnight before reheating.

    Reheating Tips

    • Oven: Preheat to 350°F (175°C) and heat in an oven-safe dish for about 15-20 minutes.
    • Microwave: Heat in a microwave-safe bowl on high for 1-2 minutes, stirring halfway through.
    • Stovetop: Reheat in a skillet over medium heat, stirring occasionally until warmed through.

    Frequently Asked Questions

    Can I substitute the bacon in this recipe?

    Yes, you can use turkey bacon or a vegetarian alternative, but the flavor will differ.

    Would anyone eat this fried cabbage with bacon onion and garlic cold?

    While it’s best served hot, some enjoy it cold as a salad or side dish.

    How can I make this recipe healthier?

    Consider using less bacon or opting for a leaner protein source, and add more vegetables like bell peppers or carrots.

    Can I add other vegetables to the fried cabbage?

    Absolutely! Carrots, bell peppers, or even mushrooms work well with this dish.

    Final Thoughts

    This Fried Cabbage with Bacon, Onion, and Garlic is a savory, satisfying dish that’s easy to prepare. We encourage you to try making it and share your thoughts in the comments below. Your feedback is invaluable to us!


    Dinner


    Title: Would Anyone Eat This Fried Cabbage with Bacon, Onion, and Garlic?
    Meta: Discover if anyone would eat this fried cabbage with bacon, onion, and garlic. Try the recipe today and share your thoughts!
    Synonyms: fried cabbage with bacon, sautéed cabbage with bacon, garlic cabbage dish, onion and garlic cabbage, bacon cabbage recipe, savory fried cabbage, easy cabbage side dish, cabbage with bacon flavor, flavorful cabbage recipe, bacon onion garlic sauté, comforting cabbage dish, quick fried cabbage, cabbage and bacon stir-fry, delicious cabbage recipe, garlic-infused cabbage, healthy fried cabbage, southern-style cabbage, fried cabbage side, simple cabbage recipe, crumbled bacon cabbage.

    WOULD ANYONE EAT THIS FRIED CABBAGE WITH BACON ONION AND GARLIC


    5.0 from 24 reviews

    This savory dish combines the rich flavors of crispy bacon, tender cabbage, and aromatic garlic and onion. It's a comforting side that pairs well with any meal, offering a delightful blend of textures and tastes.

    Author: Munch Twist
    Prep Time: 10 minutes
    Cook Time: 20 minutes
    Total Time: 30 minutes
    Yield: 4 servings
    Category: Lunch
    Method: No bake
    Cuisine: American

    WOULD ANYONE EAT THIS FRIED CABBAGE WITH BACON ONION AND GARLIC

    SCALE:
    1x
    2x
    3x
    Cook Mode: Prevent your screen from going dark

    Ingredients

    • 1 onion, chopped
    • ½ tsp garlic powder
    • 1 head of cabbage, chopped
    • Reserved bacon grease
    • Salt and pepper to taste
    • ½ tsp onion powder
    • 2 tsp minced garlic
    • 5 strips of bacon, cooked and crumbled

    Instructions

    1. Cook the bacon until crispy and set aside to cool. Reserve the bacon grease.
    2. Place the reserved bacon grease in a deep-sided pot or skillet. Cook the chopped onion over medium heat until softened.
    3. Add the minced garlic to the pot and sauté for another 30 seconds until fragrant.
    4. Reduce the heat to medium-low. Add the chopped cabbage to the pot, stirring to combine. Cover and simmer until the cabbage has softened.
    5. Stir in the garlic powder, onion powder, salt, and pepper to taste. Sauté for another 2-3 minutes.
    6. Add the crumbled bacon to the top of the cabbage mixture and stir to combine. Serve hot.

    Nutrition Facts

    Serving Size: 1 serving
    Calories: 150 kcal
    Sugar: 2g
    Sodium: 400mg
    Fat: 12g
    Saturated Fat: 4g
    Carbohydrates: 8g
    Fiber: 3g
    Protein: 4g
    Cholesterol: 20mg

  • Refreshing Asian Vermicelli Noodle Salad Recipe

    Refreshing Asian Vermicelli Noodle Salad Recipe

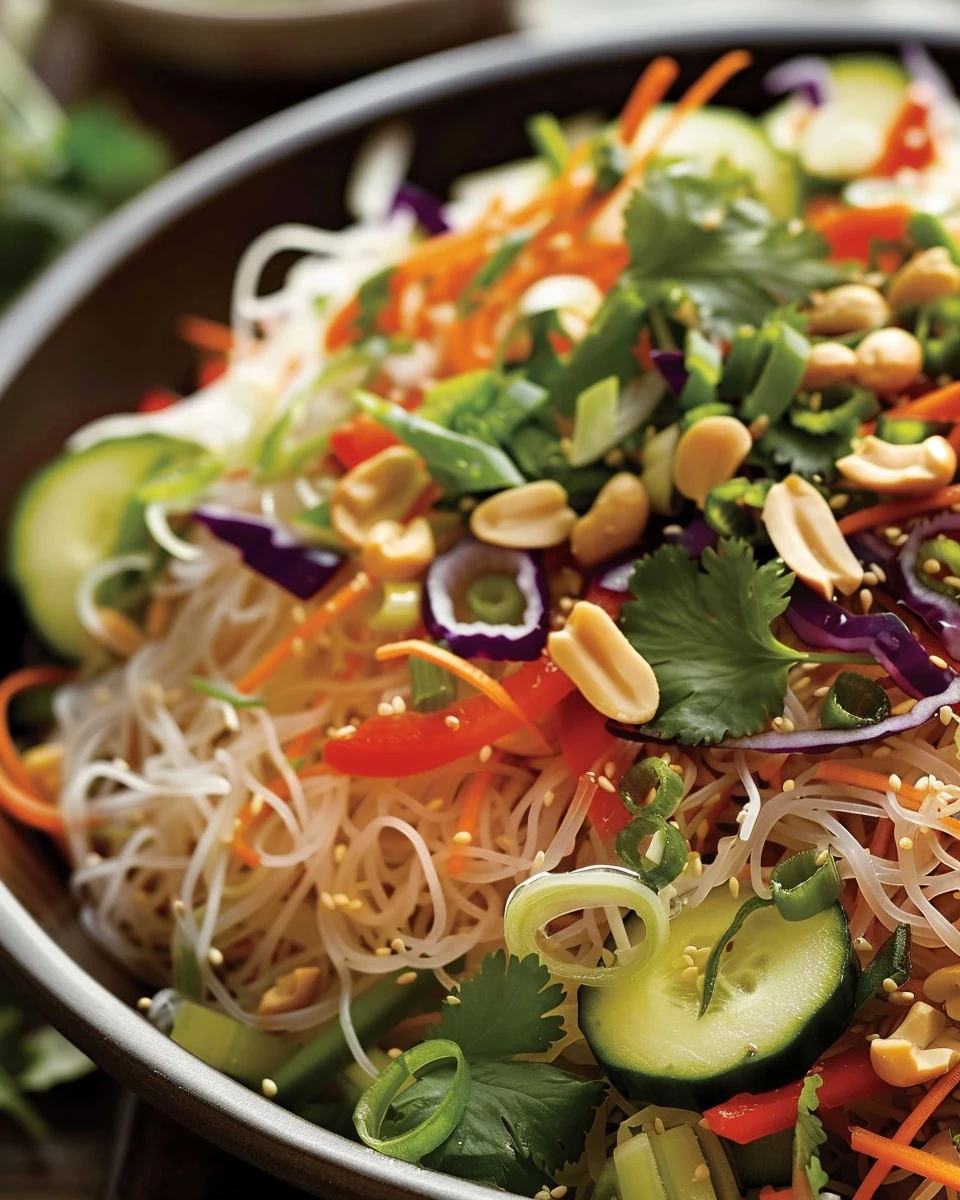
    Asian Vermicelli Noodle Salad is a delightful dish that perfectly balances fresh vegetables and tender noodles. This vibrant salad is bursting with flavors and textures, making it an ideal choice for a light meal or a side dish.

    Why You’ll Love This Recipe

    • Refreshing Flavors: The combination of fresh vegetables and zesty dressing offers a delightful taste experience.
    • Nutritious Ingredients: Packed with vitamins and minerals, this salad is a healthy option for any meal.
    • Versatile Dish: Enjoy it as a main course or as a side to complement your favorite Asian-inspired dishes.
    • Quick & Easy: Ready in just 20 minutes, this recipe is perfect for busy weeknights.
    • Customizable: Feel free to add protein like chicken or tofu for a heartier option.

    Tools and Equipment

    Before you start, gather your kitchen tools for a smooth cooking experience.

    Essential Tools

    • Large mixing bowl
    • Whisk
    • Cutting board
    • Sharp knife
    • Measuring cups and spoons
    • Pot for soaking noodles

    Why These Tools Matter

    • Large mixing bowl: Provides ample space for tossing the salad without spilling.
    • Whisk: Ensures the dressing is well combined for optimal flavor distribution.
    • Sharp knife: Makes it easy to julienne vegetables, ensuring uniform pieces for even cooking and presentation.

    Ingredients for Asian Vermicelli Noodle Salad

    Vegetables

    • 1 cup bean sprouts
    • 2 cups shredded cabbage
    • 1 red bell pepper, julienned
    • 2 green onions, sliced
    • 1 carrot, julienned
    • 1 cucumber, julienned
    • 1/4 cup chopped cilantro

    Noodles

    • 100g dried vermicelli noodles

    Dressing

    • 3 tbsp soy sauce
    • 1 tbsp lime juice
    • 1 tbsp honey
    • 1 clove garlic, minced
    • 1 tsp grated ginger
    • 1 tsp chili flakes
    • 2 tbsp rice vinegar
    • 1 tbsp sesame oil

    How to Make Asian Vermicelli Noodle Salad Step-by-Step

    Step 1: Prepare the Noodles

    Soak 100g of dried vermicelli noodles in hot water until they are tender. This usually takes about 5 minutes. Once soft, drain and rinse the noodles with cold water to stop the cooking process and prevent sticking.

    Step 2: Make the Dressing

    In a bowl, combine 3 tbsp soy sauce, 2 tbsp rice vinegar, 1 tbsp sesame oil, 1 tbsp lime juice, 1 tbsp honey, 1 clove minced garlic, 1 tsp grated ginger, and 1 tsp chili flakes. Whisk these ingredients together until they are well blended and set aside.

    Step 3: Combine Ingredients

    In a large mixing bowl, toss together the prepared noodles, 2 cups shredded cabbage, 1 carrot (julienned), 1 cucumber (julienned), 1 red bell pepper (julienned), 1 cup bean sprouts, and 2 green onions (sliced). Ensure all ingredients are mixed thoroughly.

    Step 4: Add the Dressing

    Pour the dressing over the noodle and vegetable mixture. Toss everything well to ensure that all ingredients are evenly coated with the flavorful dressing.

    Step 5: Serve

    Top the salad with 1/4 cup chopped cilantro and 1/4 cup crushed peanuts. You can serve it immediately or chill it in the refrigerator for a refreshing dish.

    Preparation time for this Asian Vermicelli Noodle Salad is about 15 minutes, while the cooking time involves only 5 minutes for soaking the noodles.

    Enjoy this refreshing and vibrant Asian Vermicelli Noodle Salad as a light meal or a colorful side dish!

    How to Serve Asian Vermicelli Noodle Salad

    This vibrant and refreshing salad can be served in various creative ways.

    As a Standalone Meal

    Serve the Asian Vermicelli Noodle Salad as a light, standalone meal. Its combination of fresh vegetables and protein provides a satisfying option for lunch or dinner.

    In Lettuce Wraps

    Spoon the salad mixture into large lettuce leaves for a fun and interactive dining experience. This adds a crunchy texture and makes for a delightful appetizer or snack.

    As a Side Dish

    Pair the Asian Vermicelli Noodle Salad with grilled meats or seafood. The salad’s refreshing flavors complement the richness of grilled dishes perfectly.

    Pro Tips for the Best Asian Vermicelli Noodle Salad

    For an exceptional Asian Vermicelli Noodle Salad experience, consider these practical tips.

    • Use Fresh Ingredients: Fresh vegetables enhance the taste and texture of the salad, making it more vibrant and appealing.

    • Adjust the Dressing: Feel free to modify the dressing ingredients according to your taste preferences, such as adding more lime juice for extra acidity or honey for sweetness.

    • Chill Before Serving: Allowing the salad to chill in the refrigerator for 30 minutes before serving can help the flavors meld together beautifully.

    • Add Protein: For a more filling dish, consider adding cooked shrimp, chicken, or tofu to the salad.

    • Garnish Creatively: Experiment with different garnishes such as sesame seeds or sliced radishes for added flavor and visual appeal.

    Best Side Dishes and Pairings

    To enhance your meal, consider these delicious side dishes and drinks that pair wonderfully with Asian Vermicelli Noodle Salad.

    1. Grilled Teriyaki Chicken: The sweet and savory flavors of teriyaki chicken complement the fresh, tangy notes of the salad.

    2. Spring Rolls: These light and crispy rolls make an excellent appetizer that perfectly matches the salad’s refreshing profile.

    3. Miso Soup: A warm bowl of miso soup serves as a comforting side that balances the cold salad.

    4. Edamame: These lightly salted soybeans add a protein-packed, savory element that pairs well with the salad.

    5. Chilled Green Tea: A glass of chilled green tea is a refreshing drink option that enhances the meal without overpowering the flavors.

    Common Mistakes to Avoid

    • Overcooking the Noodles: Soak the vermicelli noodles just until tender to prevent them from becoming mushy.
    • Skipping the Rinse: Always rinse the noodles with cold water after soaking to stop the cooking process and prevent sticking.
    • Ignoring the Dressing Balance: Adjust the dressing ingredients to suit your taste—too much soy sauce can overpower the salad.
    • Not Chilling Before Serving: For the best flavor, allow the salad to chill in the refrigerator for at least 30 minutes before serving.

    Storage & Reheating Instructions

    Refrigerator Storage

    Store the Asian Vermicelli Noodle Salad in airtight containers. It will stay fresh for up to 3 days in the refrigerator.

    Freezing Instructions

    This salad is best enjoyed fresh, but if you need to freeze it, separate the dressing from the salad and freeze only the noodles and vegetables. Thaw in the refrigerator before mixing with the dressing.

    Reheating Tips

    • Oven: Preheat to 350°F (175°C) and heat for about 10 minutes, covered with foil to retain moisture.
    • Microwave: Heat in 30-second intervals, stirring in between until warmed through.
    • Stovetop: Add a splash of water in a pan over medium heat, stirring until heated through.

    Frequently Asked Questions

    What is Asian Vermicelli Noodle Salad?

    Asian Vermicelli Noodle Salad is a light, refreshing dish made with vermicelli noodles, fresh vegetables, and a flavorful dressing, perfect for a healthy meal or side dish.

    Can I add protein to the Asian Vermicelli Noodle Salad?

    Absolutely! You can enhance the salad by adding grilled chicken, shrimp, or tofu for added protein.

    How long does the Asian Vermicelli Noodle Salad last in the fridge?

    When stored properly in an airtight container, the salad will remain fresh for up to 3 days in the refrigerator.

    Can I make the dressing ahead of time?

    Yes, the dressing can be prepared in advance and stored in the refrigerator for up to a week. Just give it a good shake before using it.

    What vegetables work well in Asian Vermicelli Noodle Salad?

    Feel free to customize the salad with your favorite vegetables, such as bell peppers, carrots, cucumbers, and snap peas for added crunch and flavor.

    Final Thoughts

    This Asian Vermicelli Noodle Salad is not only delicious but also versatile and easy to prepare. We encourage you to try it out and share your thoughts in the comments below. Your feedback helps us improve and inspire more delicious recipes!


    Lunch

    Asian Vermicelli Noodle Salad


    5.0 from 24 reviews

    This refreshing Asian Vermicelli Noodle Salad combines crunchy vegetables and tender noodles, all tossed in a flavorful dressing. It's perfect as a light meal or a vibrant side dish.

    Author: Munch Twist
    Prep Time: 15 minutes
    Cook Time: 5 minutes
    Total Time: 20 minutes
    Yield: 4 servings
    Category: Lunch
    Method: No bake
    Cuisine: American

    Asian Vermicelli Noodle Salad

    SCALE:
    1x
    2x
    3x
    Cook Mode: Prevent your screen from going dark

    Ingredients

    • 1 cup bean sprouts
    • 2 cups shredded cabbage
    • 100g dried vermicelli noodles
    • 1 red bell pepper, julienned
    • 2 green onions, sliced
    • 1 carrot, julienned
    • 1/4 cup chopped cilantro
    • 1 cucumber, julienned
    • 1/4 cup crushed peanuts
    • 3 tbsp soy sauce
    • 1 tbsp lime juice
    • 1 tbsp honey
    • 1 clove garlic, minced
    • 1 tsp grated ginger
    • 1 tsp chili flakes
    • 2 tbsp rice vinegar
    • 1 tbsp sesame oil

    Instructions

    1. Soak 100g of dried vermicelli noodles in hot water until tender. Drain and rinse with cold water.
    2. In a bowl, whisk together soy sauce, rice vinegar, sesame oil, lime juice, honey, minced garlic, grated ginger, and chili flakes until well combined.
    3. In a large mixing bowl, toss together the prepared noodles, shredded cabbage, julienned carrot, julienned cucumber, julienned red bell pepper, bean sprouts, and sliced green onions.
    4. Pour the dressing over the noodle and vegetable mixture. Toss well to ensure everything is evenly coated.
    5. Top the salad with chopped cilantro and crushed peanuts. Serve immediately or chill before serving.

    Nutrition Facts

    Serving Size: 1 serving
    Calories: 210 kcal
    Sugar: 7g
    Sodium: 800mg
    Fat: 9g
    Saturated Fat: 1g
    Carbohydrates: 27g
    Fiber: 3g
    Protein: 6g
    Cholesterol: 0mg

  • Perfect Longhorn Steakhouse Parmesan Crusted Chicken Recipe

    Perfect Longhorn Steakhouse Parmesan Crusted Chicken Recipe

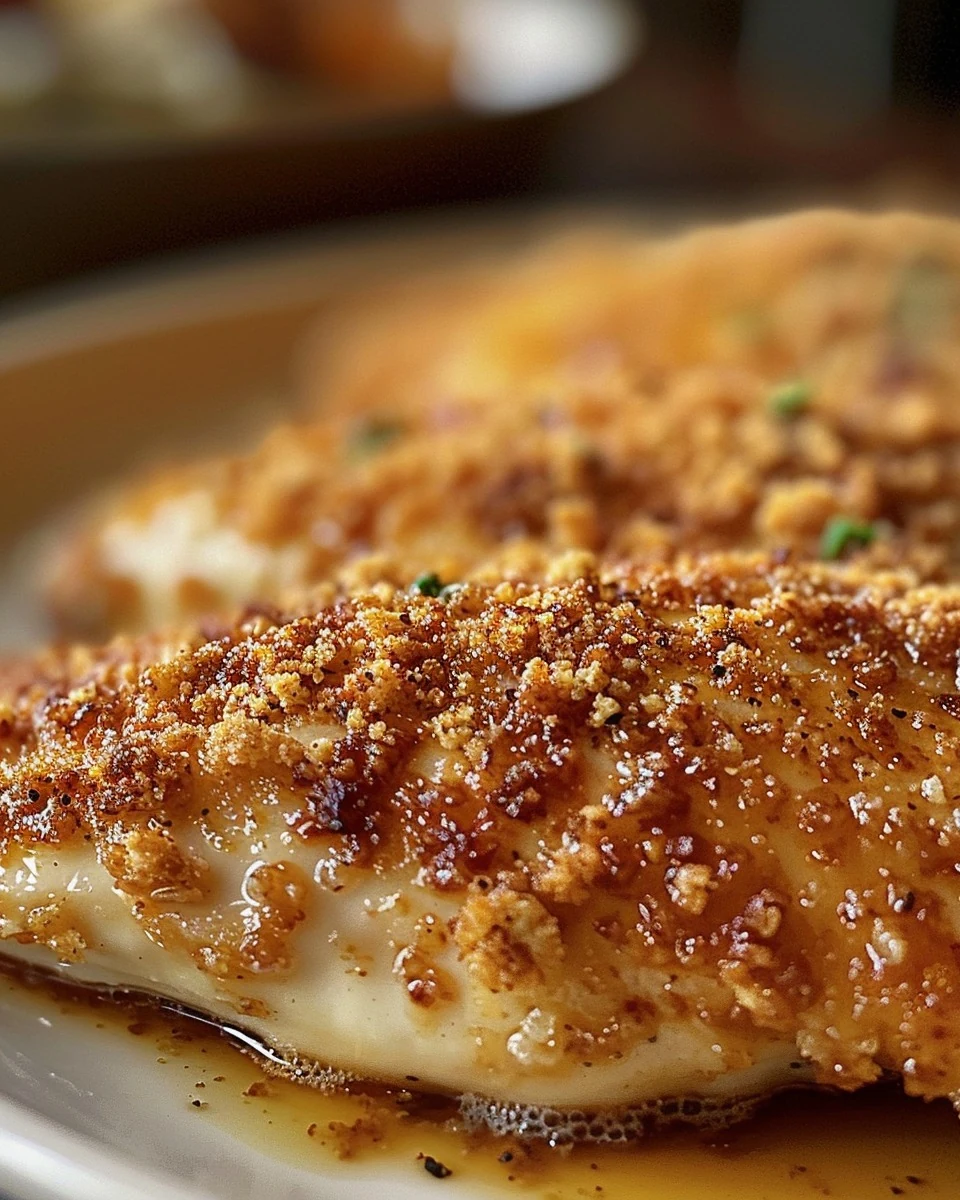
    Longhorn Steakhouse Parmesan Crusted Chicken is a flavorful dish that combines crispy textures with cheesy goodness. This recipe delivers a restaurant-quality meal right at home, making it a perfect choice for family dinners or special occasions.

    Why You’ll Love This Recipe

    • Delicious Flavor: The combination of provolone and Parmesan cheese creates a rich, savory topping.
    • Crispy Texture: The panko breadcrumbs add a satisfying crunch that complements the tender chicken.
    • Quick & Easy: This dish can be prepared in under 30 minutes, allowing for a stress-free cooking experience.
    • Versatile Meal: It pairs well with various sides, making it ideal for any occasion.
    • Kid-Friendly: The cheesy crust appeals to both kids and adults, ensuring everyone enjoys their meal.

    Tools and Equipment

    Having the right tools makes cooking easier and more enjoyable. Here are the essentials you’ll need.

    Essential Tools

    • Skillet
    • Baking sheet
    • Parchment paper or olive oil spray
    • Mixing bowl
    • Measuring cups and spoons
    • Tongs or spatula

    Why These Tools Matter

    • Skillet: Perfect for searing chicken, ensuring a golden-brown exterior.
    • Baking sheet: Provides a stable surface for baking and easy cleanup with parchment paper.
    • Mixing bowl: Allows for thorough mixing of ingredients, ensuring even distribution of flavors.

    Ingredients for Longhorn Steakhouse Parmesan Crusted Chicken

    Cheese Mixture

    • 1/2 cup shredded provolone cheese
    • 1 cup shredded Parmesan cheese
    • 1/2 cup panko breadcrumbs
    • 2 tablespoons unsalted butter, melted
    • 1/4 cup mayonnaise

    Chicken Preparation

    • 4 boneless, skinless chicken breasts
    • 1 tablespoon all-purpose flour
    • 1 teaspoon garlic powder
    • 1 teaspoon onion powder
    • 1/2 teaspoon paprika
    • 1/2 teaspoon dried oregano
    • Salt and pepper, to taste
    • Olive oil, for cooking

    How to Make Longhorn Steakhouse Parmesan Crusted Chicken Step-by-Step

    Step 1: Preheat the Oven

    Preheat your oven to 375°F (190°C). Line a baking sheet with parchment paper or lightly grease it with olive oil to prevent sticking.

    Step 2: Prepare Parmesan Mixture

    In a small bowl, combine the shredded Parmesan cheese, shredded provolone cheese, panko breadcrumbs, melted butter, and mayonnaise. Mix until well combined to create a rich topping.

    Step 3: Season Chicken

    Season the chicken breasts with garlic powder, onion powder, paprika, dried oregano, salt, and pepper. This step ensures the chicken is flavorful throughout.

    Step 4: Sear Chicken

    Heat a skillet over medium-high heat. Add a drizzle of olive oil and sear the chicken breasts for 3-4 minutes on each side until they are golden brown. This adds depth to the flavor and texture. Transfer the seared chicken to the prepared baking sheet.

    Step 5: Top and Bake

    Spread the Parmesan mixture evenly over the chicken breasts. Bake in the preheated oven for 15-20 minutes, or until the chicken is cooked through and the topping is golden and crispy. This step is crucial for achieving that perfect crust.

    Step 6: Serve

    Allow the chicken to cool slightly before serving. This will help the topping set and enhances the overall presentation of the dish.

    Nutritional Information (per serving)

    • Calories: Approximately 450 kcal
    • Carbohydrates: 12g
    • Proteins: 45g
    • Fats: 24g
    • Fiber: 1g

    Preparation time: 15 minutes | Cooking time: 20-25 minutes

    Enjoy your homemade Longhorn Steakhouse Parmesan Crusted Chicken, a dish that brings restaurant flavors right to your kitchen.

    How to Serve Longhorn Steakhouse Parmesan Crusted Chicken

    This dish can be enjoyed in various ways to enhance your dining experience.

    With a Fresh Salad

    Pair the Parmesan Crusted Chicken with a light mixed greens salad dressed in a simple vinaigrette. The freshness of the salad complements the richness of the chicken.

    On a Bed of Risotto

    Serve the chicken atop a creamy risotto for a more indulgent meal. The creamy texture of the risotto will balance the crispy topping beautifully.

    With Garlic Mashed Potatoes

    Accompany the chicken with garlic mashed potatoes for a comforting side. The buttery potatoes will absorb the flavors of the chicken and the Parmesan topping.

    Pro Tips for the Best Longhorn Steakhouse Parmesan Crusted Chicken

    To ensure your chicken turns out perfectly every time, consider these expert tips.

    • Use Fresh Ingredients: Fresh cheese and spices will enhance the flavor of your dish significantly.
    • Don’t Skip the Searing: Searing the chicken before baking adds a depth of flavor and keeps the chicken juicy.
    • Monitor Cooking Time: Keep an eye on the chicken as ovens can vary; you want the chicken to be cooked through but not dry.
    • Let it Rest: Allow the chicken to rest for a few minutes after baking before serving to retain its juices.
    • Experiment with Cheese: Try adding different cheeses to the topping, such as mozzarella or cheddar, for a unique twist.

    Best Side Dishes and Pairings

    Pairing the right side dishes can elevate your Longhorn Steakhouse Parmesan Crusted Chicken experience.

    1. Steamed Asparagus: This vegetable adds a fresh crunch and a hint of bitterness that balances the richness of the chicken.
    2. Roasted Brussels Sprouts: The caramelized flavor of roasted Brussels sprouts complements the savory elements of the dish.
    3. Caesar Salad: A classic Caesar salad offers a creamy and tangy contrast that pairs well with the savory chicken.
    4. Baked Sweet Potatoes: The sweetness of baked sweet potatoes provides a delightful contrast to the savory Parmesan crust.
    5. Chardonnay: A glass of chilled Chardonnay pairs beautifully with the chicken, enhancing its flavors with its crisp acidity.

    Common Mistakes to Avoid

    • Skipping the Searing Step: Searing the chicken is crucial for flavor and texture; don’t skip it.
    • Not Letting Chicken Rest: Allow the chicken to rest after baking for juicy results; cutting into it too soon can lead to dryness.
    • Overbaking: Keep an eye on the chicken to avoid overbaking, which can make it tough.
    • Using Low-Quality Cheese: The quality of cheese impacts the dish significantly; opt for freshly shredded cheese for the best flavor.

    Storage & Reheating Instructions

    Refrigerator Storage

    Store leftovers in airtight containers in the refrigerator. They will remain fresh for up to 3 days.

    Freezing Instructions

    For best results, freeze the chicken in an airtight container. It can be frozen for up to 3 months. Thaw in the refrigerator overnight before reheating.

    Reheating Tips

    • Oven: Preheat the oven to 350°F (175°C) and bake for 10-15 minutes until heated through.
    • Microwave: Place on a microwave-safe plate, cover, and heat in 30-second intervals until warm.
    • Stovetop: Heat a skillet over medium heat, add a splash of olive oil, and warm the chicken for about 5-7 minutes.

    Frequently Asked Questions

    How can I make Longhorn Steakhouse Parmesan Crusted Chicken healthier?

    You can use skinless chicken breasts and reduce the amount of cheese or substitute with a lower-fat option.

    Can I use chicken thighs instead of breasts for Longhorn Steakhouse Parmesan Crusted Chicken?

    Yes, chicken thighs will provide a juicier flavor, but adjust the cooking time as they may take longer to cook through.

    What sides pair well with Longhorn Steakhouse Parmesan Crusted Chicken?

    Consider serving it with a fresh salad, roasted vegetables, or garlic mashed potatoes for a complete meal.

    Can I prepare Longhorn Steakhouse Parmesan Crusted Chicken ahead of time?

    Yes, you can prepare the chicken and the topping ahead of time. Store them separately in the refrigerator and assemble just before baking.

    How do I know when the chicken is cooked through?

    Use a meat thermometer; the internal temperature should reach 165°F (75°C) for safe consumption.

    Final Thoughts

    Longhorn Steakhouse Parmesan Crusted Chicken is a delicious and satisfying dish that is sure to impress family and friends. We encourage you to try this recipe and share your thoughts in the comments below. Your feedback helps us create more delicious content.


    Dinner

    Longhorn Steakhouse Parmesan Crusted Chicken


    5.0 from 24 reviews

    This delicious Parmesan Crusted Chicken features tender, juicy chicken breasts topped with a crispy, cheesy mixture of Parmesan and provolone cheeses, panko breadcrumbs, and a hint of garlic and herbs. Perfectly baked to golden perfection, this dish is sure to impress at any dinner table.

    Author: Munch Twist
    Prep Time: 15 minutes
    Cook Time: 20 minutes
    Total Time: 35 minutes
    Yield: 4 servings
    Category: Lunch
    Method: Baking
    Cuisine: American

    Longhorn Steakhouse Parmesan Crusted Chicken

    SCALE:
    1x
    2x
    3x
    Cook Mode: Prevent your screen from going dark

    Ingredients

    • 1/2 cup shredded provolone cheese
    • 1 teaspoon garlic powder
    • 1 teaspoon onion powder
    • 2 tablespoons unsalted butter, melted
    • 4 boneless, skinless chicken breasts
    • 1/2 teaspoon paprika
    • 1/2 cup panko breadcrumbs
    • 1/2 teaspoon dried oregano
    • 1 tablespoon all-purpose flour
    • Salt and pepper, to taste
    • Olive oil, for cooking
    • 1 cup shredded Parmesan cheese
    • 1/4 cup mayonnaise

    Instructions

    1. Preheat your oven to 375°F (190°C). Line a baking sheet with parchment paper or lightly grease it with olive oil.
    2. In a small bowl, combine the shredded Parmesan cheese, shredded provolone cheese, panko breadcrumbs, melted butter, and mayonnaise. Mix until well combined.
    3. Season the chicken breasts with garlic powder, onion powder, paprika, dried oregano, salt, and pepper.
    4. Heat a skillet over medium-high heat, add a drizzle of olive oil, and sear the chicken breasts for 3-4 minutes on each side until they are golden brown. Transfer the seared chicken to the prepared baking sheet.
    5. Spread the Parmesan mixture evenly over the chicken breasts. Bake in the preheated oven for 15-20 minutes, or until the chicken is cooked through and the topping is golden and crispy.
    6. Allow the chicken to cool slightly before serving.

    Nutrition Facts

    Serving Size: 1 serving
    Calories: 450 kcal
    Sugar: 1g
    Sodium: 800mg
    Fat: 24g
    Saturated Fat: 11g
    Carbohydrates: 12g
    Fiber: 1g
    Protein: 45g
    Cholesterol: 135mg

  • Easy and Delicious Philly Cheesesteak Stromboli Recipe

    Easy and Delicious Philly Cheesesteak Stromboli Recipe

    PHILLY CHEESESTEAK STROMBOLI combines the savory flavors of a classic cheesesteak with the convenience of a rolled pastry. This dish is not only delicious but also perfect for gatherings or a cozy night in. Its cheesy, meaty filling wrapped in golden crust makes it an irresistible choice.

    Why You’ll Love This Recipe

    • Flavorful Filling: A delightful mix of ground beef, onions, and bell peppers creates a robust flavor.
    • Cheesy Goodness: With two cups of mozzarella cheese, every bite is creamy and satisfying.
    • Easy to Make: The use of refrigerated pizza dough simplifies the process without sacrificing taste.
    • Great for Sharing: Perfect for parties, game days, or family dinners, it’s sure to please a crowd.
    • Customizable: Feel free to add your favorite ingredients, such as mushrooms or different cheeses.

    Tools and Equipment

    Having the right tools on hand makes cooking much easier.

    Essential Tools

    • Large skillet
    • Baking sheet
    • Rolling pin
    • Sharp knife
    • Mixing spoon

    Why These Tools Matter

    • Large skillet: Ensures even cooking of the beef and vegetables while providing enough space for stirring.
    • Baking sheet: A sturdy surface for baking the stromboli, allowing for even heat distribution.
    • Sharp knife: Essential for slicing the rolled dough without tearing it, ensuring a clean presentation.

    Ingredients for PHILLY CHEESESTEAK STROMBOLI

    Main Ingredients

    • 1 tsp pepper
    • 1 green bell pepper, chopped
    • ½ onion, chopped
    • 1 (13.8-oz) can refrigerated pizza dough
    • 1 tsp Italian seasoning
    • 2 cloves garlic, minced
    • 1 lb ground beef
    • ½ tsp salt
    • 1 (8-oz) bottle Parmesan-peppercorn dressing, divided
    • 1 (8-oz) pkg shredded mozzarella cheese

    How to Make PHILLY CHEESESTEAK STROMBOLI Step-by-Step

    Step 1: Prep the Base

    1. Preheat your oven to 425°F (220°C). Grease a large rimmed baking sheet.
    2. In a large skillet over medium heat, cook the ground beef, onion, bell pepper, and minced garlic. Stir until the beef is browned and crumbly. Drain excess fat and return the mixture to the skillet.

    Step 2: Season the Filling

    1. Stir in the Italian seasoning, salt, and pepper into the beef mixture. Ensure all ingredients are well combined for the best flavor.

    Step 3: Assemble the Stromboli

    1. Unroll the pizza dough on the greased baking sheet, pressing it into a large rectangle.
    2. Sprinkle 1 cup of shredded mozzarella cheese evenly over the dough.
    3. Top with the beef mixture, leaving a 1-inch border on all sides.
    4. Sprinkle another cup of shredded mozzarella cheese over the beef mixture and drizzle with ¼ cup of Parmesan-peppercorn dressing.

    Step 4: Roll and Cut

    1. Starting from one long side, roll up the dough tightly, pinching the ends to seal.
    2. Arrange the rolled dough seam side down on the baking sheet. Cut slits into the dough at 1-inch intervals to allow steam to escape.

    Step 5: Bake and Serve

    1. Bake in the preheated oven for 20 to 25 minutes, or until the stromboli is deep golden brown.
    2. Let the stromboli stand for 10 minutes before slicing.
    3. Serve with the remaining Parmesan-peppercorn dressing for dipping.

    Enjoy your delicious PHILLY CHEESESTEAK STROMBOLI, a comforting dish that’s sure to impress!

    How to Serve PHILLY CHEESESTEAK STROMBOLI

    PHILLY CHEESESTEAK STROMBOLI is versatile and can be served in various creative ways.

    Dipping Sauces

    Pair your stromboli with an assortment of sauces like marinara, ranch, or extra Parmesan-peppercorn dressing to enhance the flavors and add a fun interactive element to your meal.

    Salad Accompaniment

    Serve with a fresh garden salad topped with Italian dressing. The crisp greens and light dressing balance the hearty flavors of the stromboli, creating a satisfying meal.

    Game Day Snack

    Cut the stromboli into bite-sized pieces for an easy appetizer during game days or gatherings. It’s a crowd-pleaser that is sure to impress your guests.

    Pro Tips for the Best PHILLY CHEESESTEAK STROMBOLI

    Enhance your stromboli experience with these practical tips.

    • Use Fresh Ingredients: Fresh vegetables and high-quality beef make a significant difference in flavor and texture.
    • Don’t Overfill: Be cautious not to overload the filling; this can cause the stromboli to burst during baking.
    • Seal Properly: Make sure to pinch the seams tightly to prevent any filling from leaking out while baking.
    • Experiment with Cheese: While mozzarella is classic, consider mixing in provolone or cheddar for a unique twist.
    • Let it Rest: Allow the stromboli to rest for a few minutes after baking; this helps the cheese set and makes for cleaner slices.

    Best Side Dishes and Pairings

    Serving PHILLY CHEESESTEAK STROMBOLI with complementary sides can elevate your dining experience.

    1. Garlic Bread – The buttery, garlicky flavor complements the rich filling of the stromboli.
    2. Coleslaw – A crunchy and tangy coleslaw adds a refreshing contrast to the savory meat and cheese.
    3. Potato Wedges – Crispy potato wedges seasoned with herbs provide a hearty side that pairs well with the stromboli.
    4. Pickles – The acidity of pickles cuts through the richness of the cheese and beef, adding a delightful crunch.
    5. Beer – A cold lager or pale ale balances the flavors of the stromboli and enhances the overall dining experience.

    Common Mistakes to Avoid

    • Not Draining Excess Fat: Ensure that you drain the excess fat from the beef mixture to prevent a soggy stromboli.
    • Overstuffing the Dough: Avoid adding too much filling; leave a 1-inch border for proper sealing and rolling.
    • Skipping the Resting Time: Let the stromboli rest for 10 minutes after baking to allow the filling to set, making it easier to slice.
    • Incorrect Oven Temperature: Always preheat the oven to the correct temperature to achieve a golden-brown crust.

    Storage & Reheating Instructions

    Refrigerator Storage

    Store any leftover Philly Cheesesteak Stromboli in airtight containers. It will stay fresh for up to 3 days in the refrigerator.

    Freezing Instructions

    For best results, freeze the stromboli before baking. Wrap it tightly in plastic wrap and aluminum foil. It can be frozen for up to 2 months. Thaw in the refrigerator overnight before baking.

    Reheating Tips

    • Oven: Preheat to 350°F (175°C), wrap in foil, and heat for about 15 minutes.
    • Microwave: Place on a microwave-safe plate and heat for 1-2 minutes, checking frequently.
    • Stovetop: Heat in a skillet over low heat, covered, for about 5-7 minutes, flipping occasionally.

    Frequently Asked Questions

    How can I customize my Philly Cheesesteak Stromboli?

    You can add other ingredients like mushrooms, jalapeños, or different cheeses to personalize your stromboli.

    Can I use other types of meat for Philly Cheesesteak Stromboli?

    Yes, you can substitute ground beef with shredded chicken, turkey, or even a plant-based meat alternative for a different flavor.

    How do I know when my Philly Cheesesteak Stromboli is done?

    The stromboli is ready when it’s deep golden brown and the cheese is melted. Ensure to let it rest for 10 minutes before slicing.

    Can I make Philly Cheesesteak Stromboli ahead of time?

    Absolutely. You can prepare the filling and assemble the stromboli, then refrigerate it before baking. Just increase the baking time if it’s cold from the fridge.

    What dipping sauce pairs well with Philly Cheesesteak Stromboli?

    In addition to the Parmesan-peppercorn dressing, marinara sauce or a spicy ranch dressing also complement the flavors well.

    Final Thoughts

    This Philly Cheesesteak Stromboli is a delicious twist on a classic favorite, perfect for any meal. Give it a try and share your thoughts in the comments below. Your feedback is always welcome!


    Dinner

    PHILLY CHEESESTEAK STROMBOLI


    5.0 from 24 reviews

    This Philly Cheesesteak Stromboli combines the classic flavors of a cheesesteak with the convenience of a rolled pizza. Filled with seasoned ground beef, sautéed vegetables, and gooey mozzarella cheese, this dish is perfect for a hearty meal or a fun party appetizer. Serve it warm with a side of Parmesan-peppercorn dressing for dipping.

    Author: Munch Twist
    Prep Time: 20 minutes
    Cook Time: 25 minutes
    Total Time: 45 minutes
    Yield: 6 servings
    Category: Lunch
    Method: No bake
    Cuisine: American

    PHILLY CHEESESTEAK STROMBOLI

    SCALE:
    1x
    2x
    3x
    Cook Mode: Prevent your screen from going dark

    Ingredients

    • 1 tsp pepper
    • 1 green bell pepper, chopped
    • ½ onion, chopped
    • 1 (13.8-oz) can refrigerated pizza dough
    • 1 tsp Italian seasoning
    • 2 cloves garlic, minced
    • 1 lb ground beef
    • ½ tsp salt
    • 1 (8-oz) bottle Parmesan-peppercorn dressing, divided
    • 1 (8-oz) pkg shredded mozzarella cheese

    Instructions

    1. Preheat your oven to 425°F (220°C). Grease a large rimmed baking sheet.
    2. In a large skillet over medium heat, cook the ground beef, onion, bell pepper, and minced garlic until the beef is browned and crumbly. Drain the excess fat and return the mixture to the skillet.
    3. Stir in the Italian seasoning, salt, and pepper into the beef mixture.
    4. Unroll the pizza dough on the greased baking sheet, pressing it into a large rectangle.
    5. Sprinkle 1 cup of shredded mozzarella cheese evenly over the dough.
    6. Top with the beef mixture, leaving a 1-inch border on all sides.
    7. Sprinkle another cup of shredded mozzarella cheese over the beef mixture and drizzle with ¼ cup of Parmesan-peppercorn dressing.
    8. Starting from one long side, roll up the dough tightly, pinching the ends to seal.
    9. Arrange the rolled dough seam side down on the baking sheet. Cut slits into the dough at 1-inch intervals.
    10. Bake in the preheated oven for 20 to 25 minutes, or until the stromboli is deep golden brown.
    11. Let the stromboli stand for 10 minutes before slicing.
    12. Serve with the remaining Parmesan-peppercorn dressing for dipping.

    Nutrition Facts

    Serving Size: 1 serving
    Calories: 400 kcal
    Sugar: 3g
    Sodium: 800mg
    Fat: 23g
    Saturated Fat: 10g
    Carbohydrates: 28g
    Fiber: 2g
    Protein: 22g
    Cholesterol: 70mg

  • Delicious Parmesan Baked Pork Chops Recipe

    Delicious Parmesan Baked Pork Chops Recipe

    Parmesan Baked Pork Chops are a delightful dish that combines juicy pork with a crispy, cheesy coating. This recipe stands out with its simple preparation and rich flavor, making it a perfect choice for weeknight dinners or special occasions.

    Why You’ll Love This Recipe

    • Delicious Flavor: The combination of parmesan cheese and garlic powder provides a savory taste that elevates the pork.
    • Crispy Coating: The Italian bread crumbs create a crunchy texture that contrasts beautifully with the tender meat.
    • Quick & Easy: This dish can be prepared in under an hour, making it suitable for busy weeknights.
    • Healthy Option: With lean pork chops and minimal oil, this recipe offers a nutritious meal without sacrificing flavor.
    • Versatile Pairing: Serve with vegetables or a salad for a complete meal that appeals to everyone.

    Tools and Equipment

    Having the right tools can streamline your cooking process. Here’s what you need to make Parmesan Baked Pork Chops.

    Essential Tools

    • Baking pan
    • Tin foil
    • Cooking spray
    • Mixing plate
    • Measuring cups and spoons

    Why These Tools Matter

    • Baking pan: Provides even heat distribution for consistent cooking.
    • Tin foil: Makes cleanup easier and prevents sticking.
    • Cooking spray: Helps achieve a golden, crisp coating without added calories from excess oil.

    Ingredients for Parmesan Baked Pork Chops

    Main Ingredients

    • 1 tsp. pepper
    • 1 tsp. garlic powder
    • 1 C. Italian bread crumbs
    • 4 boneless pork chops
    • 1 T. olive oil
    • 1 C. parmesan cheese (I used Kraft)

    How to Make Parmesan Baked Pork Chops Step-by-Step

    Step 1: Prep the Oven and Baking Pan

    1. Preheat your oven to 350°F (175°C).
    2. Line a baking pan with tin foil and spray it with cooking spray to prevent sticking.

    Step 2: Prepare the Coating

    1. On a plate, combine the parmesan cheese, Italian bread crumbs, pepper, and garlic powder. Mix until evenly distributed.

    Step 3: Prepare the Pork Chops

    1. Rub each pork chop with olive oil to ensure the coating adheres well.

    Step 4: Coat the Pork Chops

    1. Dip each pork chop into the cheese mixture. Press the mixture onto the pork to ensure a thorough coating.

    Step 5: Bake the Pork Chops

    1. Place the coated pork chops on the prepared baking pan.
    2. Bake in the preheated oven for 40-45 minutes, or until the pork chops are cooked through and the coating is golden brown.

    Enjoy these Parmesan Baked Pork Chops as a flavorful and satisfying meal. Perfectly paired with a side of your choice, they are sure to become a family favorite.

    How to Serve Parmesan Baked Pork Chops

    Serving Parmesan Baked Pork Chops can elevate your meal experience. Here are some creative ideas to enhance your dining presentation.

    Fresh Salad

    A light mixed greens salad with a tangy vinaigrette complements the richness of the pork chops, balancing flavors beautifully.

    Garlic Mashed Potatoes

    Creamy garlic mashed potatoes provide a comforting side that pairs well with the savory notes of the parmesan coating.

    Grilled Vegetables

    Grilled seasonal vegetables add a smoky flavor and vibrant colors to your plate, making for a visually appealing and nutritious meal.

    Pro Tips for the Best Parmesan Baked Pork Chops

    To ensure your Parmesan Baked Pork Chops turn out perfectly every time, consider these expert tips.

    • Use Fresh Ingredients: Fresh parmesan cheese enhances the flavor compared to pre-grated options.

    • Do Not Overcook: Use a meat thermometer to check for an internal temperature of 145°F (63°C) to avoid dry pork.

    • Let Rest Before Serving: Allow the pork chops to rest for 5-10 minutes after baking; this helps retain their juices.

    • Customize Seasoning: Feel free to add herbs like oregano or thyme to the breading for additional flavor.

    • Experiment with Coatings: Try mixing in crushed nuts or different cheese varieties for a unique twist on the classic recipe.

    Best Side Dishes and Pairings

    Pairing your Parmesan Baked Pork Chops with the right sides can enhance the overall meal experience. Here are some excellent options.

    1. Steamed Broccoli: The slight bitterness of broccoli contrasts well with the savory pork, adding a nutritious element.

    2. Roasted Sweet Potatoes: The natural sweetness of roasted sweet potatoes balances the richness of the pork and adds a colorful touch.

    3. Caesar Salad: A classic Caesar salad with its creamy dressing and crunchy croutons complements the flavors of the pork chops.

    4. Red Wine: A glass of medium-bodied red wine, such as Merlot, adds depth to the meal and enhances the savory profile.

    5. Garlic Bread: Warm, crispy garlic bread is perfect for soaking up any juices from the pork, making every bite enjoyable.

    Common Mistakes to Avoid

    • Not Preheating the Oven: Always preheat your oven to ensure even cooking.
    • Skipping the Olive Oil: Olive oil helps the coating adhere and enhances flavor.
    • Overcrowding the Baking Pan: Give each pork chop enough space for optimal browning.
    • Not Checking Internal Temperature: Use a meat thermometer to ensure the pork chops reach 145°F (63°C).

    Storage & Reheating Instructions

    Refrigerator Storage

    Store leftover Parmesan Baked Pork Chops in airtight containers. They will remain fresh for up to 3 days in the refrigerator.

    Freezing Instructions

    To freeze, wrap the pork chops tightly in plastic wrap and then place them in a freezer-safe bag. They can be frozen for up to 2 months. For best results, thaw in the refrigerator overnight before reheating.

    Reheating Tips

    • Oven: Preheat to 350°F (175°C) and heat for about 15-20 minutes or until warmed through.
    • Microwave: Place on a microwave-safe plate, cover with a damp paper towel, and heat on medium power for 1-2 minutes.
    • Stovetop: Heat a skillet over medium heat and warm the pork chops for about 5 minutes on each side.

    Frequently Asked Questions

    How long do I bake Parmesan Baked Pork Chops?

    Parmesan Baked Pork Chops should be baked in a preheated oven for 40-45 minutes or until the internal temperature reaches 145°F (63°C).

    Can I use bone-in pork chops for this recipe?

    While boneless pork chops are recommended for even cooking, you can use bone-in chops. Just adjust the cooking time as they may take a bit longer.

    What can I serve with Parmesan Baked Pork Chops?

    These pork chops pair well with a variety of sides such as roasted vegetables, mashed potatoes, or a fresh salad.

    Can I make Parmesan Baked Pork Chops ahead of time?

    Yes, you can prepare the pork chops and coat them with the cheese mixture ahead of time. Store them in the refrigerator until you are ready to bake.

    Final Thoughts

    Parmesan Baked Pork Chops are a simple yet delicious meal that is sure to impress. We encourage you to try this recipe and share your experience in the comments below. Your feedback helps others discover the joy of cooking!


    Dinner

    Parmesan Baked Pork Chops


    5.0 from 24 reviews

    Parmesan Baked Pork Chops are a delicious and easy-to-make dish that combines tender pork chops with a crispy, cheesy coating. Perfect for a weeknight dinner, these chops are seasoned to perfection and baked until golden brown, making them a family favorite.

    Author: Munch Twist
    Prep Time: 10 mins
    Cook Time: 45 mins
    Total Time: 55 mins
    Yield: 4 servings
    Category: Lunch
    Method: Baking
    Cuisine: American

    Parmesan Baked Pork Chops

    SCALE:
    1x
    2x
    3x
    Cook Mode: Prevent your screen from going dark

    Ingredients

    • 1 tsp pepper
    • 1 tsp garlic powder
    • 1 cup Italian bread crumbs
    • 4 boneless pork chops
    • 1 tbsp olive oil
    • 1 cup parmesan cheese

    Instructions

    1. Preheat your oven to 350°F (175°C). Line a baking pan with tin foil and spray with cooking spray.
    2. On a plate, combine the parmesan cheese, Italian bread crumbs, pepper, and garlic powder.
    3. Rub each pork chop with olive oil.
    4. Dip each pork chop into the cheese mixture, pressing the mixture onto the pork chops to ensure they are well coated.
    5. Place the coated pork chops on the prepared baking pan.
    6. Bake in the preheated oven for 40-45 minutes, or until the pork chops are cooked through and the coating is golden brown.

    Nutrition Facts

    Serving Size: 1 serving
    Calories: 350 kcal
    Sugar: 1g
    Sodium: 600mg
    Fat: 20g
    Saturated Fat: 7g
    Carbohydrates: 8g
    Fiber: 1g
    Protein: 35g
    Cholesterol: 90mg

  • Delicious Avocado Mozzarella and Tomato Grilled Cheese Recipe

    Delicious Avocado Mozzarella and Tomato Grilled Cheese Recipe

    Avocado Mozzarella and Tomato Grilled Cheese is a delightful twist on the classic sandwich. This recipe combines creamy avocado, gooey mozzarella, and juicy tomatoes, creating a comforting yet fresh flavor profile that will appeal to both grilled cheese lovers and health-conscious eaters alike.

    Why You’ll Love This Recipe

    • Quick & Easy: Ready in under 30 minutes, perfect for busy weeknights or a quick lunch.
    • Nutritious: Packed with healthy fats from avocado and protein from mozzarella, this sandwich is also rich in vitamins.
    • Flavorful: The combination of creamy, tangy, and savory ingredients creates a deliciously satisfying meal.
    • Versatile: Customize it by adding herbs, spices, or other vegetables to suit your taste.
    • Satisfying: With a perfect balance of textures, this grilled cheese is both crispy and gooey.

    Tools and Equipment

    To prepare this delicious grilled cheese, you will need a few essential kitchen tools.

    Essential Tools

    • Non-stick frying pan
    • Spatula
    • Butter knife
    • Cutting board
    • Sharp knife

    Why These Tools Matter

    • Non-stick frying pan: Prevents the sandwich from sticking, allowing for easy flipping and cooking.
    • Spatula: Essential for flipping the sandwich without losing any fillings.
    • Sharp knife: Ensures clean cuts for even slicing of the tomatoes and avocado.

    Ingredients for Avocado Mozzarella and Tomato Grilled Cheese

    Bread

    • 2 slices multigrain bread (I prefer Ezekiel sprouted grain bread)

    Cheese

    • 4 slices mozzarella cheese

    Vegetables

    • 4 cherry tomatoes (halved)
    • ½ avocado (sliced)

    Other

    • A dab of butter

    How to Make Avocado Mozzarella and Tomato Grilled Cheese Step-by-Step

    Step 1: Prep the Base

    Butter the outside of each slice of bread generously. This will create a golden, crispy exterior when cooked.

    Step 2: Assemble the Sandwich

    Heat a frying pan over medium heat. Place one slice of bread in the pan, buttered side down. Layer the mozzarella cheese, cherry tomatoes, and avocado slices on top of the bread in the pan. Place the second slice of bread on top, buttered side up.

    Step 3: Cook the First Side

    Cook the sandwich for a few minutes until the bottom slice is golden brown and crispy. Keep an eye on it to avoid burning.

    Step 4: Flip and Finish Cooking

    Carefully flip the sandwich using a spatula. Cook the other side until it is golden brown, and the cheese has fully melted.

    Step 5: Serve

    Remove the sandwich from the pan and let it cool slightly before serving. This helps prevent burns and allows the flavors to meld.

    Enjoy this Avocado Mozzarella and Tomato Grilled Cheese, a delightful fusion of flavors that is sure to please everyone at the table.

    How to Serve Avocado Mozzarella and Tomato Grilled Cheese

    Elevate your grilled cheese experience with these creative serving ideas.

    With a Side of Tomato Soup

    Pairing this sandwich with a warm bowl of tomato soup creates a classic combination that enhances the flavors of both dishes.

    Add a Fresh Salad

    Serve your grilled cheese alongside a light green salad dressed with a lemon vinaigrette. The acidity of the dressing complements the richness of the sandwich.

    Garnish with Fresh Herbs

    Top your sandwich with freshly chopped basil or cilantro for an aromatic finish that adds a burst of flavor.

    Pro Tips for the Best Avocado Mozzarella and Tomato Grilled Cheese

    Maximize the deliciousness of your grilled cheese with these helpful tips.

    • Use Fresh Ingredients: Always opt for ripe avocados and fresh mozzarella to ensure the best flavor and texture.
    • Choose the Right Bread: Multigrain or sourdough bread can add a delightful crunch and flavor to your sandwich.
    • Control the Heat: Cooking on medium heat allows the cheese to melt completely without burning the bread.
    • Experiment with Spices: A sprinkle of garlic powder or red pepper flakes can add an extra layer of flavor to your sandwich.
    • Let it Rest: Allow the sandwich to cool for a minute before cutting to avoid messy toppings spilling out.

    Best Side Dishes and Pairings

    Complement your Avocado Mozzarella and Tomato Grilled Cheese with these delightful sides and beverages.

    1. Kale Caesar Salad: This salad’s creamy dressing and crunchy croutons provide a refreshing contrast to the sandwich’s richness.
    2. Sweet Potato Fries: Crispy sweet potato fries offer a slightly sweet flavor that pairs perfectly with the savory elements of the grilled cheese.
    3. Crisp Pickles: The acidity and crunch of pickles cut through the creaminess, creating a balanced bite.
    4. Herbal Iced Tea: A refreshing iced tea infused with herbs can cleanse the palate and enhance the overall meal experience.
    5. Roasted Vegetable Platter: A mix of seasonal roasted vegetables adds a nutritious and colorful element to your dining experience.

    Common Mistakes to Avoid

    • Not Buttering Evenly: Ensure that the butter is spread evenly on the bread to achieve a perfect golden crust.
    • Overcrowding the Ingredients: Avoid adding too many toppings, as it can make it difficult to flip the sandwich without spilling.
    • Cooking on High Heat: Cooking at too high a temperature can burn the bread before the cheese has a chance to melt.
    • Skipping the Cooling Period: Allowing the sandwich to cool slightly helps the cheese set, making it easier to cut and eat.

    Storage & Reheating Instructions

    Refrigerator Storage

    Store your Avocado Mozzarella and Tomato Grilled Cheese in an airtight container in the refrigerator. It will stay fresh for up to 2 days.

    Freezing Instructions

    For best results, freeze the sandwich before cooking. Wrap it tightly in plastic wrap and then in aluminum foil. It can be frozen for up to 1 month. Thaw in the refrigerator overnight before cooking.

    Reheating Tips

    • Oven: Preheat the oven to 350°F (175°C). Place the sandwich on a baking sheet and heat for about 10-15 minutes until warmed through.
    • Microwave: Place the sandwich on a microwave-safe plate and cover it with a damp paper towel. Heat for 30 seconds, checking to see if it’s warmed through.
    • Stovetop: Reheat in a pan over low heat for about 5 minutes on each side, covering with a lid to ensure even heating.

    Frequently Asked Questions

    How do I make the Avocado Mozzarella and Tomato Grilled Cheese gluten-free?

    You can easily make this sandwich gluten-free by using gluten-free bread. Just make sure the bread is sturdy enough to hold the fillings.

    Can I add additional ingredients to the Avocado Mozzarella and Tomato Grilled Cheese?

    Yes, feel free to add ingredients like spinach, pesto, or even a slice of turkey for extra flavor and nutrition.

    What is the best type of cheese for this grilled cheese recipe?

    While mozzarella is the classic choice, you can mix in other cheeses like sharp cheddar or fontina for a different flavor profile.

    How can I enhance the flavor of my Avocado Mozzarella and Tomato Grilled Cheese?

    Consider adding herbs such as basil or a sprinkle of red pepper flakes for added flavor. A drizzle of balsamic glaze can also elevate the taste.

    Can I make this recipe vegan?

    To make a vegan version, substitute the mozzarella with a plant-based cheese and use vegan butter or olive oil for grilling.

    Final Thoughts

    This Avocado Mozzarella and Tomato Grilled Cheese is a delightful twist on a beloved classic. By combining fresh ingredients and a gooey texture, it offers a satisfying meal perfect for any time of day. I encourage you to try this recipe and share your experience in the comments below.


    Lunch

    Avocado Mozzarella and Tomato Grilled Cheese


    5.0 from 24 reviews

    This Avocado Mozzarella and Tomato Grilled Cheese is a delicious twist on the classic sandwich. It features creamy avocado, gooey mozzarella, and juicy cherry tomatoes, all grilled to perfection between slices of multigrain bread. Perfect for a quick lunch or snack.

    Author: Munch Twist
    Prep Time: 5 minutes
    Cook Time: 10 minutes
    Total Time: 15 minutes
    Yield: 1 serving
    Category: Lunch
    Method: No bake
    Cuisine: American

    Avocado Mozzarella and Tomato Grilled Cheese

    SCALE:
    1x
    2x
    3x
    Cook Mode: Prevent your screen from going dark

    Ingredients

    • 4 slices mozzarella cheese
    • 2 slices multigrain bread
    • 4 cherry tomatoes (halved)
    • ½ avocado (sliced)
    • A dab of butter

    Instructions

    1. Butter the outside of each slice of bread.
    2. Heat a frying pan over medium heat. Place one slice of bread in the pan, buttered side down.
    3. Layer the mozzarella cheese, cherry tomatoes, and avocado slices on top of the bread in the pan.
    4. Place the second slice of bread on top, buttered side up.
    5. Cook for a few minutes until the bottom slice is golden brown and crispy.
    6. Flip the sandwich carefully and cook the other side until golden brown and the cheese is melted.
    7. Remove from the pan and let cool slightly before serving.

    Nutrition Facts

    Serving Size: 1 serving
    Calories: 380 kcal
    Sugar: 3g
    Sodium: 600mg
    Fat: 25g
    Saturated Fat: 10g
    Carbohydrates: 24g
    Fiber: 6g
    Protein: 18g
    Cholesterol: 60mg

  • Easy and Delicious Crockpot Cheeseburgers Recipe

    Easy and Delicious Crockpot Cheeseburgers Recipe

    Crockpot cheeseburgers offer a delicious twist on the classic favorite, transforming a traditional meal into an effortless slow-cooked delight. This recipe combines savory flavors with creamy cheese, making it perfect for gatherings or a cozy family dinner. The convenience of cooking in a crockpot means you can enjoy that rich, cheesy taste without hours of effort.

    Why You’ll Love This Recipe

    • Flavorful Comfort Food: The combination of Velveeta cheese and seasoned ground beef creates a rich, creamy filling.
    • Hands-Off Cooking: Simply set your slow cooker and let it do the work, freeing you up for other tasks.
    • Customizable Options: Add your favorite toppings like jalapeños or sautéed mushrooms for a personalized touch.
    • Perfect for Gatherings: This recipe yields a hearty meal that is sure to please a crowd, making it ideal for parties.
    • Easy Cleanup: With minimal pots and pans involved, you can enjoy your meal without worrying about a mountain of dishes.

    Tools and Equipment

    Having the right tools makes the cooking process smoother and more enjoyable.

    Essential Tools

    • Slow cooker
    • Skillet
    • Cutting board
    • Chef’s knife
    • Wooden spoon or spatula

    Why These Tools Matter

    • Slow cooker: Allows for even cooking and rich flavor development over hours without constant attention.
    • Skillet: Perfect for browning the beef and onions, enhancing the overall flavor before slow cooking.
    • Chef’s knife: Ensures precise cutting of vegetables, which is essential for even cooking and presentation.

    Ingredients for Crockpot Cheeseburgers

    Main Ingredients

    • 2 tablespoons ketchup
    • 2 cloves garlic, minced
    • 1 onion, diced
    • 1 teaspoon olive oil
    • 8 ounces Velveeta cheese, cubed
    • Buns, for serving
    • 1 ½ pounds lean ground beef
    • Salt and pepper, to taste
    • Cheese slices, for serving
    • 2 tablespoons mustard
    • Pickles, for serving

    How to Make Crockpot Cheeseburgers Step-by-Step

    Step 1: Brown the Beef

    In a skillet, heat 1 teaspoon olive oil over medium-high heat. Add 1 ½ pounds lean ground beef and 1 onion, diced. Cook, breaking up the beef, until no pink remains and the onions are translucent. Add 2 cloves minced garlic and cook for another 30 seconds, just until fragrant.

    Step 2: Transfer to Slow Cooker

    Transfer the cooked beef mixture to the slow cooker. Season with salt and pepper to taste.

    Step 3: Add Cheese and Condiments

    Stir in 8 ounces cubed Velveeta cheese, 2 tablespoons ketchup, and 2 tablespoons mustard until well combined.

    Step 4: Slow Cook

    Cover and cook on low for 3 to 4 hours. Stir about once an hour to ensure even cooking and a creamy texture.

    Step 5: Serve

    Once cooked, serve the cheesy beef mixture on buns. Top with additional cheese slices and pickles for a classic cheeseburger experience.

    Enjoy your delicious crockpot cheeseburgers, packed with flavor and simplicity. Perfect for any occasion!

    How to Serve Crockpot Cheeseburgers

    Crockpot cheeseburgers are versatile and can be enjoyed in various ways.

    Classic Cheeseburger Style

    Serve the cheesy beef mixture on toasted buns, topped with your favorite condiments like lettuce, tomato, and additional pickles for a traditional cheeseburger experience.

    Sliders for Entertaining

    Scoop the cheeseburger filling onto small slider buns for a fun appetizer. Pair with a platter of assorted toppings, allowing guests to customize their sliders.

    Cheeseburger Quesadillas

    Spread the cheesy beef mixture between two tortillas, sprinkle with extra cheese, and grill until crispy for a delicious twist on the classic cheeseburger.

    Pro Tips for the Best Crockpot Cheeseburgers

    Enhance your crockpot cheeseburger experience with these practical tips.

    • Quality Ground Beef: Use lean ground beef for a healthier option without sacrificing flavor.

    • Experiment with Cheese: While Velveeta is a classic choice, feel free to mix in other cheeses like cheddar or pepper jack for added flavor.

    • Adjust Seasoning: Taste the mixture before serving and adjust the salt and pepper as necessary to enhance the overall flavor.

    • Cook Low and Slow: For the best texture and flavor, always cook on low for the recommended time. This allows the flavors to meld beautifully.

    • Keep it Warm: If serving at a gathering, keep the slow cooker on warm to maintain the perfect serving temperature throughout the event.

    Best Side Dishes and Pairings

    These side dishes and drinks complement the rich flavors of crockpot cheeseburgers.

    1. Sweet Potato Fries: Their natural sweetness contrasts perfectly with the savory cheeseburger flavors.

    2. Coleslaw: A tangy, crunchy coleslaw adds a refreshing balance to the richness of the cheeseburgers.

    3. Potato Salad: Creamy potato salad provides a classic side that pairs well with the hearty cheeseburger filling.

    4. Corn on the Cob: Grilled or boiled corn on the cob offers a sweet and buttery addition to your meal.

    5. Iced Tea: A refreshing iced tea helps cleanse the palate and is a classic beverage choice for a casual meal.

    Common Mistakes to Avoid

    • Not Browning the Beef: Skipping the browning step can lead to a less flavorful dish.
    • Overcooking the Cheese: Cooking Velveeta for too long can result in a grainy texture; stir gently and monitor closely.
    • Skipping Seasoning: Failing to season the meat adequately can make the final dish bland.
    • Neglecting to Stir: Not stirring occasionally during cooking can cause uneven melting and cooking.

    Storage & Reheating Instructions

    Refrigerator Storage

    Store any leftovers in airtight containers. They will remain fresh for up to 3 days in the refrigerator.

    Freezing Instructions

    For best results, freeze the cheeseburger mixture in airtight containers or freezer bags. It can be frozen for up to 3 months. Thaw in the refrigerator before reheating.

    Reheating Tips

    • Oven: Preheat to 350°F (175°C) and heat in a covered dish for about 15-20 minutes, or until warmed through.
    • Microwave: Place in a microwave-safe dish, cover, and heat on medium power for 1-2 minutes, stirring halfway through.
    • Stovetop: Reheat in a skillet over medium heat, stirring frequently until warmed throughout.

    Frequently Asked Questions

    How do I make Crockpot Cheeseburgers healthier?

    You can use leaner ground turkey or chicken instead of beef and opt for low-fat cheese to reduce calories and fat content.

    Can I use different types of cheese?

    Yes, feel free to substitute Velveeta with other melting cheeses like cheddar or pepper jack for a unique flavor twist.

    How can I spice up my Crockpot Cheeseburgers?

    Consider adding diced jalapeños, chili powder, or hot sauce to the mixture for an extra kick.

    Can I prepare Crockpot Cheeseburgers ahead of time?

    Absolutely. You can prepare the beef mixture a day in advance and store it in the refrigerator until you’re ready to cook.

    What can I serve with Crockpot Cheeseburgers?

    Complement your cheeseburgers with sides like fries, coleslaw, or a fresh garden salad for a complete meal.

    Final Thoughts

    Crockpot Cheeseburgers are a delicious and convenient meal that can satisfy any craving. Give this recipe a try, and don’t forget to leave a comment with your thoughts and any modifications you made.


    Dinner

    Crockpot Cheeseburgers


    5.0 from 24 reviews

    Enjoy a delicious and easy-to-make crockpot cheeseburger recipe that combines lean ground beef, creamy Velveeta cheese, and your favorite condiments. Perfect for a hearty meal, this dish is sure to satisfy your cravings with its rich flavors and comforting textures.

    Author: Munch Twist
    Prep Time: 10 minutes
    Cook Time: 240 minutes
    Total Time: 250 minutes
    Yield: 6 servings
    Category: Lunch
    Method: No bake
    Cuisine: American

    Crockpot Cheeseburgers

    SCALE:
    1x
    2x
    3x
    Cook Mode: Prevent your screen from going dark

    Ingredients

    • 2 tablespoons ketchup
    • 2 cloves garlic, minced
    • 1 onion, diced
    • 1 teaspoon olive oil
    • 8 ounces Velveeta cheese, cubed
    • Buns, for serving
    • 1 ½ pounds lean ground beef
    • Salt and pepper to taste
    • Cheese slices, for serving
    • 2 tablespoons mustard
    • Pickles, for serving

    Instructions

    1. In a skillet, heat olive oil over medium-high heat. Add ground beef and diced onion. Cook, breaking up the beef, until no pink remains and the onions are translucent. Add minced garlic and cook for another 30 seconds, just until fragrant.
    2. Transfer the cooked beef mixture to the slow cooker and season with salt and pepper.
    3. Stir in the cubed Velveeta cheese, ketchup, and mustard.
    4. Cover and cook on low for 3 to 4 hours, stirring about once an hour to ensure even cooking.
    5. Once cooked, serve the cheesy beef mixture on buns with additional cheese slices and pickles for a classic cheeseburger experience.

    Nutrition Facts

    Serving Size: 1 serving
    Calories: 450 kcal
    Sugar: 4g
    Sodium: 800mg
    Fat: 30g
    Saturated Fat: 15g
    Carbohydrates: 20g
    Fiber: 1g
    Protein: 25g
    Cholesterol: 90mg