
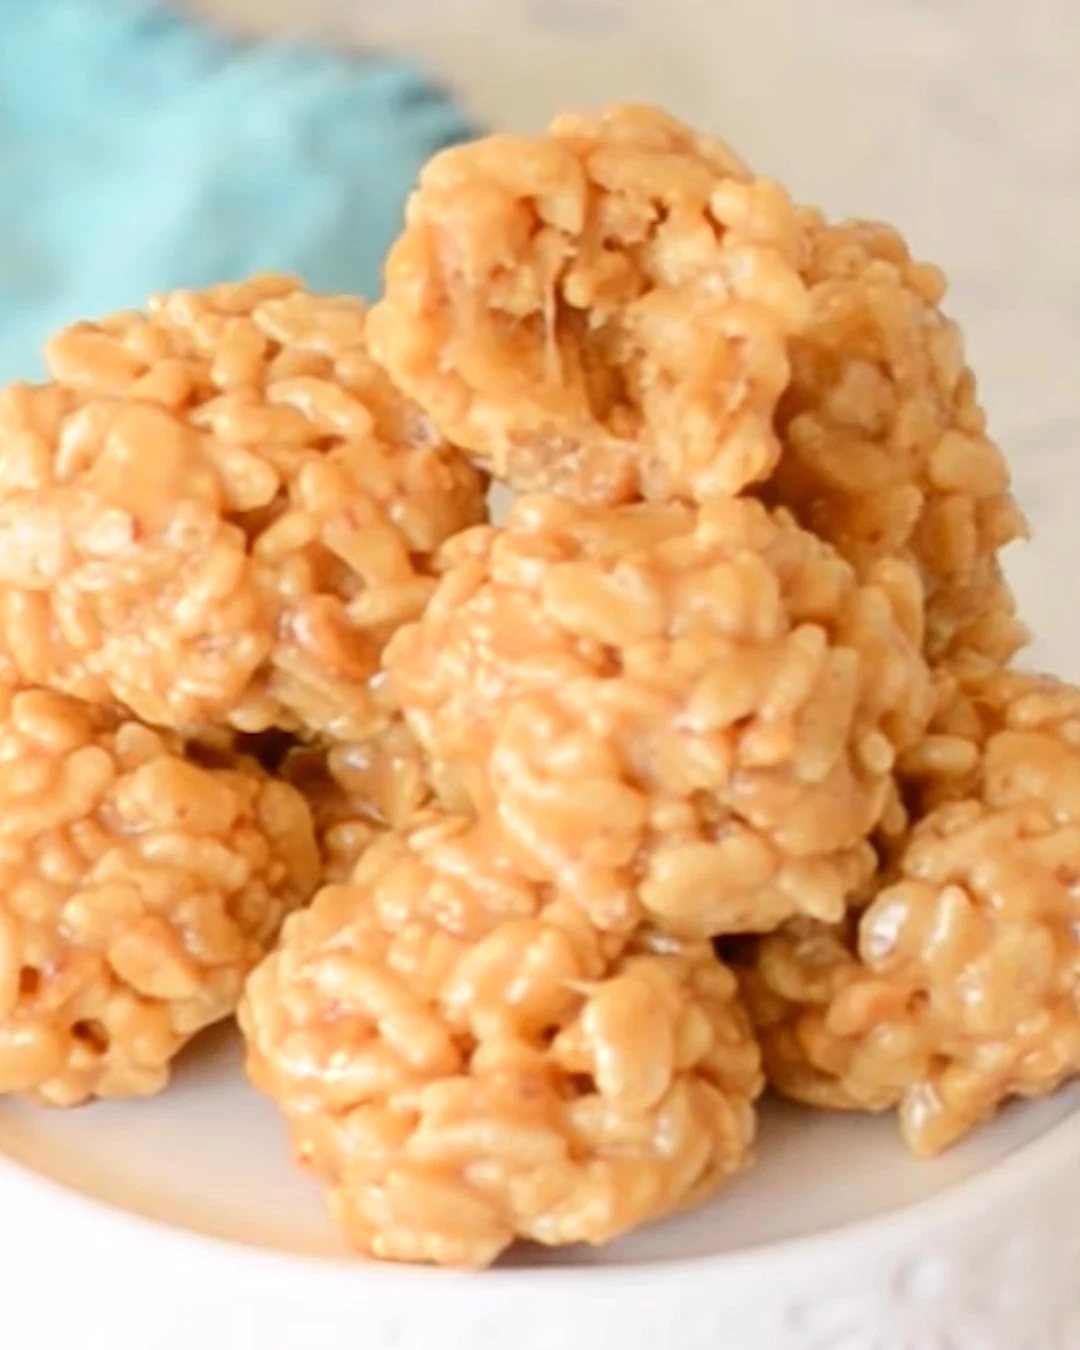
Rice Krispie Peanut Butter Balls are a delightful treat that blend the crunch of cereal with the creamy richness of peanut butter. These no-bake snacks are perfect for any occasion, offering a sweet and satisfying bite that both kids and adults will love.
Why You’ll Love This Recipe
- Quick & Easy: Ready in under 30 minutes, these treats are perfect for a last-minute dessert.
- No Baking Required: Skip the oven and enjoy a hassle-free cooking experience.
- Customizable: Add your favorite toppings like sprinkles or crushed peanuts for a personal touch.
- Kid-Friendly: An excellent choice for little hands to help with, making baking a fun family activity.
- Deliciously Satisfying: The combination of crunchy, sweet, and nutty flavors makes these balls irresistible.
Tools and Equipment
Gathering the right tools makes the preparation process smoother and more enjoyable.
Essential Tools
- Mixing bowl
- Spoon or spatula
- Baking sheet
- Parchment paper
- Fork
- Refrigerator
Why These Tools Matter
- Mixing bowl: Essential for combining ingredients evenly, ensuring a well-mixed base.
- Baking sheet: Provides a stable surface for cooling and setting your Rice Krispie Peanut Butter Balls.
- Parchment paper: Prevents sticking, making it easy to remove the balls once they are set.
Ingredients for Rice Krispie Peanut Butter Balls
Base Ingredients
- 2 cups Rice Krispies cereal
- 1 cup creamy peanut butter
- 1/2 cup powdered sugar
- 2 tablespoons unsalted butter, melted
Dipping Ingredients
- 1 cup semi-sweet chocolate chips, melted for dipping
- Optional: Sprinkles or crushed peanuts for decoration
How to Make Rice Krispie Peanut Butter Balls Step-by-Step
Step 1: Prep the Base
In a large mixing bowl, combine the Rice Krispies, creamy peanut butter, powdered sugar, and melted butter. Stir the mixture until it is well combined and sticks together.
Step 2: Form the Balls
Scoop out tablespoon-sized portions of the mixture and roll them into balls. Place the balls on a parchment paper-lined baking sheet, ensuring they are spaced apart.
Step 3: Chill the Balls
Refrigerate the balls for 30 minutes. This will help them firm up and hold their shape.
Step 4: Dip in Chocolate
Once chilled, melt the semi-sweet chocolate chips. Dip each ball into the melted chocolate using a fork to coat them evenly. Allow the excess chocolate to drip off before returning them to the baking sheet.
Step 5: Add Decorations
If desired, sprinkle decorative sprinkles or crushed peanuts on top of the chocolate while it is still wet.
Step 6: Final Chill
Refrigerate the chocolate-covered balls for another 30 minutes or until the chocolate has fully set.
Serve the Rice Krispie Peanut Butter Balls chilled or at room temperature for a sweet and crunchy treat that everyone will enjoy!
How to Serve Rice Krispie Peanut Butter Balls
Rice Krispie Peanut Butter Balls are versatile treats that can be enjoyed in various ways. Here are some creative serving ideas:
As a Party Snack
Serve these delightful balls on a platter at your next gathering. Their bite-sized nature makes them perfect for mingling and snacking.
With a Glass of Milk
Pairing Rice Krispie Peanut Butter Balls with a cold glass of milk enhances the flavor and adds a creamy contrast to the crunchy treats.
In a Dessert Platter
Include these balls on a dessert platter alongside brownies and cookies for a diverse selection of sweets that will please every palate.
Pro Tips for the Best Rice Krispie Peanut Butter Balls
To achieve the most delicious Rice Krispie Peanut Butter Balls, consider these expert tips:
- Use Fresh Ingredients: Make sure your Rice Krispies and peanut butter are fresh for the best flavor and texture.
- Chill Thoroughly: Allow both the initial mixture and the chocolate-dipped balls to chill adequately for optimal firmness.
- Experiment with Flavors: Try adding a pinch of salt or a splash of vanilla extract to the mixture for an enhanced flavor profile.
- Chocolate Coating Technique: For a smoother chocolate coating, ensure the chocolate is fully melted and at a warm temperature for easy dipping.
- Storage Tips: Store the finished balls in an airtight container in the refrigerator to maintain freshness and prevent melting.
Best Side Dishes and Pairings
Rice Krispie Peanut Butter Balls can be complemented by a variety of side dishes and beverages. Here are some excellent pairings:
- Fresh Fruit Salad: The lightness of fruit balances the richness of the peanut butter, providing a refreshing contrast.
- Vanilla Ice Cream: A scoop of vanilla ice cream adds a creamy texture that pairs beautifully with the crunchy balls.
- Chocolate Milk: This classic drink complements the chocolate coating of the balls, creating a delightful chocolate experience.
- Coffee or Espresso: The bitterness of coffee enhances the sweetness of the balls, making for a perfect afternoon treat.
- Nutty Granola Bars: Enjoying these alongside nutty granola bars can amplify the peanut butter flavor while adding additional crunch.
Common Mistakes to Avoid
- Not Measuring Ingredients Accurately: Precision is key for the perfect texture.
- Skipping the Chilling Step: Chilling helps the balls maintain their shape when dipped in chocolate.
- Overheating Chocolate: Melt chocolate gently to avoid burning, which can affect the flavor.
- Using Crunchy Peanut Butter: Stick to creamy peanut butter for a smoother consistency in the balls.
Storage & Reheating Instructions
Refrigerator Storage
Store Rice Krispie Peanut Butter Balls in an airtight container in the refrigerator. They will stay fresh for up to one week.
Freezing Instructions
To freeze, place the formed balls on a baking sheet until firm, then transfer them to a freezer-safe container. They can be frozen for up to three months. Thaw in the refrigerator before serving.
Reheating Tips
- Oven: Preheat to 300°F (150°C) and warm for 5-10 minutes.
- Microwave: Heat for 10-15 seconds at a time until just warm.
- Stovetop: Place in a covered skillet over low heat, stirring occasionally until warmed through.
Frequently Asked Questions
How do I make Rice Krispie Peanut Butter Balls vegan?
You can substitute the butter with a plant-based alternative and use dairy-free chocolate chips for dipping.
Can I use crunchy peanut butter in Rice Krispie Peanut Butter Balls?
While you can, it’s recommended to use creamy peanut butter to achieve the desired smooth texture.
How long will Rice Krispie Peanut Butter Balls last?
When stored properly in an airtight container, they will last up to one week in the refrigerator.
Can I add other ingredients to Rice Krispie Peanut Butter Balls?
Absolutely! Feel free to mix in ingredients like mini marshmallows, dried fruits, or nuts for added texture and flavor.
Final Thoughts
Rice Krispie Peanut Butter Balls are a delightful and easy treat that combines the perfect blend of crunch and creaminess. I encourage you to try this recipe and share your experience in the comments below. Your feedback is always appreciated!
Desserts
PrintRice Krispie Peanut Butter Balls
Rice Krispie Peanut Butter Balls are a delightful treat combining the crunch of Rice Krispies with the creamy richness of peanut butter. These no-bake snacks are easy to make and perfect for any occasion, offering a sweet and satisfying flavor that will please both kids and adults alike.
- Prep Time: 15 minutes
- Cook Time: 0 minutes
- Total Time: 75 minutes
- Yield: 20 balls 1x
- Category: Desserts
- Method: Baking
- Cuisine: American
Ingredients
- 2 cups Rice Krispies cereal
- 1 cup creamy peanut butter
- 1/2 cup powdered sugar
- 2 tablespoons unsalted butter, melted
- 1 cup semi-sweet chocolate chips, melted for dipping
- Optional: Sprinkles or crushed peanuts for decoration
Instructions
- In a large mixing bowl, combine the Rice Krispies, peanut butter, powdered sugar, and melted butter. Stir until the mixture is well combined and sticks together.
- Scoop out tablespoon-sized portions and roll them into balls. Place on a parchment paper-lined baking sheet.
- Chill the balls in the refrigerator for 30 minutes to firm up.
- Once chilled, dip each ball into melted chocolate, using a fork to help coat them evenly. Allow the excess chocolate to drip off before returning them to the baking sheet.
- If desired, immediately sprinkle with decorative sprinkles or crushed peanuts while the chocolate is still wet.
- Refrigerate the balls for another 30 minutes or until the chocolate has set.
- Serve chilled or at room temperature.
Nutrition
- Calories: 150
- Sugar: 8g
- Sodium: 70mg
- Fat: 8g
- Saturated Fat: 3g
- Carbohydrates: 18g
- Fiber: 1g
- Protein: 3g
- Cholesterol: 5mg