
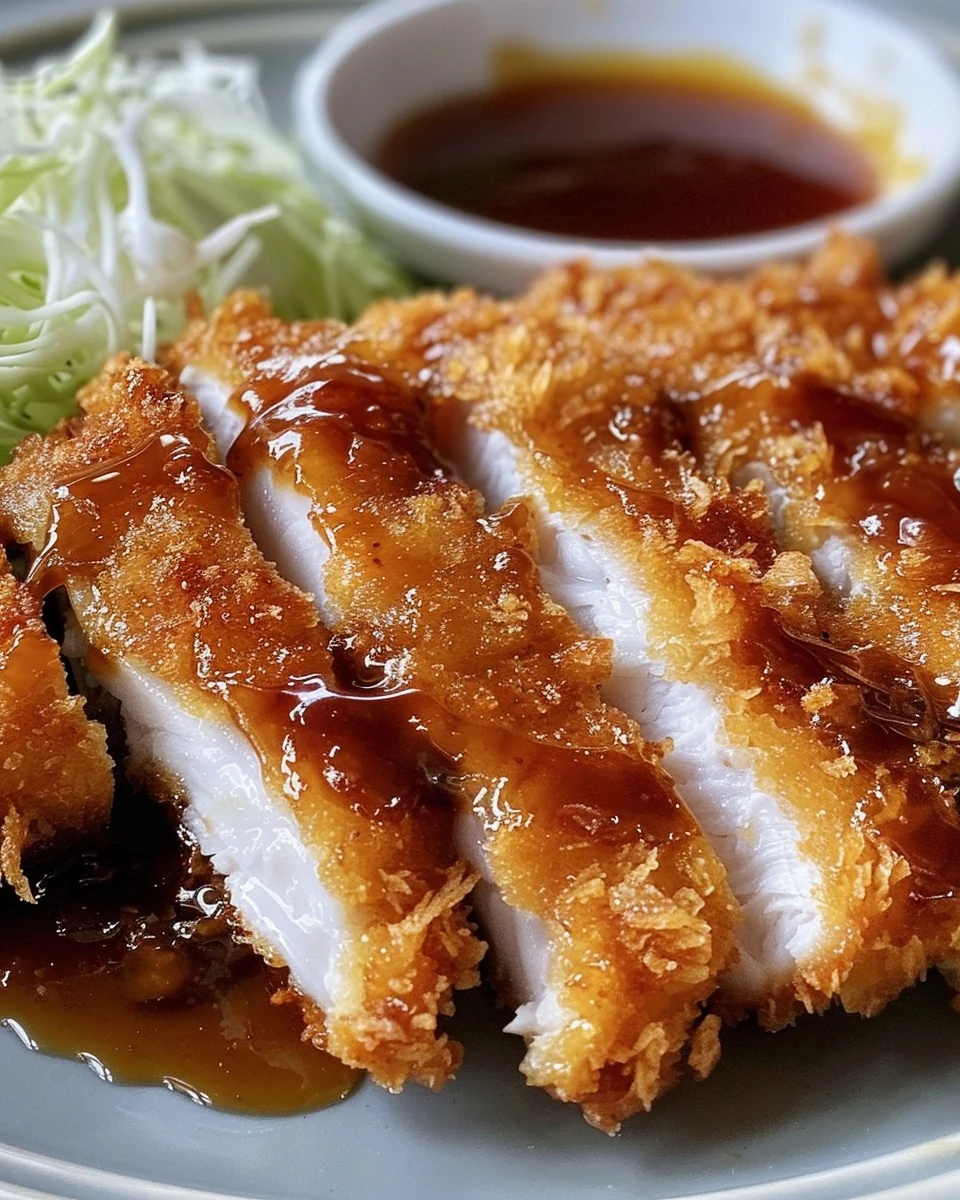
Easy Chicken Katsu is a delightful dish that combines crispy breaded chicken with a tangy sauce. This Japanese-inspired recipe is not only satisfying but also simple enough for weeknight dinners. The crunchy texture and savory flavor make it a crowd-pleaser for all ages.
Why You’ll Love This Recipe
- Quick & Easy: Ready in under 50 minutes, perfect for busy evenings.
- Crispy Texture: The panko breadcrumbs create a satisfying crunch that elevates the dish.
- Flavorful Sauce: The homemade sauce adds a tangy kick that complements the chicken perfectly.
- Versatile Meal: Serve it with rice, salad, or your favorite sides for a complete meal.
- Family-Friendly: A hit with both kids and adults, making it great for family dinners.
Tools and Equipment
Having the right tools makes this cooking process smoother and more enjoyable.
Essential Tools
- Large skillet
- Shallow bowls (for breading)
- Meat mallet or rolling pin (for flattening chicken)
- Tongs
- Paper towels
Why These Tools Matter
- Large skillet: Provides ample space for frying multiple pieces at once, ensuring even cooking.
- Shallow bowls: Facilitate easy breading of the chicken, reducing mess and speeding up the process.
- Tongs: Allow for safe handling of hot chicken during frying, preventing burns.
Ingredients for Easy Chicken Katsu
For the Chicken:
- 2 boneless, skinless chicken breasts (about 10 oz each)
- 2 cups panko breadcrumbs
- 1/2 cup all-purpose flour
- 3 large eggs
- 1 1/2 tsp kosher salt, divided
- 3 cups vegetable or canola oil (for frying)
For the Sauce:
- 1/2 cup ketchup
- 1/4 cup Worcestershire sauce
- 1 tbsp soy sauce
- 1 1/2 tsp granulated sugar
- 1 tsp apple cider vinegar
How to Make Easy Chicken Katsu Step-by-Step
Step 1: Prepare the Breading
Start by mixing 1/2 cup of panko breadcrumbs with 1/2 tsp of salt in a shallow bowl. In another bowl, beat the eggs until well combined. Place the flour on a plate for easy dredging.
Step 2: Slice the Chicken
Cut each chicken breast into thin, diagonal slices, aiming for about 1/3-inch thickness. This helps the chicken cook evenly and ensures a crispy texture.
Step 3: Bread the Chicken
Dredge each chicken slice in flour, shaking off any excess. Dip the floured chicken into the beaten eggs, then coat it with the seasoned panko breadcrumbs. Ensure each piece is fully covered for maximum crunch.
Step 4: Fry the Chicken
Heat the oil in a large skillet over medium heat until it reaches 350°F (175°C). Carefully fry the breaded chicken slices in batches, cooking for about 3-4 minutes per side. They should be golden brown and crispy. Once cooked, drain them on paper towels to remove excess oil.
Step 5: Make the Sauce
In a mixing bowl, whisk together the ketchup, Worcestershire sauce, soy sauce, granulated sugar, and apple cider vinegar. This sauce adds a perfect blend of flavors to the chicken.
Step 6: Serve
Arrange the crispy chicken on a plate and serve it with steamed rice. Drizzle the homemade sauce over the chicken for a delicious finish. Enjoy your Easy Chicken Katsu!
Preparation time: 20 minutes | Cooking time: 30 minutes | Total Time: 50 minutes
Nutritional Information (per serving, assuming 4 servings):
* Calories: 470
* Carbohydrates: 44g
* Protein: 27g
* Fat: 22g
* Sodium: 900mg
* Sugar: 8g
This Easy Chicken Katsu recipe promises a satisfying meal that will impress your family and friends alike.
How to Serve Easy Chicken Katsu
Easy Chicken Katsu is versatile and can be served in various delightful ways.
With Steamed Vegetables
Serve the chicken alongside a medley of steamed vegetables, such as broccoli and carrots, for a nutritious addition that complements the crispy texture.
On a Rice Bowl
Create a satisfying rice bowl by placing sliced Easy Chicken Katsu over a bed of fluffy rice, topped with pickled ginger and green onions for added flavor.
In a Sandwich
Transform your Chicken Katsu into a delicious sandwich by placing it in a soft bun with shredded cabbage and a drizzle of the sauce for a quick, handheld meal.
Pro Tips for the Best Easy Chicken Katsu
To elevate your Easy Chicken Katsu, consider these essential tips.
-
Use Fresh Panko Breadcrumbs: Fresh breadcrumbs provide a superior crunch compared to stale ones, enhancing the overall texture.
-
Maintain Oil Temperature: Ensure the oil remains at 350°F (175°C) while frying to achieve a uniformly golden and crispy coating.
-
Do Not Overcrowd the Pan: Fry the chicken in batches to avoid lowering the oil’s temperature, which can lead to soggy breading.
-
Let Chicken Rest After Frying: Allow the fried chicken to rest on paper towels for a few minutes to absorb excess oil and maintain crispness.
-
Experiment with Seasoning: Feel free to customize the panko breadcrumbs with spices or herbs, such as garlic or paprika, for added flavor.
Best Side Dishes and Pairings
Pairing sides with Easy Chicken Katsu enhances the meal experience. Here are some excellent options.
-
Steamed Rice
A classic choice, steamed rice perfectly absorbs the savory flavors of the sauce. -
Miso Soup
This traditional Japanese soup adds warmth and depth to your meal, balancing the richness of the chicken. -
Cabbage Salad
A light and crunchy cabbage salad with sesame dressing provides a refreshing contrast to the crispy chicken. -
Pickled Vegetables
Serve with pickled vegetables for a tangy bite that complements the savory elements of the dish. -
Green Tea
A soothing cup of green tea pairs well, enhancing the flavors while providing a light, refreshing drink option.
Common Mistakes to Avoid
- Using the Wrong Breadcrumbs: Ensure you use panko breadcrumbs for the best texture; regular breadcrumbs won’t yield the same crunch.
- Not Heating the Oil Properly: Oil that is too cold will make the chicken greasy. Use a thermometer to maintain the ideal frying temperature of 350°F (175°C).
- Overcrowding the Pan: Fry the chicken in batches to avoid lowering the oil temperature, which can lead to uneven cooking.
- Skipping the Drying Step: Patting the chicken dry before breading helps the coating stick better and results in a crispier finish.
Storage & Reheating Instructions
Refrigerator Storage
Store any leftover Easy Chicken Katsu in an airtight container in the refrigerator. It will remain fresh for up to 3 days.
Freezing Instructions
To freeze, place the cooked chicken katsu in a single layer on a baking sheet until solid, then transfer to airtight freezer bags. It can be stored for up to 3 months.
Reheating Tips
- Oven: Preheat the oven to 375°F (190°C). Place the chicken on a baking sheet and heat for about 10-15 minutes, or until heated through and crispy.
- Microwave: Place the chicken on a microwave-safe plate and cover with a damp paper towel. Heat in 30-second intervals until warmed, though this may soften the crust.
- Stovetop: Reheat in a skillet over medium heat for about 5-7 minutes, turning frequently to avoid burning and to keep the coating crispy.
Frequently Asked Questions
How do I make Easy Chicken Katsu gluten-free?
You can substitute all-purpose flour with a gluten-free flour blend and use gluten-free panko breadcrumbs to ensure the dish remains gluten-free.
Can I bake Easy Chicken Katsu instead of frying?
Yes, you can bake it. Preheat your oven to 400°F (200°C) and place the breaded chicken on a baking sheet. Spray lightly with cooking spray and bake for about 20-25 minutes or until golden brown.
What should I serve with Easy Chicken Katsu?
Traditional accompaniments include steamed rice and a simple salad. You can also serve it with pickled vegetables for added flavor.
Can I use chicken thighs for Easy Chicken Katsu?
Absolutely! Chicken thighs can be used for a juicier, more flavorful result. Just ensure they are boneless and skinless.
How do I keep the chicken crispy after frying?
To maintain crispiness, avoid stacking the fried chicken and allow it to drain on paper towels. Serve immediately or reheat in the oven.
Final Thoughts
This Easy Chicken Katsu is a delightful dish that offers a perfect balance of crispy texture and savory flavor. It’s a fantastic meal for any day of the week. We encourage you to try this recipe and share your thoughts in the comments below. Your feedback is invaluable!
Dinner
PrintEasy Chicken Katsu
This Easy Chicken Katsu recipe features tender chicken breasts coated in a crispy panko breadcrumb crust, served with a tangy homemade sauce. It’s a delightful dish that combines crunch and flavor, perfect for a satisfying meal.
- Prep Time: 20 minutes
- Cook Time: 30 minutes
- Total Time: 50 minutes
- Yield: 4 servings 1x
- Category: Desserts
- Method: No bake
- Cuisine: American
Ingredients
- 2 boneless, skinless chicken breasts (about 10 oz each)
- 2 cups panko breadcrumbs
- 1/2 cup all-purpose flour
- 3 large eggs
- 1 1/2 tsp kosher salt, divided
- 3 cups vegetable or canola oil (for frying)
- 1/2 cup ketchup
- 1/4 cup Worcestershire sauce
- 1 tbsp soy sauce
- 1 1/2 tsp granulated sugar
- 1 tsp apple cider vinegar
Instructions
- Mix 1/2 cup panko breadcrumbs with 1/2 tsp salt in a shallow bowl. In another shallow bowl, beat the eggs. Place flour on a plate.
- Cut each chicken breast into thin, diagonal slices about 1/3-inch thick.
- Dredge each chicken slice in flour, dip in beaten eggs, then coat with the seasoned panko breadcrumbs.
- Heat oil in a skillet to 350°F (175°C). Fry the breaded chicken slices in batches until golden brown, about 3-4 minutes per side. Drain on paper towels.
- In a bowl, whisk together ketchup, Worcestershire sauce, soy sauce, granulated sugar, and apple cider vinegar.
- Arrange the crispy chicken on a plate, serve with steamed rice, and drizzle with the homemade sauce.
Nutrition
- Calories: 470
- Sugar: 8g
- Sodium: 900mg
- Fat: 22g
- Saturated Fat: 3g
- Carbohydrates: 44g
- Fiber: 1g
- Protein: 27g
- Cholesterol: 210mg