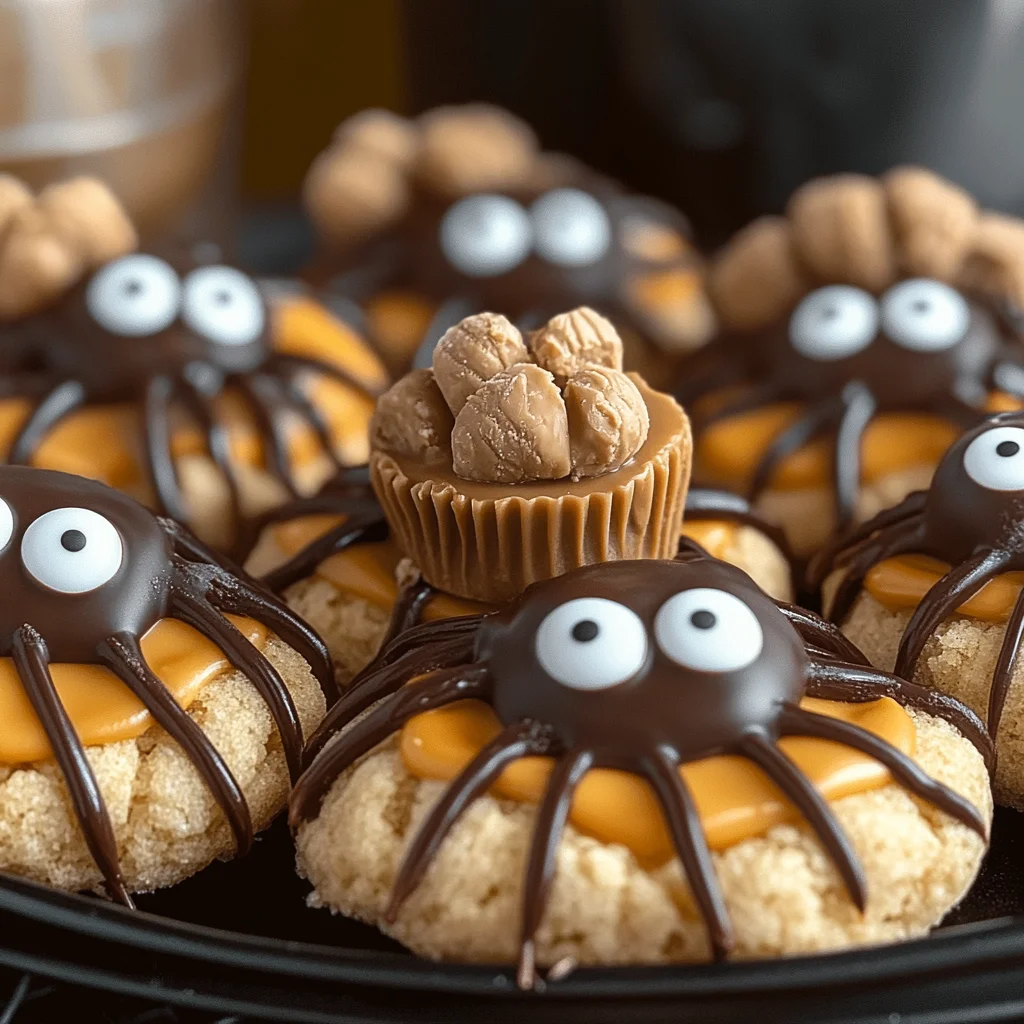
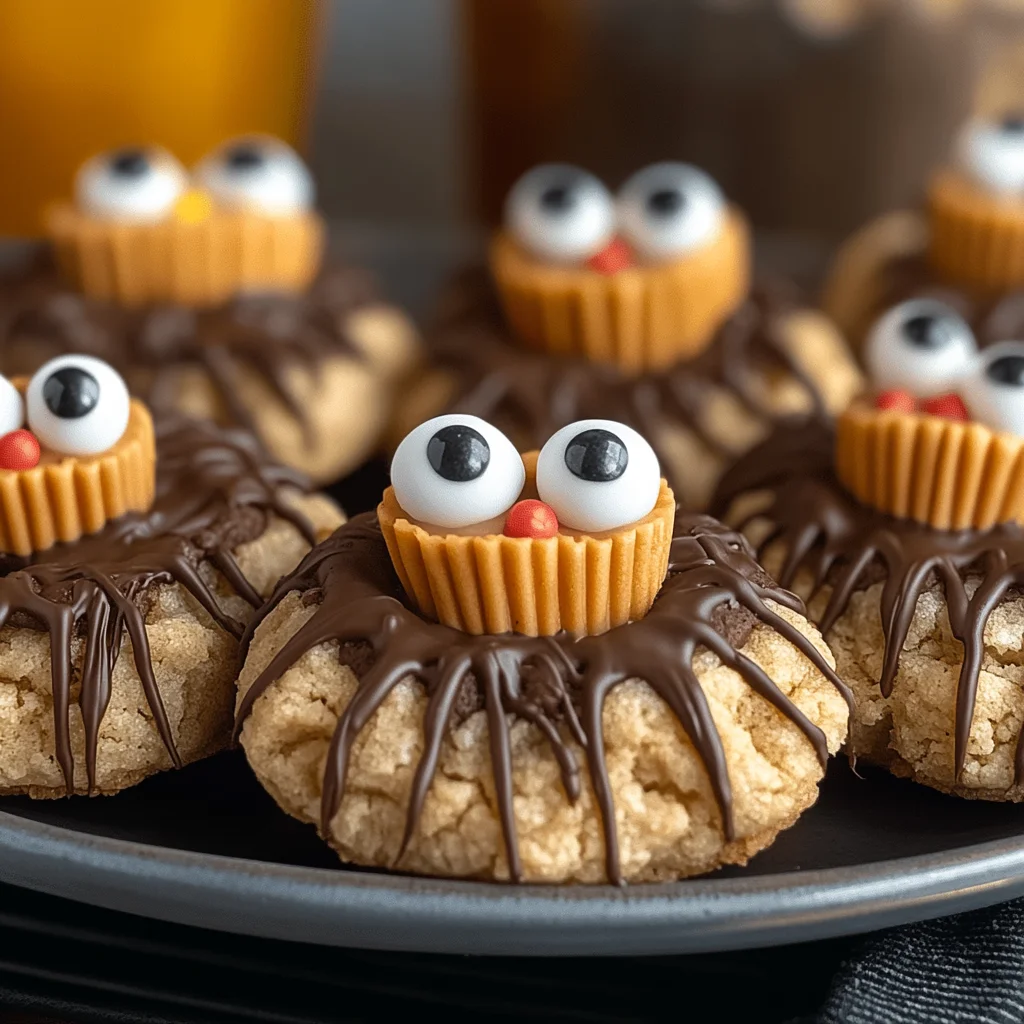
Soft and chewy Peanut Butter Spider Cookies are a delightful treat that adds a spooky touch to any Halloween celebration. These cookies are not only easy to make, but they also look fantastic with their chocolatey spider legs and candy eyes. Perfect for parties, family gatherings, or just a fun baking day, these cookies will be a hit with kids and adults alike. Get ready to impress your guests with this unique and tasty dessert!
Why You’ll Love This Recipe
- Easy to Make: With simple steps and common ingredients, these cookies are perfect for bakers of all skill levels.
- Fun Presentation: The spooky design makes them an exciting addition to Halloween festivities.
- Delicious Flavor: The combination of peanut butter, chocolate, and candy creates a sweet treat that’s hard to resist.
- Versatile: Great for parties, school events, or just as a fun family baking activity.
- Perfectly Chewy: The soft texture combined with the crunchy Reese’s makes every bite enjoyable.
Tools and Preparation
Before you get started on your Peanut Butter Spider Cookies, gather your tools to streamline the process. Having everything on hand will make your baking experience smoother.
Essential Tools and Equipment
- Electric mixer
- Mixing bowl
- Cookie scoop or tablespoon
- Silicone lined baking sheet
- Microwave-safe bowl
- Squeeze bottle or sandwich bag
Importance of Each Tool
- Electric mixer: Saves time and effort when mixing butter and sugars until fluffy.
- Silicone lined baking sheet: Prevents sticking and makes cleanup easy.
- Squeeze bottle: Helps create neat spider legs with melted chocolate on the cookies.
Ingredients
Soft and chewy peanut butter cookies topped with Reese’s, melted chocolate, and candy eyes, these peanut butter spider cookies are both easy and fun to make. The perfect Halloween dessert for your next party!
Ingredients:
– ½ cup (113g) unsalted butter (1 stick, room temperature)
– ½ cup (107g) brown sugar
– ⅓ cup (66g) granulated sugar
– ¾ cup (201g) creamy peanut butter (not natural)
– 1 large egg
– 1 tsp vanilla extract
– 1 ½ cups (180g) all purpose flour
– 1 tsp baking soda
– ½ tsp baking powder
– ½ tsp salt
– Granulated sugar (for rolling the cookies)
– Mini Reese’s Peanut Butter Cups
– ½ cup (85g) semi-sweet chocolate chips (for melting)
– Candy eye balls
How to Make Peanut Butter Spider Cookies
Step 1: Prepare the Reese’s Cups
Start by unwrapping about 24 mini Reese’s cups. Place them in a bowl and put them in the freezer. This helps them maintain their shape once added to the hot cookies. Preheat the oven to 350ºF.
Step 2: Mix the Wet Ingredients
In a mixing bowl, combine the butter, brown sugar, and granulated sugar. Beat with an electric mixer for about one minute until smooth and fluffy.
Step 3: Add Peanut Butter & Egg
Add in the creamy peanut butter, egg, and vanilla extract. Beat again for less than one minute until fully incorporated.
Step 4: Combine Dry Ingredients
Add in the all purpose flour, baking soda, baking powder, and salt. Mix on low speed or use a spatula just until combined. Be careful not to overmix.
Step 5: Shape the Cookies
Use a small cookie scoop or tablespoon to form tablespoon-sized balls from the dough. Roll each ball between your hands for uniformity, then roll in granulated sugar. Place the cookies about 2-3 inches apart on a silicone lined baking sheet.
Step 6: Bake & Add Reese’s Cups
Bake for 8–11 minutes or until the edges begin to crack and turn golden. Remove from oven and press a mini Reese’s cup into each cookie’s center. Allow cooling for about 15–20 minutes before transferring them to a cooling rack.
Step 7: Melt Chocolate
Place the chocolate chips in a microwave-safe bowl. Microwave at half power for three minutes, stirring after each minute until completely melted. Transfer melted chocolate into a squeeze bottle or sandwich bag with one corner cut off.
Step 8: Decorate
Draw four legs on each side of the cookies using melted chocolate. Use a bit of melted chocolate on the back of each candy eyeball to attach them to the Reese’s cup. Let it set before transferring cookies to a serving platter.
Enjoy your spooky yet delicious Peanut Butter Spider Cookies!
How to Serve Peanut Butter Spider Cookies
Peanut Butter Spider Cookies are not only delicious but also visually fun, making them a hit at any gathering. Here are some creative ways to serve these festive treats.
Halloween Party Platter
- Arrange the cookies on a decorative platter alongside spider-themed decorations for a spooky vibe.
- Pair with themed treats like gummy worms or chocolate-covered pretzels for an exciting dessert table.
Milk and Cookie Bar
- Set up a milk station with different types of milk (whole, almond, chocolate) for guests to enjoy with their cookies.
- Include fun straws and cups to enhance the experience.
Sweet Treat Bags
- Package individual cookies in clear bags tied with orange or black ribbons for party favors.
- Add a tag that says Happy Halloween! for a personal touch.
Ice Cream Sandwiches
- Sandwich a scoop of vanilla or chocolate ice cream between two Peanut Butter Spider Cookies.
- Serve immediately for a delightful and creamy dessert option.
Cookie Decorating Station
- Provide extra melted chocolate and candy eyes for guests to decorate their own cookies.
- This interactive activity is perfect for kids and adds to the fun of the event.
Dessert Buffet
- Include Peanut Butter Spider Cookies as part of a larger dessert buffet featuring various Halloween-themed sweets.
- Offer options like pumpkin pie, caramel apples, and ghost cupcakes to complement the cookies.
How to Perfect Peanut Butter Spider Cookies
These tips will help you achieve the best Peanut Butter Spider Cookies possible.
- Use Room Temperature Ingredients: Ensure your butter and egg are at room temperature for better mixing and texture.
- Don’t Overmix the Dough: Mix until just combined to keep your cookies soft and chewy.
- Chill Your Reese’s Cups: Freezing them helps maintain their shape when pressed into the warm cookies.
- Observe Baking Time: Keep an eye on your cookies; they should be slightly golden at the edges but still soft in the center when done.
- Let Them Cool Properly: Allowing cookies to cool on the baking sheet prevents them from sinking or losing shape when transferring.
- Experiment with Toppings: Try adding different candies or nuts for variety beyond just Reese’s cups.
Best Side Dishes for Peanut Butter Spider Cookies
Pairing side dishes with Peanut Butter Spider Cookies can elevate your dessert experience. Here are some great options:
- Pumpkin Spice Latte: The warm spices complement the peanut butter flavor perfectly, making it an ideal pairing.
- Hot Chocolate Bar: Offer various toppings like marshmallows, whipped cream, and chocolate shavings for a cozy drink that enhances cookie enjoyment.
- Caramel Apple Slices: These sweet treats provide a refreshing balance against the richness of peanut butter cookies.
- Cheese Board: A selection of cheeses can offer a savory contrast to the sweet flavors of your cookies; include crackers and fruits as well.
- Fruit Salad: A mix of seasonal fruits adds freshness and lightness alongside your rich peanut butter treats.
- Popcorn Mix: Create a spooky popcorn mix with candy corn, nuts, and pretzels for a crunchy snack that pairs well with soft cookies.
Common Mistakes to Avoid
Making Peanut Butter Spider Cookies can be a delightful experience, but some common mistakes can ruin the fun. Here are key errors to watch out for:
- Skipping the Freezing Step: Not freezing the Reese’s cups before baking may cause them to melt too much. Always freeze them to keep their shape intact.
- Overmixing the Dough: Overmixing can lead to tough cookies. Mix just until the ingredients are combined for soft and chewy results.
- Not Measuring Flour Properly: Using too much flour can make your cookies dry. Use the spoon and level method for accurate measurement.
- Ignoring Baking Time: Baking cookies for too long can make them hard. Watch for the edges turning golden and remove them promptly.
- Moving Cookies Too Soon: Transferring warm cookies can lead to melting decorations. Allow them to cool for at least 15-20 minutes before moving.
Storage & Reheating Instructions
Refrigerator Storage
- Store peanut butter spider cookies in an airtight container.
- They will stay fresh for up to 1 week in the refrigerator.
Freezing Peanut Butter Spider Cookies
- To freeze, layer cookies with parchment paper in an airtight container.
- These cookies can be frozen for up to 3 months.
Reheating Peanut Butter Spider Cookies
- Oven: Preheat to 350°F and warm cookies for about 5 minutes until soft.
- Microwave: Heat on medium power for 10-15 seconds for a quick warm-up.
- Stovetop: Place cookies in a skillet over low heat, covering with a lid until warmed through.
Frequently Asked Questions
Here are some frequently asked questions about making peanut butter spider cookies:
How do I make Peanut Butter Spider Cookies gluten-free?
You can substitute all-purpose flour with a gluten-free blend in equal amounts. Ensure all other ingredients are gluten-free as well.
Can I use natural peanut butter in this recipe?
While you can use natural peanut butter, it may alter the texture of your cookies. Creamy peanut butter provides better results.
What if I don’t have candy eyeballs?
You can use chocolate chips or small pieces of fruit as substitutes for candy eyes on your spider cookies.
How long do Peanut Butter Spider Cookies last?
These cookies will last about a week in an airtight container at room temperature or up to three months if frozen properly.
Can I customize the toppings on my Peanut Butter Spider Cookies?
Absolutely! You can try different candies or sprinkles to create your own unique version of these fun Halloween treats.
Final Thoughts
Peanut Butter Spider Cookies are not only fun to make but also perfect for any Halloween gathering. Their soft and chewy texture combined with creative toppings makes them irresistible. Feel free to customize with different candies or even add nuts for extra crunch. Give these spooky delights a try – they’re sure to be a hit!
Peanut Butter Spider Cookies
- Prep Time: 20 minutes
- Cook Time: 10 minutes
- Total Time: 30 minutes
- Yield: Approximately 24 cookies 1x
- Category: Dessert
- Method: Baking
- Cuisine: American
Description
Delight your family and friends this Halloween with these soft and chewy Peanut Butter Spider Cookies. These spooky treats are not only easy to make but also visually striking with their chocolatey spider legs and candy eyes. Perfect for parties or a fun baking day, they bring a festive touch that will impress both kids and adults alike. The combination of creamy peanut butter, melty chocolate, and sweet candy creates an irresistible dessert that everyone can enjoy. Get ready to create some memorable moments in the kitchen with this fun recipe!
Ingredients
- ½ cup unsalted butter (room temperature)
- ½ cup brown sugar
- ⅓ cup granulated sugar
- ¾ cup creamy peanut butter
- 1 large egg
- 1 tsp vanilla extract
- 1 ½ cups all-purpose flour
- 1 tsp baking soda
- ½ tsp baking powder
- ½ tsp salt
- Mini Reese’s Peanut Butter Cups
- ½ cup semi-sweet chocolate chips (for melting)
- Candy eyeballs
Instructions
- Preheat the oven to 350°F. Unwrap and freeze mini Reese's cups for about 30 minutes.
- In a mixing bowl, beat together the butter, brown sugar, and granulated sugar until fluffy.
- Add peanut butter, egg, and vanilla; mix until smooth.
- Gradually add flour, baking soda, baking powder, and salt; mix until just combined.
- Shape tablespoon-sized balls of dough, roll in sugar, and place on a silicone-lined baking sheet.
- Bake for 8–11 minutes or until edges are golden. Press a frozen Reese’s cup into each cookie immediately after baking.
- Melt chocolate chips in a microwave-safe bowl at half power until smooth; use a squeeze bottle to pipe spider legs on cookies and attach candy eyeballs with melted chocolate.
Nutrition
- Serving Size: 1 cookie (32g)
- Calories: 140
- Sugar: 10g
- Sodium: 90mg
- Fat: 7g
- Saturated Fat: 3g
- Unsaturated Fat: 4g
- Trans Fat: 0g
- Carbohydrates: 17g
- Fiber: 1g
- Protein: 3g
- Cholesterol: 15mg
Keywords: Use room temperature ingredients for better mixing. Don’t overmix the dough to ensure soft cookies. Experiment with different candies for toppings.