Author: munch twist

  • Refreshing Key Lime Cheesecake Parfaits Recipe

    Refreshing Key Lime Cheesecake Parfaits Recipe

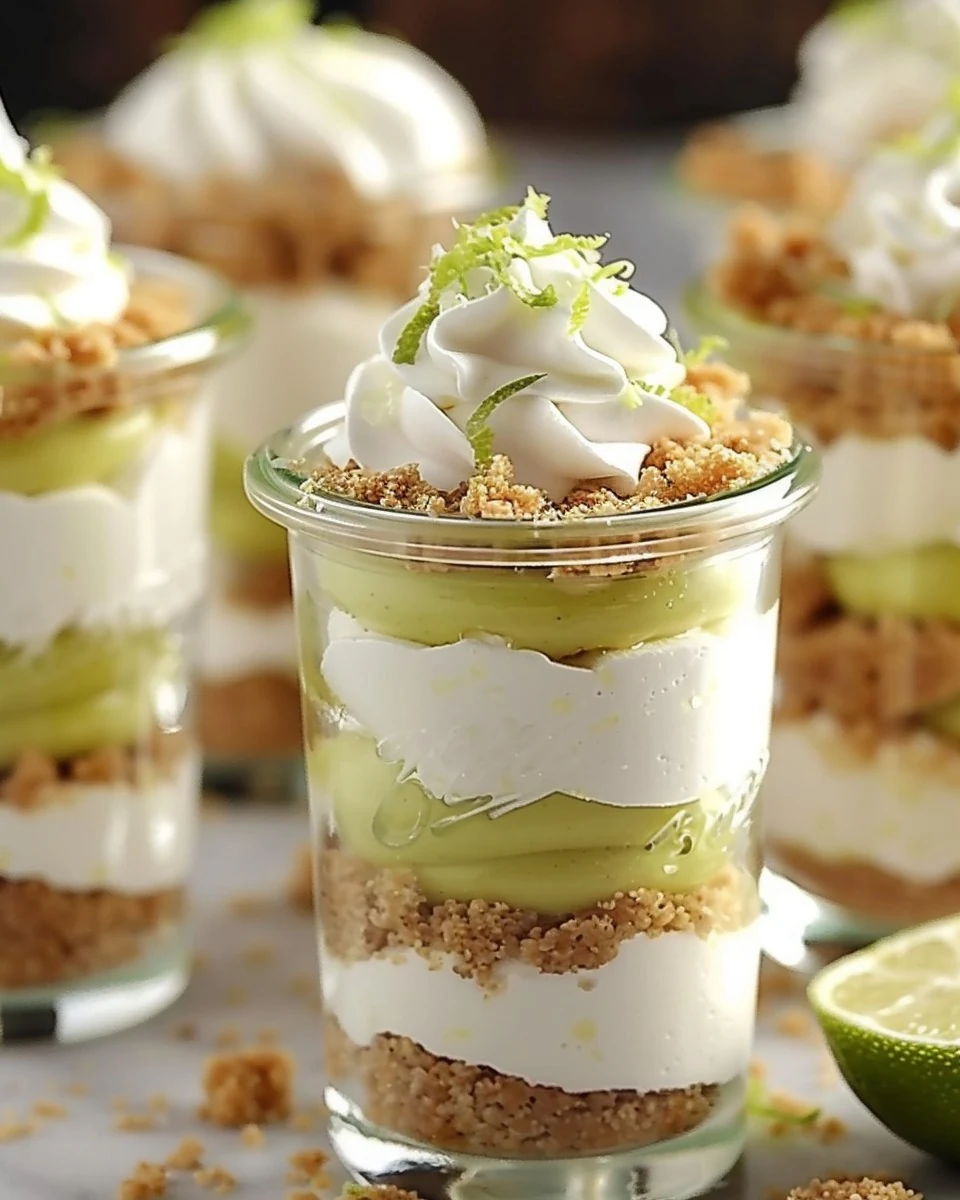
    Key Lime Cheesecake Parfaits are a delightful combination of tartness and creaminess that will tantalize your taste buds. These individual desserts are perfect for any occasion, offering a refreshing twist on traditional cheesecake. With their vibrant lime flavor and layered presentation, they are as visually appealing as they are delicious.

    Why You’ll Love This Recipe

    • Refreshing Flavor: The zesty key lime juice offers a bright and tangy flavor that balances the richness of the cheesecake.
    • Individual Servings: These parfaits are served in jars, making them perfect for parties or a special treat at home.
    • No-Bake Delight: With no baking required, you can enjoy these desserts without turning on the oven.
    • Customizable Layers: Feel free to adjust the layers to your liking, adding more crust or whipped cream as desired.
    • Make Ahead Option: Prepare these parfaits in advance and chill them for a stress-free dessert option.

    Tools and Equipment

    Having the right tools will make your preparation efficient and enjoyable.

    Essential Tools

    • Mixing bowl
    • Handheld electric mixer
    • Piping bag
    • 8-ounce canning jars
    • Measuring cups and spoons
    • Rubber spatula

    Why These Tools Matter

    • Handheld Electric Mixer: Ensures a smooth and creamy cheesecake filling without lumps.
    • Piping Bag: Allows for precise layering of the cheesecake filling, making the parfaits look professionally made.
    • Canning Jars: Provide an attractive presentation while keeping the parfaits fresh and easy to store.

    Ingredients for Key Lime Cheesecake Parfaits

    For the Crust

    • 1 tablespoon lime zest
    • 1 2/3 cups finely crushed Graham cracker crumbs (about 14 whole sheets)
    • 8 tablespoons unsalted butter, melted

    For the Cheesecake Filling

    • 16 ounces cream cheese, softened
    • 3 tablespoons powdered sugar
    • 1/4 cup granulated sugar
    • 1 cup sweetened condensed milk
    • 1/3 cup key lime juice

    For Garnish

    • Whipped cream, for topping

    How to Make Key Lime Cheesecake Parfaits Step-by-Step

    Step 1: Prepare the Crust

    In a bowl, mix the finely crushed Graham cracker crumbs with the melted butter until well combined. Set this mixture aside for layering later.

    Step 2: Make the Cheesecake Filling

    In a large mixing bowl, use a handheld electric mixer to beat the softened cream cheese and powdered sugar together until smooth and creamy. Gradually add the sweetened condensed milk, key lime juice, granulated sugar, and lime zest, mixing until everything is well blended and creamy.

    Step 3: Chill the Filling (Optional)

    For easier piping, place the cheesecake filling in the fridge for about 1-2 hours. This step helps the filling firm up, making the layering process simpler.

    Step 4: Layer the Parfaits

    Transfer the cheesecake mixture to a piping bag. In 8-ounce canning jars, layer the Graham cracker mixture and the cheesecake filling. Start with a layer of the Graham cracker crumbs, followed by the cheesecake mousse, and repeat until the jars are filled, finishing with the cheesecake layer.

    Step 5: Set the Parfaits

    Secure the jars with lids and refrigerate for about 3 hours. This allows the parfaits to set completely, enhancing the flavors and textures.

    Step 6: Garnish and Serve

    When ready to serve, remove the lids and pipe a dollop of whipped cream on top of each parfait. Garnish with additional lime zest for a burst of color and flavor. Enjoy your deliciously tart and creamy Key Lime Cheesecake Parfaits!

    Nutritional Information (Approximate per serving)

    • Calories: 420 kcal
    • Carbohydrates: 34g
    • Protein: 6g
    • Fats: 30g
    • Fiber: 1g
    • Sodium: 220mg

    How to Serve Key Lime Cheesecake Parfaits

    Key Lime Cheesecake Parfaits are versatile and can be served in various creative ways.

    Individual Jars

    Serving the parfaits in individual jars not only makes for an elegant presentation but also allows guests to enjoy their own personal portion. This is perfect for parties or gatherings where a self-serve option is desired.

    Layered Dessert Table

    Create a dessert table featuring an array of parfaits with different flavors. Alongside the Key Lime Cheesecake Parfaits, include other fruit-flavored or chocolate parfaits to cater to diverse tastes, making it a delightful centerpiece for any occasion.

    Picnic Treats

    Pack these parfaits in portable containers for a picnic. Their layered texture and refreshing flavor make them an ideal dessert to enjoy outdoors, bringing a taste of summer to any outing.

    Pro Tips for the Best Key Lime Cheesecake Parfaits

    To ensure your Key Lime Cheesecake Parfaits turn out perfectly, keep these expert tips in mind.

    • Use Fresh Ingredients: Opt for fresh key lime juice instead of bottled for a more vibrant flavor. Fresh ingredients enhance the overall taste of the dessert.
    • Chill the Cheesecake Mixture: Allow the filling to chill for 1-2 hours in the refrigerator before layering. This will help it firm up and make piping easier.
    • Adjust Sweetness to Taste: Feel free to modify the amount of powdered sugar and granulated sugar based on your sweetness preference. Taste the mixture before layering to ensure it meets your liking.
    • Keep Crust Crunchy: To maintain the crunchiness of the Graham cracker crust, avoid assembling the parfaits too far in advance. Layer just before serving or keep the crust separate until ready to enjoy.
    • Experiment with Flavors: While key lime is classic, try adding a layer of fruit puree or switching up the citrus for a unique twist. Consider using lemon or orange zest for a refreshing variation.

    Best Side Dishes and Pairings

    Pairing your Key Lime Cheesecake Parfaits with complementary dishes can elevate the dining experience.

    1. Fresh Fruit Salad: A light and refreshing fruit salad with seasonal fruits balances the richness of the cheesecake, enhancing the overall meal.
    2. Coconut Macaroons: The chewy texture and tropical flavor of coconut macaroons complement the tartness of the parfaits, making for a delightful combination.
    3. Iced Tea: A chilled glass of unsweetened iced tea provides a refreshing beverage option that contrasts the sweetness of the dessert without overpowering it.
    4. Lemon Sorbet: The citrusy flavor of lemon sorbet offers a palate cleanser that pairs beautifully with the creamy parfaits, making it a refreshing accompaniment.
    5. Minted Water: Infusing water with fresh mint and lime provides a refreshing drink that echoes the flavors of the parfaits, enhancing the dining experience.

    Common Mistakes to Avoid

    • Using Fresh Limes Instead of Key Limes: Fresh limes can alter the flavor profile; opt for key limes for authenticity.
    • Overmixing the Filling: Be careful not to overbeat the cheesecake mixture, as this can introduce too much air and affect the texture.
    • Skipping the Refrigeration Step: Allowing the parfaits to set in the fridge is essential for the best texture and flavor.
    • Neglecting to Measure Ingredients Accurately: Precision is key in baking; ensure you measure ingredients correctly for optimal results.

    Storage & Reheating Instructions

    Refrigerator Storage

    Store any leftovers in airtight containers in the refrigerator. They will stay fresh for up to 3 days.

    Freezing Instructions

    For longer storage, you can freeze the parfaits. Make sure they are in airtight containers or freezer-safe jars. Thaw in the refrigerator overnight before serving.

    Reheating Tips

    • Oven: Preheat to 350°F (175°C), cover the parfaits with foil, and warm for about 10 minutes.
    • Microwave: Heat in short bursts of 15-20 seconds until just warmed. Be cautious not to overheat.
    • Stovetop: Place the parfaits in a heat-safe dish, cover, and warm on low heat for a few minutes.

    Frequently Asked Questions

    How can I make Key Lime Cheesecake Parfaits gluten-free?

    You can substitute the Graham cracker crumbs with gluten-free alternatives like crushed gluten-free cookies or gluten-free graham crackers.

    Can I use regular cream cheese instead of low-fat?

    Yes, regular cream cheese can be used, but low-fat options will result in a lighter texture.

    How long do Key Lime Cheesecake Parfaits need to chill?

    They should chill for at least 3 hours to set properly, but overnight is even better for flavor development.

    Can I add toppings to my Key Lime Cheesecake Parfaits?

    Absolutely! Fresh fruit, additional lime zest, or a sprinkle of crushed nuts make great toppings.

    Final Thoughts

    Key Lime Cheesecake Parfaits are a delightful combination of tart and creamy flavors, perfect for any occasion. We encourage you to try this recipe and share your thoughts in the comments below. Your feedback helps us create more delicious recipes.


    Desserts

    Key Lime Cheesecake Parfaits


    5.0 from 24 reviews

    These Key Lime Cheesecake Parfaits are a delightful combination of creamy cheesecake filling and a crunchy Graham cracker crust, layered beautifully in jars. Perfect for a refreshing dessert, they offer a tangy lime flavor that balances the sweetness of the cream cheese and condensed milk. Easy to prepare and ideal for gatherings, these parfaits are sure to impress your guests.
    Author: Munch Twist
    Prep Time: 30 mins
    Cook Time: 0 mins
    Total Time: 3 hours 30 mins
    Yield: 4 servings
    Category: Desserts
    Method: No bake
    Cuisine: American

    Key Lime Cheesecake Parfaits

    SCALE:
    1x
    2x
    3x
    Cook Mode: Prevent your screen from going dark

    Ingredients

    • 1 tablespoon lime zest
    • 16 ounces cream cheese, softened
    • 1 2/3 cups finely crushed Graham cracker crumbs
    • 3 tablespoons powdered sugar
    • 1/3 cup key lime juice
    • 8 tablespoons unsalted butter, melted
    • 1/4 cup granulated sugar
    • 1 cup sweetened condensed milk
    • Whipped cream, for topping

    Instructions

    1. In a bowl, mix the finely crushed Graham cracker crumbs with the melted butter until well combined. Set aside.
    2. In a large mixing bowl, use a handheld electric mixer to beat the softened cream cheese and powdered sugar together until smooth and creamy. Gradually beat in the sweetened condensed milk, key lime juice, granulated sugar, and lime zest until the mixture is well blended and creamy.
    3. For easier piping, place the cheesecake filling in the fridge for about 1-2 hours to firm up.
    4. Transfer the cheesecake mixture to a piping bag. In 8-ounce canning jars, layer the Graham cracker mixture and the cheesecake filling, starting with the Graham cracker crumbs and finishing with the cheesecake mousse.
    5. Secure the jars with lids and refrigerate for about 3 hours to allow the parfaits to set completely.
    6. When ready to serve, remove the lids and pipe a dollop of whipped cream on top. Garnish with additional lime zest.
    Nutrition Facts

    Serving Size: 1 serving
    Calories: 420 kcal
    Sugar: 24g
    Sodium: 220mg
    Fat: 30g
    Saturated Fat: 18g
    Carbohydrates: 34g
    Fiber: 1g
    Protein: 6g
    Cholesterol: 90mg

  • Irresistible Cream Cheese and Bacon Stuffed Doritos Chicken

    Irresistible Cream Cheese and Bacon Stuffed Doritos Chicken

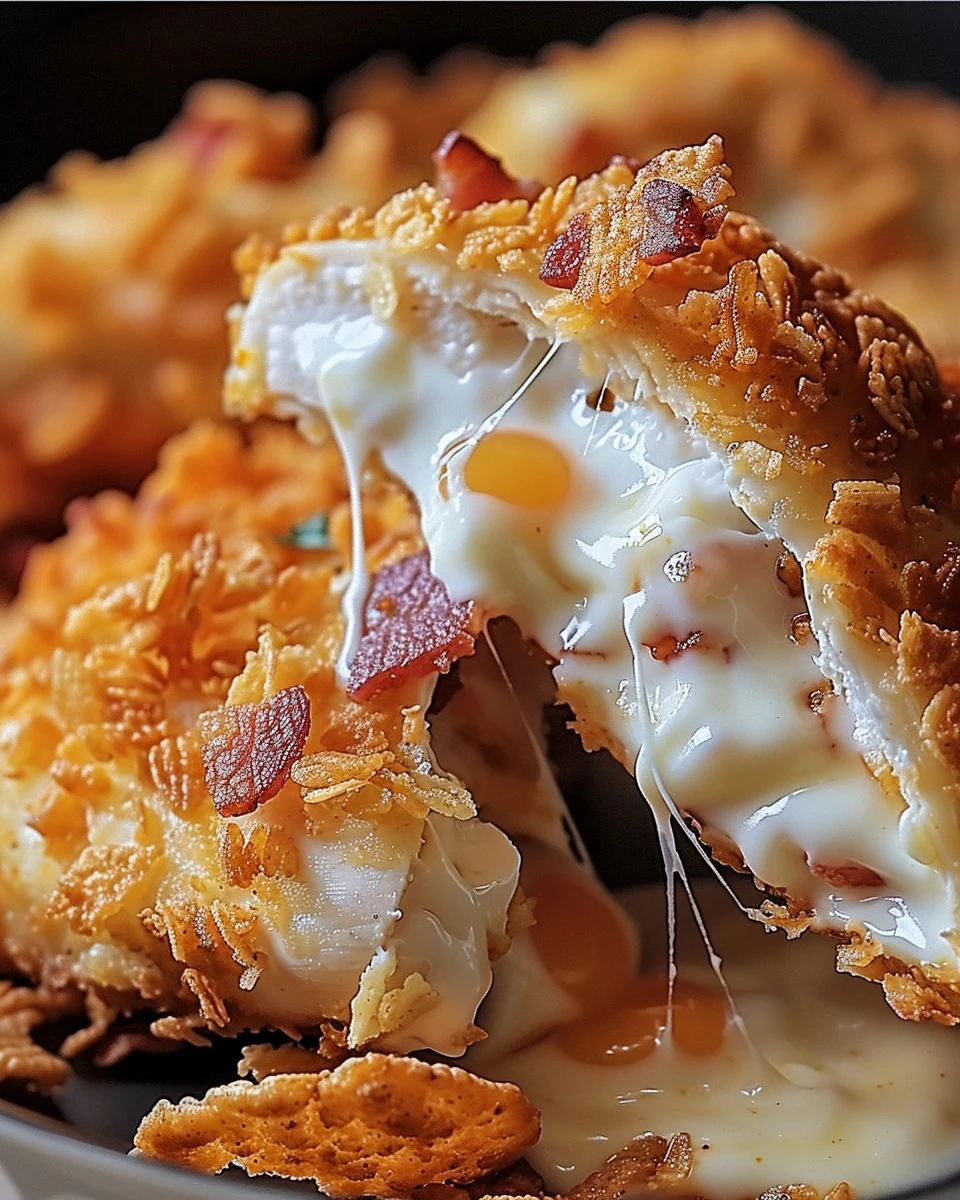
    Cream Cheese and Bacon Stuffed Doritos Chicken is a delightful dish that combines creamy, cheesy goodness with a satisfying crunch. This recipe delivers a flavor explosion that will impress family and friends alike. Perfect for dinner or a special occasion, this dish is sure to become a favorite.

    Why You’ll Love This Recipe

    • Flavorful Combination: The blend of cream cheese, bacon, and cheese creates a rich and savory filling.
    • Crunchy Texture: The Doritos coating adds an irresistible crunch that contrasts beautifully with the tender chicken.
    • Easy to Prepare: With straightforward steps, this dish is perfect for both novice and experienced cooks.
    • Versatile Serving Options: Great as a main dish or served alongside your favorite sides for a complete meal.
    • Crowd-Pleaser: Ideal for gatherings, this recipe is sure to impress your guests and satisfy their cravings.

    Tools and Equipment

    To successfully prepare Cream Cheese and Bacon Stuffed Doritos Chicken, you’ll need a few essential tools.

    Essential Tools

    • Sharp knife
    • Medium mixing bowl
    • Baking sheet
    • Parchment paper or cooking spray
    • Three shallow dishes for coating
    • Measuring cups and spoons

    Why These Tools Matter

    • A sharp knife ensures clean cuts when preparing the chicken, making it easier to create pockets for stuffing.
    • Mixing bowls are vital for combining the filling ingredients thoroughly, ensuring every bite is packed with flavor.
    • Shallow dishes for coating make the breading process simple and allow for even coverage on the chicken.

    Ingredients for Cream Cheese and Bacon Stuffed Doritos Chicken

    Filling Ingredients

    • 8 oz cream cheese, softened
    • 1 cup shredded cheddar cheese
    • 6 slices bacon, cooked and crumbled
    • 1 teaspoon garlic powder
    • 1 teaspoon onion powder
    • Salt and black pepper to taste

    Chicken Ingredients

    • 4 boneless, skinless chicken breasts

    Coating Ingredients

    • 1/2 cup all-purpose flour
    • 2 large eggs, beaten
    • 2 cups crushed Doritos (any flavor)

    Garnish

    • Fresh parsley, chopped (optional, for garnish)

    How to Make Cream Cheese and Bacon Stuffed Doritos Chicken Step-by-Step

    Step 1: Preheat the Oven

    Preheat your oven to 375°F (190°C). Prepare a baking sheet by lining it with parchment paper or lightly greasing it.

    Step 2: Prepare the Chicken

    Using a sharp knife, carefully cut a pocket into each chicken breast. Be cautious not to cut all the way through, as you want to keep the filling contained.

    Step 3: Make the Filling

    In a medium mixing bowl, combine the softened cream cheese, shredded cheddar cheese, crumbled bacon, garlic powder, onion powder, salt, and black pepper. Mix until well combined.

    Step 4: Stuff the Chicken

    Spoon the cream cheese mixture into each chicken breast pocket. Ensure the filling is well packed and press the edges of the chicken to seal it.

    Step 5: Coat the Chicken

    Set up three shallow dishes. Place flour in one, beaten eggs in another, and crushed Doritos in the third. Dredge each stuffed chicken breast in the flour, shaking off the excess. Dip it into the beaten eggs, then press it firmly into the crushed Doritos for full coverage.

    Step 6: Bake

    Arrange the coated chicken breasts on the prepared baking sheet. Bake in the preheated oven for 25-30 minutes until the chicken is cooked through and the coating is crispy and golden brown.

    Step 7: Serve

    If desired, garnish with fresh parsley before serving. Enjoy this creamy, cheesy, and crunchy delight with your favorite side dishes.

    This Cream Cheese and Bacon Stuffed Doritos Chicken will surely become a staple in your home cooking repertoire.

    How to Serve Cream Cheese and Bacon Stuffed Doritos Chicken

    This dish can be enjoyed in various ways to enhance your dining experience.

    With a Fresh Salad

    Serve the chicken alongside a crisp garden salad. The freshness of the greens balances the richness of the stuffed chicken.

    On a Bed of Rice

    Place the chicken on a bed of fluffy rice, such as cilantro lime rice. This adds a delightful texture and complements the flavors beautifully.

    As a Sandwich

    Transform the stuffed chicken into a hearty sandwich. Use a toasted bun, add lettuce and tomato, and drizzle with ranch dressing for a satisfying meal.

    Pro Tips for the Best Cream Cheese and Bacon Stuffed Doritos Chicken

    Maximize the flavor and texture of your dish with these helpful tips.

    • Use Room Temperature Ingredients: Allow the cream cheese to soften at room temperature for easier mixing and a smoother filling.
    • Choose Quality Bacon: Opt for thick-cut bacon for a heartier crunch and richer flavor in the stuffing.
    • Don’t Overstuff the Chicken: Be cautious not to overfill the chicken breasts, as this can lead to spillage during baking.
    • Experiment with Dorito Flavors: Try using different flavors of Doritos, such as Cool Ranch or Spicy Nacho, to add unique twists to the dish.
    • Let the Chicken Rest: Allow the stuffed chicken to rest for a few minutes after baking. This helps the juices redistribute for a moister bite.

    Best Side Dishes and Pairings

    Complement your Cream Cheese and Bacon Stuffed Doritos Chicken with these delightful options.

    1. Garlic Mashed Potatoes: Creamy mashed potatoes provide a comforting side that pairs well with the crunchy chicken.
    2. Steamed Broccoli: The slight bitterness of broccoli contrasts nicely with the richness of the stuffed chicken, adding a healthy touch.
    3. Coleslaw: A tangy coleslaw adds a refreshing crunch that balances the savory flavors of the chicken.
    4. Corn on the Cob: Sweet corn enhances the overall meal experience with its natural sweetness and vibrant color.
    5. Iced Tea: A chilled glass of iced tea provides a refreshing beverage option that complements the meal without overpowering it.

    Common Mistakes to Avoid

    • Not Sealing the Chicken Properly: Ensure the chicken pocket is tightly sealed to prevent the filling from leaking during cooking.
    • Using Cold Cream Cheese: Make sure the cream cheese is softened to blend easily with other ingredients for a smooth filling.
    • Skipping the Coating: Don’t skip the Doritos coating, as it adds essential crunch and flavor to the dish.
    • Overcrowding the Baking Sheet: Give each chicken breast enough space on the baking sheet to ensure even cooking and crispiness.

    Storage & Reheating Instructions

    Refrigerator Storage

    Store leftover Cream Cheese and Bacon Stuffed Doritos Chicken in airtight containers. It will stay fresh for up to 3 days in the refrigerator.

    Freezing Instructions

    To freeze, wrap each stuffed chicken breast tightly in plastic wrap, then place them in a freezer-safe bag. They can be frozen for up to 3 months. When ready to use, thaw in the refrigerator overnight before reheating.

    Reheating Tips

    • Oven: Preheat the oven to 350°F (175°C) and bake the chicken for about 15-20 minutes until heated through.
    • Microwave: Place the chicken on a microwave-safe plate and heat in 30-second intervals until warmed, but be cautious as it may become soggy.
    • Stovetop: Heat in a skillet over medium heat, turning occasionally, until warmed through.

    Frequently Asked Questions

    Can I use different types of cheese in the Cream Cheese and Bacon Stuffed Doritos Chicken?

    You can certainly experiment with different cheeses. Monterey Jack, pepper jack, or even mozzarella would work well alongside or instead of cheddar.

    How can I make the Cream Cheese and Bacon Stuffed Doritos Chicken healthier?

    To lighten the dish, consider using lower-fat cream cheese and turkey bacon. You can also bake the chicken without the Doritos coating for a lighter version.

    What should I serve with Cream Cheese and Bacon Stuffed Doritos Chicken?

    This dish pairs well with a fresh salad, roasted vegetables, or a side of rice to complement the flavors.

    Can I prepare the Cream Cheese and Bacon Stuffed Doritos Chicken ahead of time?

    Yes, you can prepare the chicken breasts and stuff them the day before. Store them in the refrigerator and bake when ready to serve.

    Is this recipe suitable for meal prep?

    Absolutely! Cream Cheese and Bacon Stuffed Doritos Chicken makes for a delicious meal prep option. Just store in individual containers for quick lunches or dinners.

    Final Thoughts

    Cream Cheese and Bacon Stuffed Doritos Chicken is a delightful dish that combines creamy, cheesy goodness with a satisfying crunch. It’s perfect for family dinners or meal prep. Give this recipe a try and let us know how it turns out in the comments!


    Dinner

    Cream Cheese and Bacon Stuffed Doritos Chicken


    5.0 from 24 reviews

    This Cream Cheese and Bacon Stuffed Doritos Chicken is a delightful dish that combines tender chicken breasts with a rich and creamy filling of cream cheese, cheddar cheese, and crumbled bacon. The chicken is then coated in crushed Doritos for a crunchy texture, making it a perfect comfort food that is both savory and satisfying.

    Author: Munch Twist
    Prep Time: 15 mins
    Cook Time: 30 mins
    Total Time: 45 mins
    Yield: 4 servings
    Category: Lunch
    Method: No bake
    Cuisine: American

    Cream Cheese and Bacon Stuffed Doritos Chicken

    SCALE:
    1x
    2x
    3x
    Cook Mode: Prevent your screen from going dark

    Ingredients

    • 1 cup shredded cheddar cheese
    • 4 boneless, skinless chicken breasts
    • 2 large eggs, beaten
    • 6 slices bacon, cooked and crumbled
    • 2 cups crushed Doritos (any flavor)
    • 1 teaspoon onion powder
    • 1/2 cup all-purpose flour
    • 8 oz cream cheese, softened
    • Salt and black pepper to taste
    • 1 teaspoon garlic powder
    • Fresh parsley, chopped (optional, for garnish)

    Instructions

    1. Preheat your oven to 375°F (190°C). Line a baking sheet with parchment paper or lightly grease it.
    2. Carefully cut a pocket into each chicken breast using a sharp knife, being cautious not to cut all the way through.
    3. In a medium bowl, mix the softened cream cheese, shredded cheddar cheese, crumbled bacon, garlic powder, onion powder, salt, and black pepper until well combined.
    4. Spoon the cream cheese mixture into each chicken breast pocket. Press the edges of the chicken to seal the filling inside.
    5. Prepare three shallow dishes: place flour in one, beaten eggs in another, and crushed Doritos in the third. Dredge each stuffed chicken breast in the flour, shaking off any excess. Dip into the beaten eggs, and then press into the crushed Doritos, ensuring the chicken is well coated.
    6. Place the coated chicken breasts on the prepared baking sheet. Bake in the preheated oven for 25-30 minutes, or until the chicken is cooked through and the coating is crispy and golden brown.
    7. Garnish with fresh parsley if desired. Serve immediately and enjoy the creamy, cheesy, and crunchy delight!

    Nutrition Facts

    Serving Size: 1 serving
    Calories: 600 kcal
    Sugar: 2g
    Sodium: 800mg
    Fat: 38g
    Saturated Fat: 18g
    Carbohydrates: 25g
    Fiber: 2g
    Protein: 40g
    Cholesterol: 150mg